Many users have complained about Windows 10 freezing frequently. Are you facing this issue as well? If so, this post is just for you.
Today, we’ll be discussing seven ways to fix up the Windows 10 Freezing issue. So, let’s get started
Solution 1 – Update your device drivers
Did you know that outdated device drivers can cause all sorts of issues, including the Windows 10 freezing problem? Therefore, before you try anything else, update your device drivers.
You can update your drivers manually or automatically, but we recommend you take the latter route as it is easier and simpler. You don’t need to be proficient in Windows to update your drivers automatically. Instead, all you need is a reliable driver update tool.
Updating Drivers Automatically
Automatic driver update tools offer many benefits, the most important ones being:
- You can update device drivers automatically
- The software scans and updates all outdated or missing drivers at one go
- The tool picks the right drivers for your device and operating system, so you won’t have to worry about installing an incorrect driver by mistake
- Automatic driver updates are 100% safe
Driver Updater is one of the best driver update tools out there. Outbyte Driver Updater will give you access to a database of over 1 million drivers. It will regularly scan your PC, suggesting new driver versions to install. Driver Updater contains drivers for a variety of Windows devices. With just one click, you can update drivers in your system.
Step 1
Click here to Install and launch the app
Step 2
Scan all devices
Step 3
Install or update drivers automatically
Solution 2 – Remove your computer’s temp files
When was the last time you cleared your computer’s temp files? If it has been a while, it’s possible the temp files might be occupying a lot of space and slowing down the system in return.
Here are the steps you need to follow to remove the temp files.
- Press Window Key and R Key on your keyboard simultaneously
- In the run dialog box, type temp and press the Enter key
- In the Temp folder, select all the files and remove them
- Now check if the issue is solved
If the problem persists, try the next solution.
Solution 3 – Adjust virtual memory
Virtual memory is nothing more than an extension of the physical memory of your computer. When the physical memory is in short supply, Windows transfers pages of data from RAM to disk storage. In other words, when RAM is running low, the hard disk is used to provide an extension to it.
Here’s how you can adjust the virtual memory.
- Press the Windows key and Pause/Break key simultaneously. Then click Advanced System Settings in the left window
- In the System Properties dialog box, click the Advanced tab. Next, click the Settings button
- Click the Advanced tab again and then click Change (below Virtual memory)
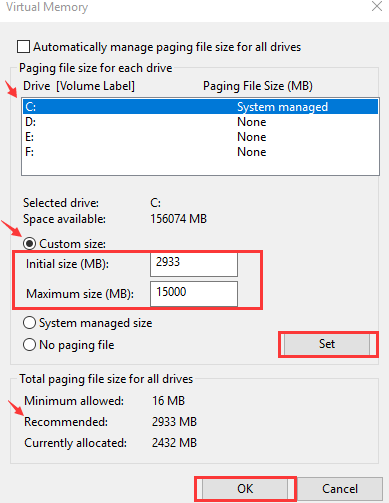
- Make sure that the square box before “Automatically manage paging file size for all drivers” is not ticked
- Choose the windows drive (that is, the partition or the hard drive that houses Windows, typically it is the “C” drive). Now, enter both an initial and maximum size for virtual memory

Initial size – You can use the number listed in the recommended category. Else, you can pick a value that’s suitable for your computer.
Maximum size – This value should be around 1.5 times the size of your physical RAM. For example, if your PC has 4GB RAM, virtual memory should be roughly 6,144 MB (that is, 4096 MB x 1.5). Keep in mind you shouldn’t set virtual RAM too high.
- Once you’ve set the values, click the Set button and then click OK
- Now check if the problem is solved
If the issue still persists, try the next solution.
Solution 4 – Perform a memory check
You can also encounter the issue of Windows freezing often if you have a faulty memory card. You can use an inbuilt tool to check if the memory card is faulty or not.
Here’re the steps to follow:
- Press the Windows logo key and R simultaneously. In the run dialog box, type mdsched.exe and press Enter
- Click “Restart now and check for problems (recommended)” in case you want to investigate the issue immediately. Otherwise, choose “Check for problems the next time I start my computer”
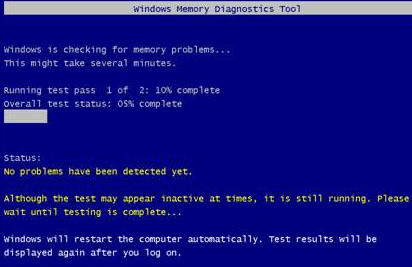
- Now windows will reboot. You will come across the following page, which will show you the progress of the scan

- If no error is reported here, that means there’s no problem with the memory card
Solution 5 – Check disk for errors
Disk errors can occur any time and cause all sorts of issues, including locking up of Windows 10. Checking the hard disk for errors and fixing is easy and requires no effort on your part. All you have to do is launch a built-in tool.
Here’re the steps to follow:
- Close all open files and programs on your computer
- Click Start, then click File Explorer, and finally click This PC
- In the list, locate the drive that you want to check. Right-click it and then click Properties
- In the Properties dialog box, click the Tools tab and then click Check
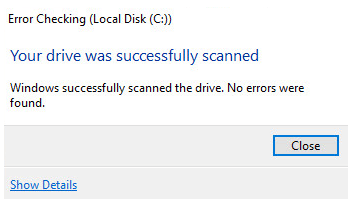
- If there’re no issues with the hard disk, you shall see the following message

This means there’s no problem with the hard drive either.
Solution 6 – Run system file checker
Another built-in tool that you can use to troubleshoot the Windows locking up frequently issue is the System File Checker. It restores any missing or broken system files and consequently may help fix various problems, including the titled one.
Here’s what you need to do:
- Press the Windows key
- Type cmd (but don’t press Enter). In the list of programs, locate Command Prompt, right-click it, and select Run as administrator
- Click Yes in case you are asked to provide administrative permission
- Type the following command in Command Prompt and then press Enter

Windows will now scan the system files to identify and fix missing and corrupt system files. So it’s important that you let the tool run and don’t shut it prematurely. Once it’s done, you will see the results in the Command Prompt window.
If the tool finds that everything is fine with your system files, move on to the next solution.
Solution 7 – Disable CPU-States in BIOS
Simply put, these are power saving options. That is, they will turn down the system’s multipliers, voltage, etc. so that the computer utilizes minimum possible power in its idle state. If you disable CPUT-States (also called C-States), your Windows computer will become more stable. This, in turn, lowers the chances of you encountering unexpected problems such as rebooting or random freezing.
Here’s what you need to do:
- Restart Windows. When the logo screen appears, press the Setup Key. Different manufactures have a different Setup Key. However, generally it’s F1, F2, F12, Delete, or Esc or a combination of these.
- In case the Windows logo screen disappears before you were able to press the Setup Key, reboot windows once more
- In the BIOS setup, browse to the main menu using arrow keys. Navigate to Advanced tab and click CPU Configuration
- The following two should be disabled — Intel(R) C-STATE tech and C1E Function. In case they aren’t, disable them. To do so, use the arrow keys to browse to the list of options, select the setting you want to change, and press the Enter key on the keyboard, and then change the setting to Disabled using the arrow keys
Once you’ve made the necessary changes, save the changes and exit BIOS setup. Then restart computer and check whether the problem has got solved or not.
Solution 8 – Run a malware scan
If the problem persists, scan your computer for virus and malware. Run a full system scan to ensure that your computer is not infected. If there are any malware programs present, the scan will identify them and take an appropriate action.

Leave a Reply