If your computer is running slow, you need to first check the Task Manager. Sometimes you may see WMI Provider Host process is hogging your computer CPU usage, causing your system to work at a snail’s pace.
If you see a similar image on your screen like the one below, you would want to try the solutions listed in this post.
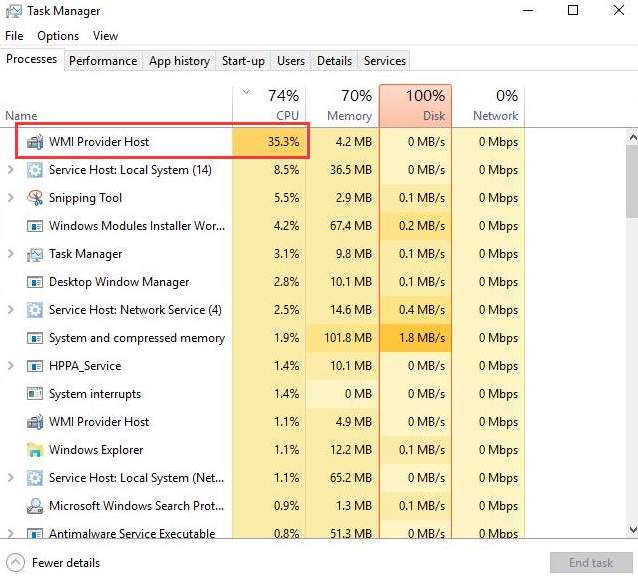
We have provides four solutions to fix the issue. You might not be required to try all solutions. Just start with the first solution and work your way downwards until the high CPU usage by WMI Provider Host process is fixed.
What is WMI provider host (WmiPrvSE.exe)?
WMI stands for “Windows Management Instrumentation”. It is an important feature that is needed to run applications. If the WMI provider host process is stopped, many features of Windows would become useless and this in turn may lead to other errors.
In general, WMI provider host service doesn’t use much CPU as it is not doing anything. It only uses CPU when an application requests information. Prolonged high CPU usage by WMI provider host process indicates something is wrong. Here are some solutions that might fix the issue.
Solution One- Run Virus Scan
You cannot rule out the possibility of malware and virus behind the high CPU usage of WMI provider host process. Run anti-virus scan and remove any suspicious programs and files it detects. After you have scanned the computer with anti-virus software, restart the computer and see if the issue is fixed. If you still see high CPU usage by WMI provider host process, try next solution.
Solution Two- Run Microsoft Support Diagnostic Tool in Safe Mode
Microsoft provides troubleshooter that allows you to fix many performance related issues using command line tool. To ensure nothing interferes with troubleshooter, you need to run msdt.exe in safe mode. Here are the steps to follow.
- Press Windows keys + R simultaneously on your keyboard to invoke Run command tool
- In Run command box, type msconfig and click OK

- Go to Boot tab and check the box for Safe boot
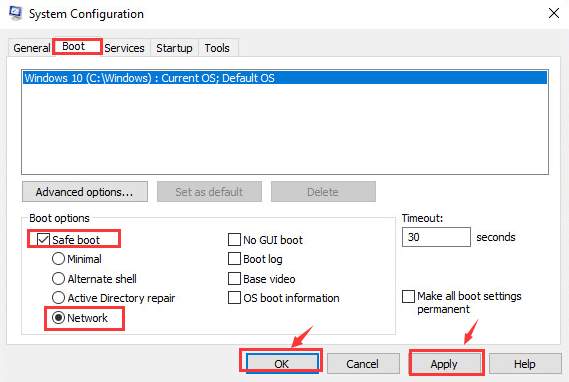
- Select Network option
- Click Apply -> OK to save
- Now restart the PC to enter Safe Mode
- When the PC boots in Safe Mode, press Windows key and X at the same time
- Click Windows Powershell(Admin)
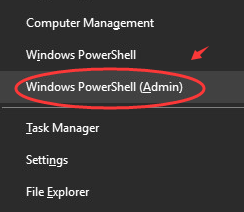
- Type the following command and hit enter
- exe -id MaintenanceDiagnostic
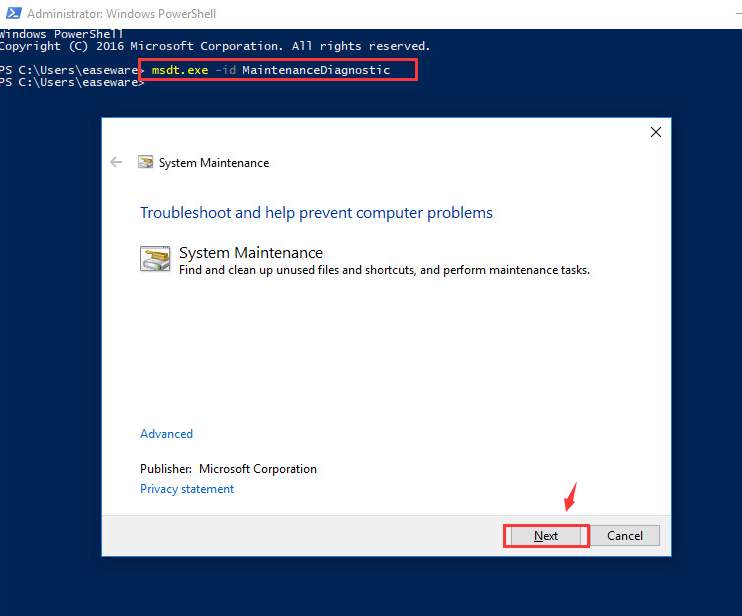
- You will see a troubleshooting window pops up on the screen, click Next to run the troubleshooter
- If the troubleshooter detects any problems, follow the instructions to fix the issue.
- Now go to the Powershell window again and type the following command and press Enter
- exe /id PerformanceDiagnostic
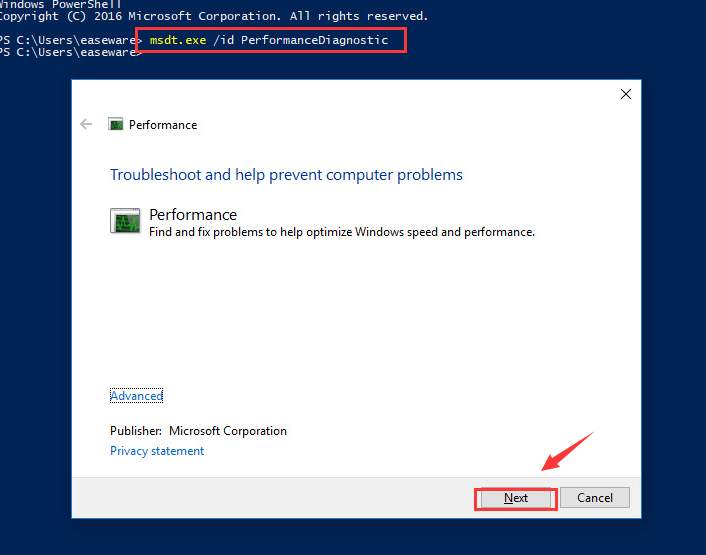
- You will again see a troubleshooting window pop up on the screen, click Next to run the troubleshooter
- If you receive any notification to make changes to system settings, follow the on-screen instructions to make changes.
- When the troubleshooting process is completed, you need to boot your computer into normal mode. You need to repeat the first two steps and then go to Boot tab
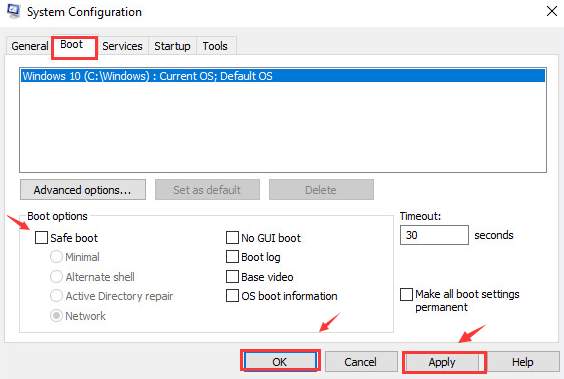
- Uncheck the box for Safe Mode option
- Click Apply and then OK to save changes
- Restart your computer to boot into normal mode
- Open Task Manager and see if the high CPU usage by WMI provider host process is resolved. If the issue still persists, try next solution.
Solution Three – Restart WMI Provider Host service
If the WMI Provider Host service is utilizing too many resources, restarting it might solve the problem. Here are the steps to follow.
- Press Windows key and R button on the keyboard simultaneously to invoke Run command
- In the Run command box, type services.msc and click OK
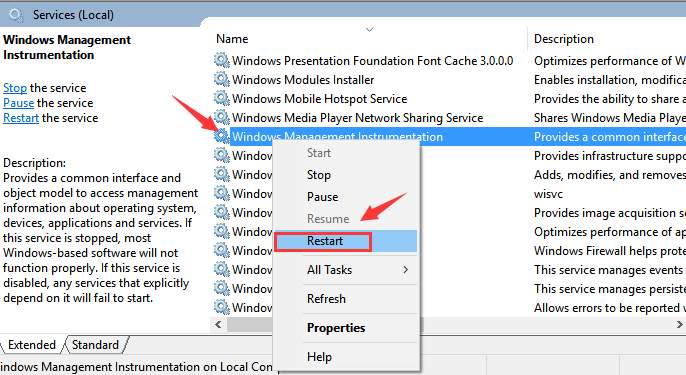
- In the Services window, locate Windows Management Instrumentation Right-click on it and select Restart
- In the Cortana search box, type cmd
- Right-click on the Command Prompt in the list and select Run as administrator
- In the command prompt window, type the following command and hit Enter after each command.
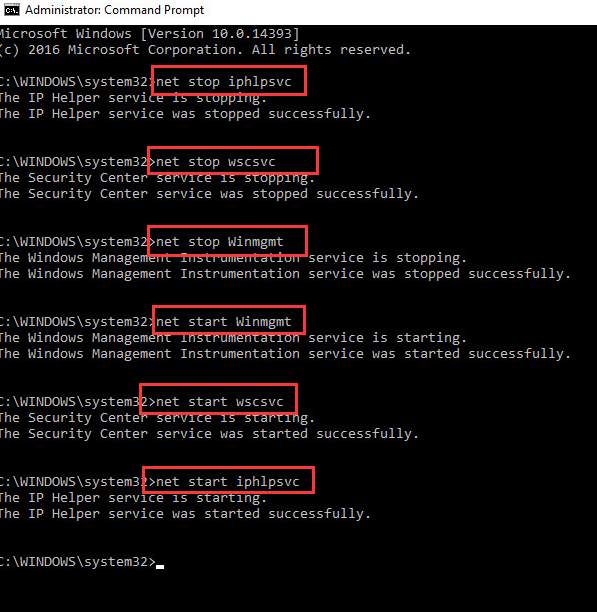
- net stop iphlpsvc
- net stop wscsvc
- net stop Winmgmt
- net start Winmgmt
- net start wscsvc
- net start iphlpsvc
- After the commands are executed successfully, close the command prompt window
Restart the computer and check the Task Manager to see if the high CPU usage of WMI provider host is fixed. If the issue still persists, move to next solution.
Solution Four – Remove Components and Drivers Causing the Problem
One of the reasons behind high CPU usage of WMI provider host is corrupt drivers and faulty components. You need to uninstall them in order to fix the issue. Here are the steps to follow.
- Press Windows key and X simultaneously on the keyboard and select Event Viewer from the list that pops up

- In the Event Viewer window, click View option that appears on top and select Show Analytic and Debug Logs
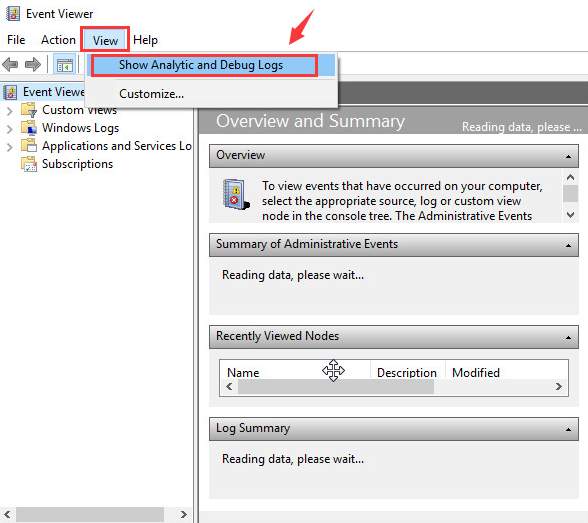
- On the left pane, follow the path : Applications and Service Logs -> Microsoft -> Windows -> WMI Activity -> Operational log
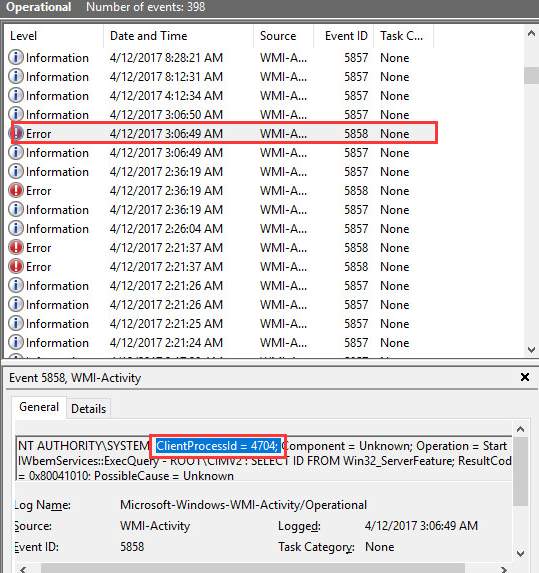
- Find entries that are marked as errors in the list
- Click on the error and go to the general tab and note down the process ID for the error
- Now, press Windows key and X simultaneously on the keyboard and select Task Manager from the list
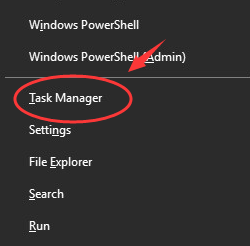
- In the Task Manager window, go to Services tab and look for process ID that you have found for errors. When you find them, click on process ID and find out the application and service related to it by reading the description
Once you know the application or service associated with various errors, you can disable the services and uninstall the application.
To Disable Services in Windows 10, follow the steps given below
- Open Start Menu and type services in Cortana search box
- In the Services window, double-click on the services you want to disable
- From Startup type, select Disabled
- Click OK
To uninstall applications in Windows 10, follow the steps given below
- Open Start Menu and click Settings(gear icon)
- In the Settings window, click Apps
- Click Apps & features from the left pane
- Select an app you wish to uninstall
- Click the Uninstall button that appears
Last Resort- Update Drivers
If none of the above solutions has fixed the issue, we suggest you update drivers and see if it helps. You need to always download drivers from trusted sources. If you have never updated drivers manually earlier, we suggest you use a Driver update tool that can update drivers automatically. Here are the steps to follow.
Updating Drivers Automatically
Automatic driver update tools offer many benefits, the most important ones being:
- You can update device drivers automatically
- The software scans and updates all outdated or missing drivers at one go
- The tool picks the right drivers for your device and operating system, so you won’t have to worry about installing an incorrect driver by mistake
- Automatic driver updates are 100% safe
Driver Updater is one of the best driver update tools out there. Outbyte Driver Updater will give you access to a database of over 1 million drivers. It will regularly scan your PC, suggesting new driver versions to install. Driver Updater contains drivers for a variety of Windows devices. With just one click, you can update drivers in your system.
Step 1
Click here to Install and launch the app
Step 2
Scan all devices
Step 3
Install or update drivers automatically

Leave a Reply