No one likes Blue Screen of Death (BSOD) errors. Windows users dread them more than anything else—and for good reason.
BSOD error like “a memory management” error—shown below—can greatly disrupt your work.
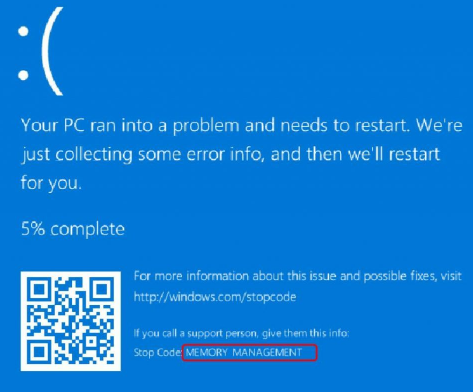
So the question is, how do you fix this “memory management” issue? Is it even something that you can easily fix yourself?
Well, the answer is “Yes.” While this “memory management” error is as stubborn as BSOD errors come, you can fix them—regardless of your level of technical proficiency—provided you’re willing to try all the solutions shared below in the order they appear.
Memory Management – What is it and what is its purpose
Some process has to manage memory usage in your PC or laptop and memory management is that process. Its sole purpose is to keep track of every single byte of memory.
When you launch programs, it is memory management that decides how much memory each launched program gets. Likewise, when you shut down a program, memory management frees up the memory that program was using earlier, and if needed, assign it to others.
Memory management is obviously an important process and when it crashes, a memory management error message will appear on your screen.
What causes memory management errors?
More often as not, memory management errors shows up because of one of these reasons:
- software conflict or hardware conflict
- faulty or outdated video driver
- disk errors
- virus infection
- faulty memory
Now let’s look at the solutions.
Solution 1 – Update your video driver
One of the most common causes of this BSOD error is an incorrect or outdated video card driver. To fix the issue, you must update the video card driver.
There are two ways you can go about updating your device drivers – update drivers manually or update them automatically.
What’s the difference between the two? Let’s check out.
Updating video card driver manually
This process can be tedious and time-consuming but if you wish to download and install drivers manually, then it certainly is possible to do so.
First, you must know what kind of video card you’re using. If you’re unsure, perform these steps:
- Right-click on the desktop area and select Display Settings
- Now in the box that appears choose Advanced Display Settings
- Select Display Adapter properties
- You’ll be able to see the relevant details pertaining to your graphics card in the Adapter tab
Once you know the brand of video card installed on your Windows 10 computer, go to the video card manufacturer’s website. Next, locate the latest available driver, and then download it.
Make sure you download the driver that’s for your PC. For instance, Windows 10 32-bit users must download a driver that works for 32-bit PCs. Similarly, those using a 64-bit Windows 10 need a driver compatible with 64-bit PCs.
Now that you have saved the driver file on your computer, double-click it to install the driver, and follow onscreen instructions (if any). You may have to reboot Windows after installation is complete.
Updating video card driver automatically
Automatic driver update tools offer many benefits, the most important ones being:
- You can update device drivers automatically
- The software scans and updates all outdated or missing drivers at one go
- The tool picks the right drivers for your device and operating system, so you won’t have to worry about installing an incorrect driver by mistake
- Automatic driver updates are 100% safe
Driver Updater is one of the best driver update tools out there. Outbyte Driver Updater will give you access to a database of over 1 million drivers. It will regularly scan your PC, suggesting new driver versions to install. Driver Updater contains drivers for a variety of Windows devices. With just one click, you can update drivers in your system.
Step 1
Click here to Install and launch the app
Step 2
Scan all devices
Step 3
Install or update drivers automatically
Solution 2 – Perform a disk check
If there’s a problem with NTFS volume, the chances of a BSOD increase manifold. Here are the steps you need to perform to fix the issue.
- Press the Windows logo key on your keyboard and then press the S key. Now in the Start Search box, type cmd
- Next right-click on Command Prompt. Next, choose Run as administrator
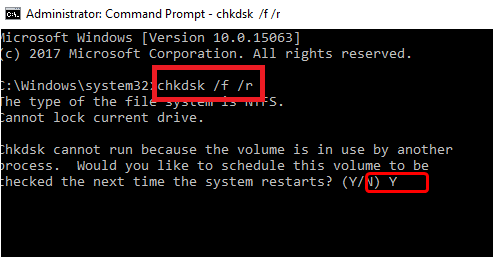
- In the Command Prompt window, type chkdsk /f /r and then press the Enter key
- You need to press Y when you are asked the question “Would you like to schedule this volume to be checked next time the system restarts?”
- Exit Command Prompt and then reboot
Solution 3 – Run SFC
The System File Checker is another tool that you can use to solve the “memory management” issue. While CHKDSK scans the entire drive for issues, SFC limits itself to Windows system files.
Here are the steps to follow to run SFC.
- Press the Windows logo key on your keyboard and then press the S key. Now in the Start Search box, type cmd
- Next right-click on Command Prompt. Next, choose Run as administrator
- In the Command Prompt window, type sfc /scannow and then press Enter
Solution 4 – Run a virus scan
Sometimes, a virus infection may lead to “memory management” error. If you haven’t run a virus scan in a long time you should do so now. If you’re not using any third-party antivirus program, make sure Windows Defender, which is preinstalled in Windows 10, is turned on.
Solution 5 – Run Windows memory diagnostic test
Another common cause is a problem with the computer’s RAM, which stands for random access memory. You don’t have to do anything special to test the RAM; simply make use of the diagnostic tool that comes preinstalled in Windows.
Here are the steps to follow:
- Press the Windows logo key and R key simultaneously. This will launch the Run dialog box
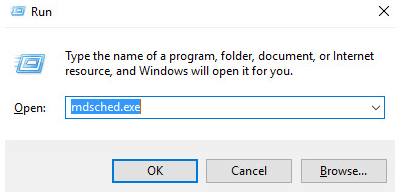
- Type mdsched.exe in the Run dialog box, and then press Enter
- We recommend you select the first option flashing on your screen, that is, Restart now and check for problems (recommended). However, if you want, you can also select the second option Check for problems the next time I start my computer
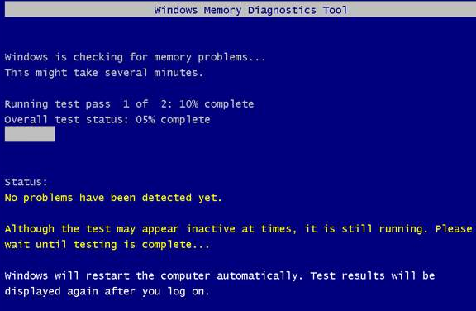
- The Windows Memory Diagnostic Tool will launch itself now. If it finds any errors, it will list them. In case no error shows up, you can safely assume your RAM is in good health
Solution 6 – Check any recently installed software and hardware
Did you install any new software or hardware? It is possible that it may be conflicting with some other program and triggering the aforementioned error. The best thing to do is uninstall any recently installed software or hardware and then check if the error vanishes. If yes, you should consider permanently uninstalling that software or hardware.
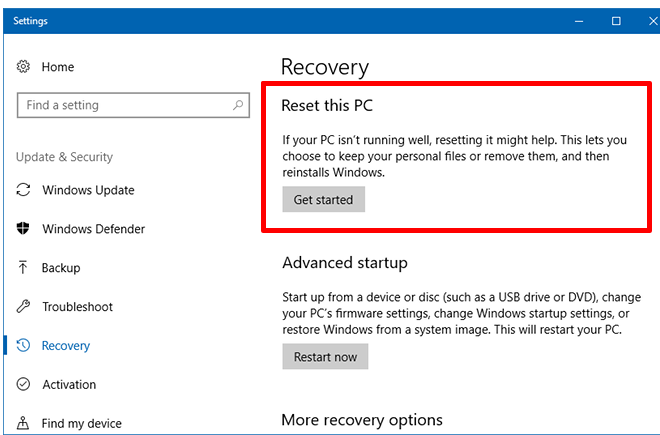
Solution 7 – Reset Windows 10
If nothing else has worked, you can try resetting Windows 10. This is the last resort, so don’t go trying it before you’ve exhausted other options.
Resetting Windows 10 will replace the existing system files with a new set. This in turn resolves—at least theoretically—any lingering issues associated with memory management.
To reset Windows, perform the following steps.
Note: Make sure you back up all important files before resetting Windows
- Go to Settings
- Click Update and Security and then select Recovery
- Click the Get Started button under Reset this PC
- When Windows restart, you may choose either of these two options: Keep my files or Remove everything

Leave a Reply