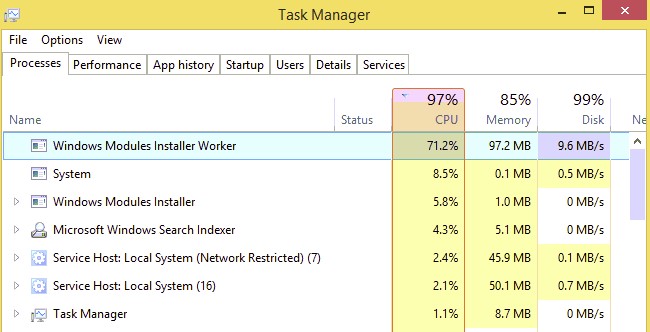
Many Windows 10 users have reported experiencing the unexplained high disk usage by the windows modules installer worker process. This in turn causes the system to freeze up.
In such situations, the Task Manager invariably shows that Windows modules installer worker process is using a large amount of CPU resources – sometimes the CPU usage was more than 50%.
If you are experiencing similar problems, this post is just for you. We have listed several DIY solutions for this problem.
What is the windows modules installer worker process?
Windows Modules installer — also known as windows modules installer worker, WMIW, or TiWorker.exe — is a core component of the Windows operating system that checks and install updates for Windows and other Microsoft products installed on your computer.
Since the Windows update process is automatic, it is common to see Windows modules installer working in the background. If the windows modules installer worker is showing high CPU and disk usage, try the following suggestions
A few checks before troubleshooting
Check if Scheduled Automatic Maintenance is running
Before you follow any troubleshooting steps, check if your Windows is running the Scheduled Automatic Maintenance task.
If the answer is yes, wait for some time and allow the process to finish. You can get information about Scheduled Automatic Maintenance by following the steps given below.
- In the search bar that appears next to the Start button, type control panel
- Click Control Panel from the list of results
- In the control panel window, click Security and Maintenance
- Next click Automatic Maintenance. Here you can see details about Automatic Maintenance
Check whether Windows is installing updates
If Windows operating system is able to download and install updates, it is normal for windows modules installer worker process to use more CPU and disk resources. In that case, you need to be patient and wait till the Windows complete installing updates.
You can check more about Windows updates by following the steps given below
- Click Start-> Settings
- In the Setting window, click Update and Security
- Next click windows update
- In the Windows Update window, you will get information about the updates that are being downloaded and installed. It will also show the percentage of work completed(installing updates)
If you have done the above-mentioned checks and see there is no reason for windows modules installer worker to use more CPU and disk resources, proceed to the solutions given below.
Solution One – Run an Antivirus scan
There is a possibility some virus has infected your system and is the root cause behind high disk usage. Run an anti-virus scan and see if it helps. If the issue remains unresolved, move to the next solution.
Solution Two – Disable Windows Update Service
Windows modules installer worker process is related to Windows update service. Many users were able to resolve the issue by disabling the Windows update service. Therefore, this solution is worth attempting.
Here are the steps to follow.
- Press Windows + R on your keyboard simultaneously. This will launch the Run command tool
- In the Run command, type services.msc and click OK. This will open the Services window
- In the Services window, find and double-click Windows update service in the list. This will open the Windows update service properties window.
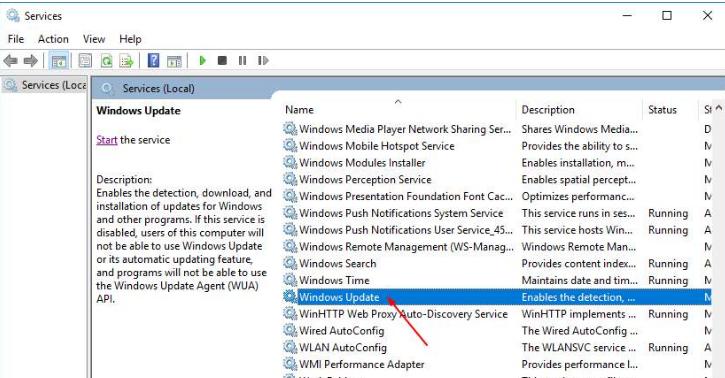
- In the Window update properties window, go to the Startup type section and select Disabled from the drop-down list. This will ensure Windows does not start Windows update service automatically at the next startup.
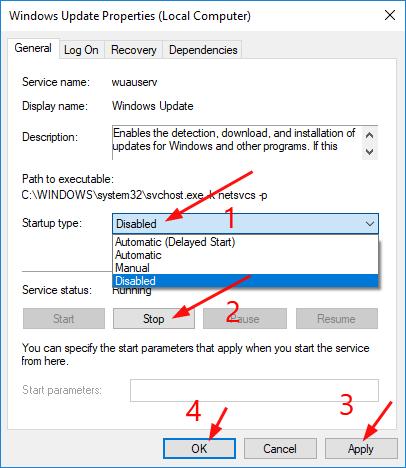
- Click Stop button
- Click Apply-> OK to apply changes
The CPU and disk usage would return to normal after making changes to the Windows updates setting. Open Task Manager and go to the Processes tab to confirm. If you see Windows modules installer worker process using a large amount of CPU and disk resources, move to the next solution.
Solution Three – Change Internet Settings
Since changing the windows update setting did not work, it would be a good idea to try changing the Internet settings on your computer. Doing so might help resolve this issue once and for all.
Many users were able to get rid of the issue after changing their Internet settings and it might help you as well.
The steps for changing the Internet Settings for a computer using a Wi-Fi network are different from that for a system using an Ethernet connection. Below we have listed the steps for both scenarios; you can use the one that apply in your case.
Case 1 – Your computer is using a Wi-Fi network
Case 2- Your computer has an Ethernet connection
How to change Internet settings when the computer is using a Wi-Fi network?
- Click Start-> Settings
- Click Network and Internet -> Wi-Fi
- Click Advanced options
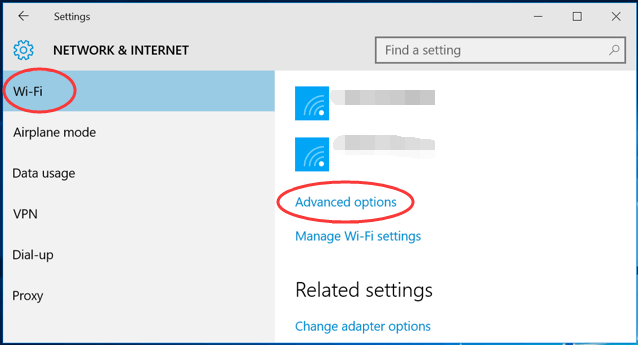
- In next window, tick on set as metered connection
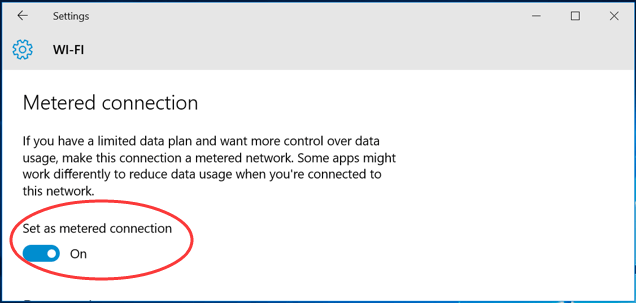
How to change Internet settings when the computer has an Ethernet connection?
- Press Windows key and R together to bring up the Run command
- In the Run command box, type regedit and click OK. This will open the Registry window
- If the User Account Control dialog pops up to confirm your action, click Yes to proceed
- In the Registry window, navigate to the following key
- HKEY_LOCAL_MACHINE > SOFTWARE > Microsoft > Windows NT > CurrentVersion > NetworkList > DefaultMediaCost
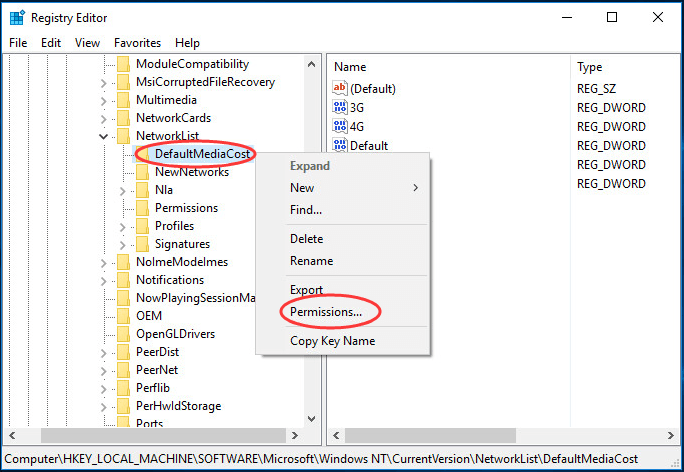
- Right-click DefaultMediaCost and selectPermissions
- In the Permissions window, click Add
- Type your user name into Enter object names section
- Next, click Check Names
- Click OK
- Go to the Permissions window again and now you will see your username in the Security section

- Click your user name and place a tick on Allow for Full control
- Click OK
- Now go back to the main Registry window and double click on DefaultMediaCost
- In the right-hand section, double-click on Ethernet
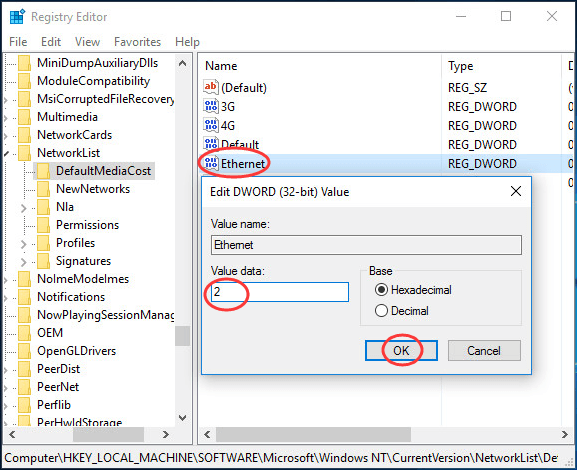
- Set its value data to 2
- Click OK
- Close Registry editor
- Reboot your computer.
After changing Internet settings, open Task Manager and you will see the Windows modules installer worker CPU usage has returned to normal.
Update Your Device Drivers
Outdated device drivers can cause many issues, including the aforementioned problem. Therefore, if nothing else has worked for you, we recommend you update your device drivers.
Automatic driver update tools offer many benefits, the most important ones being:
- You can update device drivers automatically
- The software scans and updates all outdated or missing drivers at one go
- The tool picks the right drivers for your device and operating system, so you won’t have to worry about installing an incorrect driver by mistake
- Automatic driver updates are 100% safe
Driver Updater is one of the best driver update tools out there. Outbyte Driver Updater will give you access to a database of over 1 million drivers. It will regularly scan your PC, suggesting new driver versions to install. Driver Updater contains drivers for a variety of Windows devices. With just one click, you can update drivers in your system.
Step 1
Click here to Install and launch the app
Step 2
Scan all devices
Step 3
Install or update drivers automatically

Leave a Reply