One of the frequently encountered issues in Windows is high CPU usage issue, which typically occurs when a process hogs CPU resources. As a result, your computer becomes slow and unresponsive.
If you look inside the Task Manager, you can find which process/service is causing the issue.
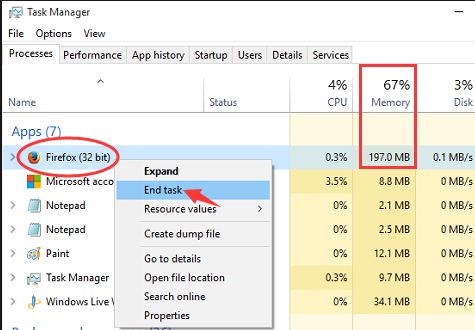
Many Windows 10 users have complained about Windows Modules Installer Worker (TiWorker.exe) service using too much CPU resources (more than 90%). As a result not much is left, in terms of CPU resources, for other processes, and the computer’s speed drops to a snail’s.
If you are experiencing a similar problem, you’ll find this post helpful. It shares some simple solutions that could resolve the issue.
What is Windows Modules Installer Worker and why it is using too much CPU resources?
The Windows Modules Installer Worker is a Windows service that is responsible for automatic installation of Windows updates. It searches for Windows updates and installs them on your computer. Since the Windows 10 operating system is set by default to install updates automatically, the service is launched automatically by Windows operating system.
The Windows Modules Installer Worker process runs in background and it might put a heavy load on your system when you’re searching, downloading, and installing updates.
In such a scenario, restarting your computer does not resolve the issue as the process starts automatically.
Here are some solutions that might work for you.
Before Troubleshooting
As mentioned earlier, the Windows 10 operating system is set to update automatically. There is a possibility your Windows operating system is downloading and installing updates as per the set schedule. We suggest you give Windows Modules Installer Worker service some time to complete the update process.
You can check the current status of Windows update by following the steps given below
- Click Start
- Click Settings(gear icon)

- Click Update and Security
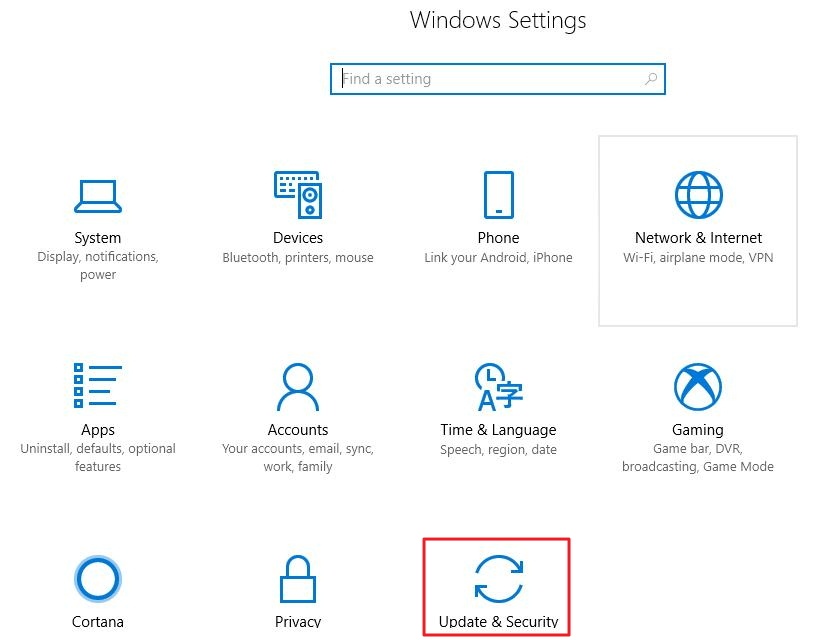
- You can see the update progress like the image given below
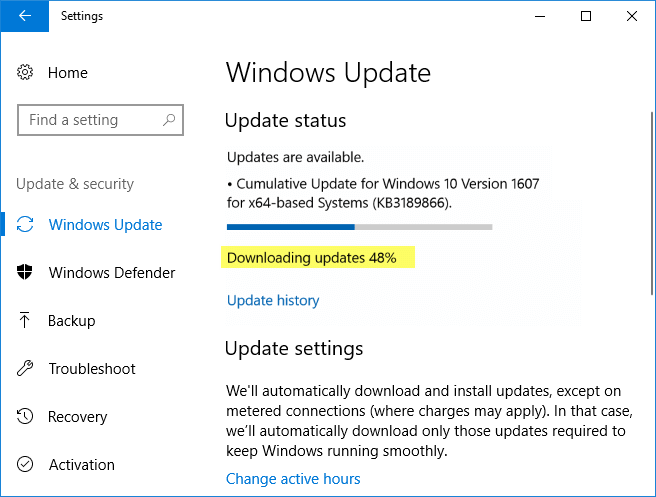
If the Windows Update process takes forever to complete, you can draw a conclusion that there is some problem with the Windows update process.
In that case, you need to try the solutions given below. Listed below are six solutions to resolve the high CPU usage by Windows Modules Installer Worker process.
You are not required to try all solutions in the post. Start with the first solution. If that doesn’t bring the CPU usage to normal, try the next solution and so on, until the issue is resolved.
Solution One – Run Windows Update Troubleshooter
There is a possibility the Windows Update process is stuck due to some issue. In that case, the Windows Update Troubleshooter can be of great help. Windows 10 features a Windows Update Troubleshooter that can resolve any problems with the Windows update process. Here are the steps to follow.
- Click Start
- Type troubleshooting in the Cortana search box
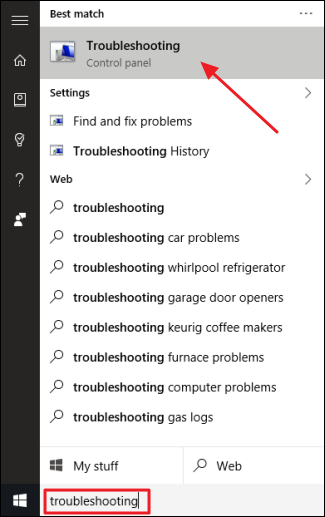
- Click Troubleshooting from the list of results
- In the Troubleshooting window, click Fix problems with Windows update under System and Security
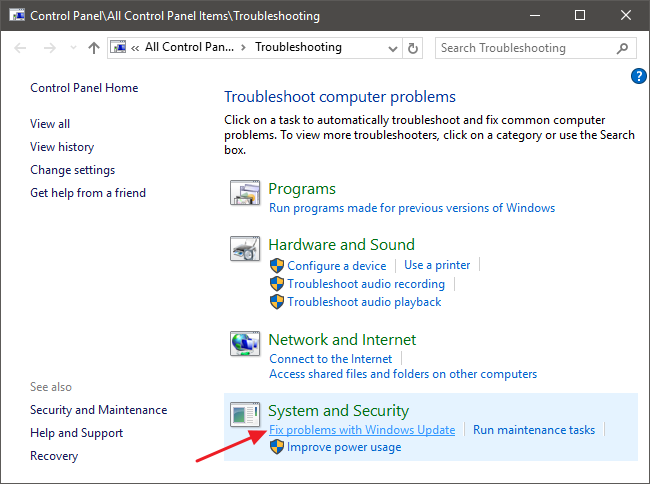
- The Windows Update Troubleshooter starts and you see the Windows Update window. Click Advanced
- In the next window, make sure the Apply repairs automatically box is checked then click Run as administrator

- Click Next
- The Windows Update Troubleshooter starts its process and gives you information about any errors and whether it can fix them
- Wait for the Windows Update Troubleshooter to complete its process.
- If it is able to fix the update errors, wait for the Windows Modules Installer Worker to complete the Windows update process. In most cases, you will see the CPU usage go down after the Windows update process is completed successfully
- If the Windows Update Troubleshooter is not able to fix any issues, try next solution.
Solution Two – Run SFC commands
If the Windows Update Troubleshooter is unable to fix any problem with Windows update, you need to run the SFC tool. SFC is short for System File Checker. It is a command-line tool that scans your system for any missing or corrupted system files. It then replaces the corrupt/missing files with cached versions in good condition. Here are the steps you need to follow.
- Click Start
- Type cmd in Cortana search box
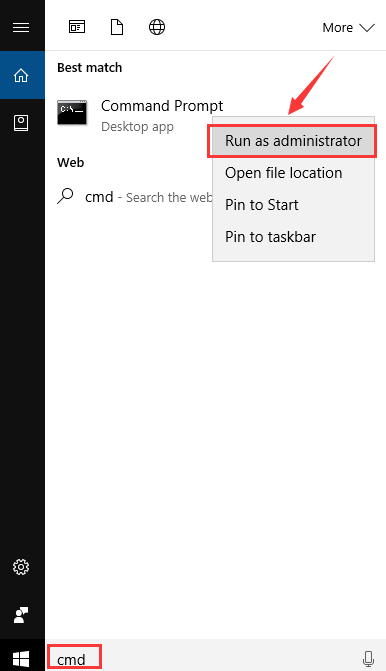
- Right-click Command Prompt from the list of results and click Run as administrator
- In the User Account Control window, click Yes
- In the command prompt window, type sfc /scannow and press Enter on the keyboard
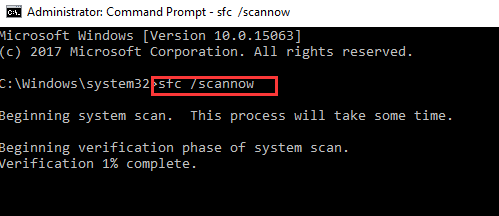
- Wait for the SFC to complete the scan and repair process.
Try updating the Windows and see if the CPU usage returns to normal after some time. If you see the Windows Update process is going to last forever, try next solution.
Solution Three-Run DISM tool
DISM is short for Deployment Image Servicing and Management. It is a nifty command line utility that is used to load service Windows images. Due to some reasons, SFC tool is not able to fix all errors in system files.
In that case, you need to run DISM commands that use Windows update to provide files that are needed to fix file corruptions. Here are the steps to run DISM tool
- Open command prompt window with admin rights. You can refer to the steps given in Solution Two – Run SFC command to open an elevated command prompt
- Type the following commands and hit Enter on the keyboard after each command.
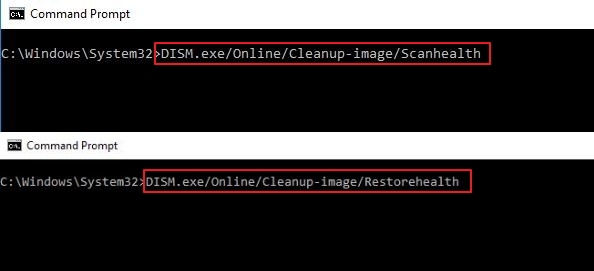
- exe /Online /Cleanup-image /Scanhealth
- exe /Online /Cleanup-image /Restorehealth
- Wait for some time as it may take several minutes for the command operation to complete
- When the command operation is completed, close command prompt window
- Reboot Windows
- Try updating Windows and wait for the update process to complete. If the Windows update process takes longer time than usual, try next solution
Solution Four – Disable Windows Modules Installer Worker
If none of the above solutions has worked for you, try disabling Windows Modules Installer Worker. This will automatically prevent the process from running and will solve the high CPU usage problem. Here are the steps to follow.
- Press Windows logo key and R simultaneously to bring up the Run command console

- In the Run command box, type services.msc
- In the Service window, double-click Windows Modules Installer
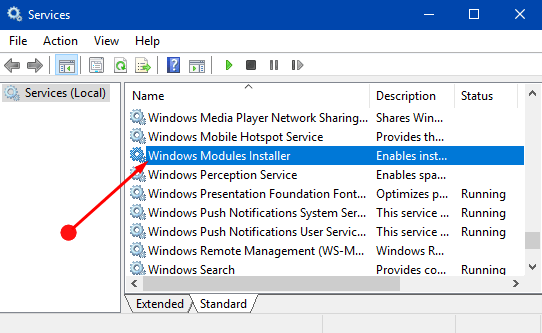
- In the Windows Modules Installer Properties window, go to Startup Type and select Manual from the drop-down list

- Click Apply then click OK
- Close all windows
Now open Task Manager and see if the CPU usage has returned to normal. In most cases, the high CPU usage by Windows Modules Installer worker problem should be resolved by now. If you still see high CPU usage in Task Manager, you need to disable Windows update. This will prevent the Windows 10 operating system from downloading updates and it will fix the issue.
Solution Five – Disable Windows Update
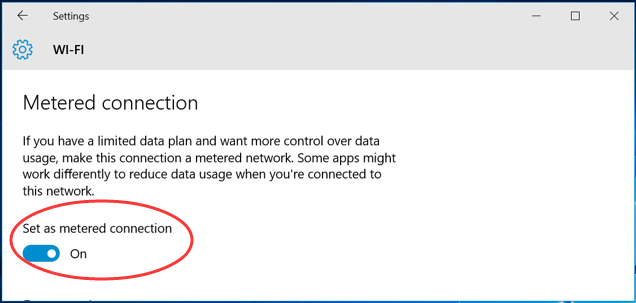
The Windows 10 can download and install updates in two ways; using Wi-Fi and using the Ethernet connection. Windows 10 has an option to set Wi-Fi as a metered connection. When you set Wi-Fi as metered connection, it will delay downloading updates that would resolve the issue.
Case 1 – Using Wi-Fi for Internet connectivity
If your Windows 10 computer connects to the Internet through Wi-Fi, you need to perform steps below
- Click Start and then click Settings(gear icon)

- In the Settings window, click Network and Internet
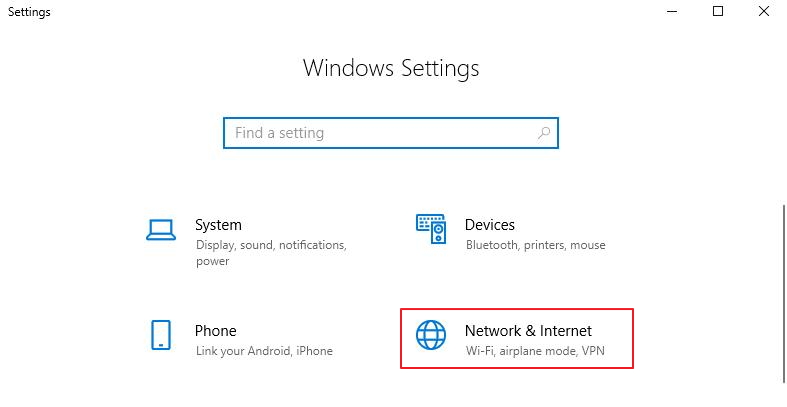
- In the next window, click Wi-Fi and then Advanced options

- In the Wi-Fi settings window, click the toggle switch “Set Metered connection” to turn it On
Case 2 – Using an Ethernet connection for Internet connectivity
If your Windows 10 computer uses a wired connection to connect to the Internet, you need to perform steps below
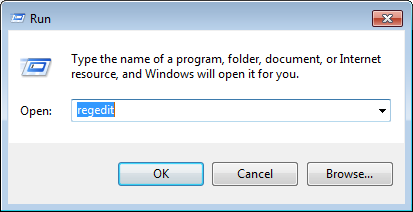
- Press Windows logo key and R simultaneously on the keyboard to bring up the Run command console
- In the Run command box, type regedit and click OK
- In the User Account Control pop-up, click Yes
- In the Registry Editor window, go to HKEY_LOCAL_MACHINE > SOFTWARE > Microsoft > Windows NT > CurrentVersion > NetworkList > DefaultMediaCost
- Right-click DefaultMediaCost and select Permissions

- In the Permissions dialog pop-up, click Add. You will see a new window pop-up
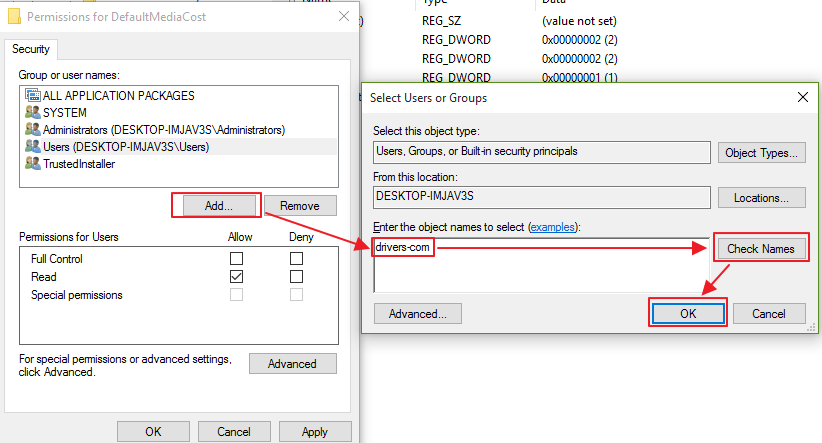
- In the Select Users or Groups popup, go to “Enter the names to select” box and type your username
- Select the username and click Check Names and click OK
- Now return to Permissions dialog popup, you can see your username in the list
- Select your username and check mark Full Control and Read options under Permissions for <username>
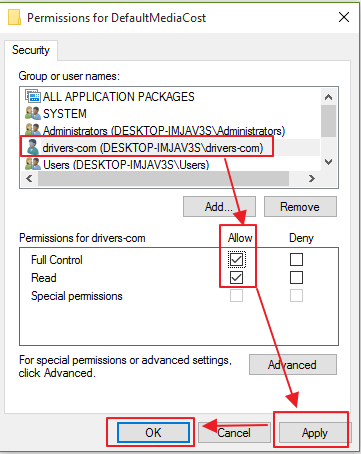
- Click Apply and then click OK
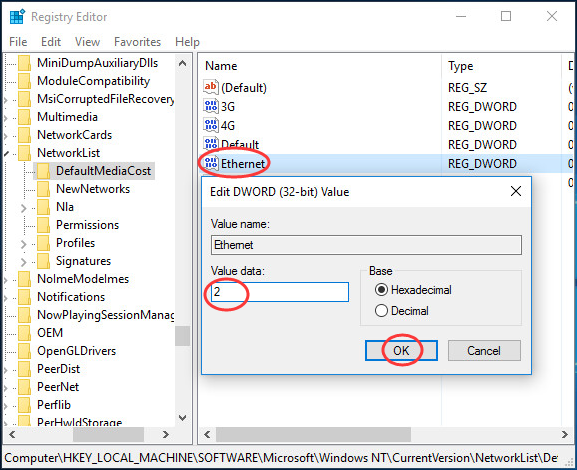
- Now go the Registry editor window and right-click Ethernet in the left column and then click Modify
- In the Edit D-Word 32-bit value window, type 2 in the Value Data field and click OK
- Close all windows
- Reboot your computer
The high CPU usage by Windows Modules Installer worker should be resolved after these troubleshooting steps. If the high CPU usage still exists, you need to update drivers by following the steps given below.
Solution Six – Update Drivers
If nothing works, try updating drivers. Outdated drivers can cause much problem, including with Windows Modules Installer.
You can obviously update device drivers manually if you want, but as anybody who’s done it before will tell you, the whole process is time-consuming. A better approach is to use a reliable and fast driver update tool for this purpose.
We recommend you to use a Driver Update Tool. It is very quick and reliable.
Automatic driver update tools offer many benefits, the most important ones being:
- You can update device drivers automatically
- The software scans and updates all outdated or missing drivers at one go
- The tool picks the right drivers for your device and operating system, so you won’t have to worry about installing an incorrect driver by mistake
- Automatic driver updates are 100% safe
Driver Updater is one of the best driver update tools out there. Outbyte Driver Updater will give you access to a database of over 1 million drivers. It will regularly scan your PC, suggesting new driver versions to install. Driver Updater contains drivers for a variety of Windows devices. With just one click, you can update drivers in your system.
Step 1
Click here to Install and launch the app
Step 2
Scan all devices
Step 3
Install or update drivers automatically

Leave a Reply