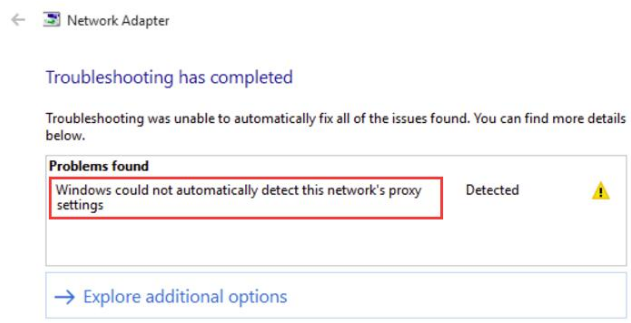
A yellow exclamation mark on the WiFi name in the system tray is not a good sign. It indicates there is an issue of some sort with the WiFi.

Sometimes windows troubleshooting can help with these issues but sometimes not. Here we offer a number of potential solutions for you to work through.
Why Does The ‘Could Not Automatically Detect This Network’s Proxy Settings’ Error Occur?
Quite often this issue crops up due to a change in the proxy settings on your computer. That, in turn, can occur because of several reasons, including malware infection, file corruptions, and a change in network settings or system files. Even an old, outdated network driver can trigger this issue.
We recommend you start with general troubleshooting solutions before moving on to the more technical ones.
Solution 1 – Update your network driver
Connection problems can arise if the network driver is outdated. Updating to the latest network driver will often fix the issue.Updating the network driver is not difficult, particularly if you use an advanced driver update tool. For your convenience, we have shared the steps for updating network driver manually as well as automatically. You decide which one works best for you.
Updating the network driver manually
Here are the steps to follow:- Press down Windows key and R key simultaneously
- In the Run dialog box, type devmgmt.msc and press Enter
- In the Device Manager window, locate Network Adapters and then double click it
- Now you will see all network devices on your computer. Select the right network device and select Uninstall
- Once the device has been uninstalled, exit the device manager window
- Reboot Windows
- Windows will now automatically install the most appropriate driver, which in turn should solve the problem
If the problem persists, that means Windows doesn’t have the right driver for the network device. In this case, you can manually download the latest network driver from the manufacturer’s website. Make sure you download the driver suitable for the type of Windows you are running. That is, if you have 32-bit Windows 10, download the driver meant for 32-bit PCs. Similarly, those with 64-bit Windows 10 should download the network driver meant for 64-bit systems.
Once you have downloaded the driver file, double-click it to start the installation process. Follow the onscreen prompts (if any) to complete the process.
Update the network driver automatically
Automatic driver update tools offer many benefits, the most important ones being:
- You can update device drivers automatically
- The software scans and updates all outdated or missing drivers at one go
- The tool picks the right drivers for your device and operating system, so you won’t have to worry about installing an incorrect driver by mistake
- Automatic driver updates are 100% safe
Driver Updater is one of the best driver update tools out there. Outbyte Driver Updater will give you access to a database of over 1 million drivers. It will regularly scan your PC, suggesting new driver versions to install. Driver Updater contains drivers for a variety of Windows devices. With just one click, you can update drivers in your system.
Step 1
Click here to Install and launch the app
Step 2
Scan all devices
Step 3
Install or update drivers automatically
Solution 2 – Use Windows Network Adapter Troubleshooter
Some users were able to fix the problem by using the Network Adapter Troubleshooter built into Windows. Since the troubleshooter solves the issue on its own, you don’t have to do anything—other than running it, of course.Here are the steps to follow:
- Press the Windows key
- In the Start Search bar, type control panel and then click Control Panel in the search results
- Next, click Network and Internet and then click Network and Sharing Center
- Now click Troubleshoot problems and then click Network Adapter
- Click Advanced and select the option Apply repairs automatically
- Click Run as administrator and then click Next
Let the Network Adapter Troubleshooter do its thing. Once it has run, check if the error is fixed.
If not, try resetting Internet Explorer, which is up next.
Solution 3 – Reset Internet Explorer
This solution worked for many users, but resetting the Internet Explorer will remove any personal settings that you might have set, so bear that in mind.
Here are the steps to follow:
- Press Windows key and R key
- In the run dialog box, type inetcpl.cpl and then press the OK button
- Now click the Advanced tab and then click Reset
- Select the option Delete personal settings
- Now click Reset
Reboot Windows and check if the issue is resolved.
Solution 4 – Uncheck “Use a Proxy Server” option
Here are the steps to follow:
- Press Windows key and I Key together
- Click Network and Internet
- Click Proxy (in the left pane)
- Deselect the option Use a Proxy Server. Next, select the checkbox before Automatically detect settings.
- Click OK

Now see if the problem is solved. If not, it’s time to try more complicated solutions. For each solution below, we have listed all the steps, so all you have to do is follow them.
Solution 5 – Use Winsock Reset Commands
Change the Winsock settings to default and see if that fixes the issue. Here are the steps you need to follow:
- Press Windows key
- In the Start Search box, type cmd
- Right-click Command Prompt and then choose Run as administrator
- Now type this command and then press Enter

- Reboot Windows to see if the issue is fixed. If not, repeat the first three steps given above
- Now type this command and then press Enter

- Now type the below-listed commands in the order they appear

- Type exit and then press the Enter key
See if the issue is solved. If you are still getting the error, reboot Windows once and then check.
Solution 6 – Deselect Proxy Server Option
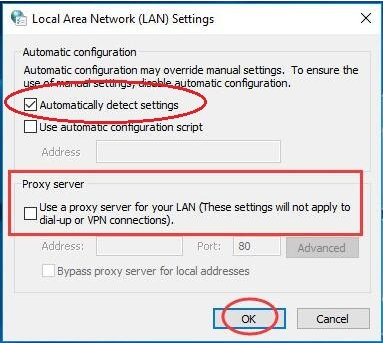
Deselecting proxy server option is another solution that has worked for many Windows users. Unchecking this option basically means you are giving your Windows computer scope to automatically detect proxy settings.
Here are the steps to follow:
- Press the Windows key and R key simultaneously
- In the run dialog box, type inetcpl.cpl and then click the OK button
- Click the Connections tab
- Next click LAN Settings
- Deselect the option Use proxy servers for your LAN
- Click the OK button twice
Check if the problem is now solved.
Solution 7 – Run a virus scan
Malware infection can cause all sorts of problems, including the this issue. Therefore, running a virus scan is worth a shot if you have been unable to solve the problem so far.
We recommend you run a boot-time scan, which runs at start-up before the majority of the applications files and most of the operating system have been loaded. Since not all malware can be detected and consequently quarantined or removed once Windows has booted and is running, a boot-time scan gives you the best chance to remove modern malware.
Solution 8 – Use System Restore
A built-in utility, System Restore allows you to roll back your computer’s setting to a previous time. In case the error is due to file corruption, running a System Restore is a viable option. Likewise, if the problem started after you downloaded and installed a particular software, then too System Restore is a good option.
Here are the steps to follow restore the system using System Restore Point:
- Search System Restore using Cortana
- Click Create a restore point
- Click System Restore
- In System Restore choose option Choose a different restore point
- Click Next
- Here you will see all available restore points. Select a suitable restore point and click the Next button
Windows will now reboot and roll back to the selected previous setting.
Solution 9 – Run System File Checker
Windows comes with a built-in utility called System File Checker (SFC) which scans system files for errors and automatically repairs them. With its help you can fix errors occurring because of file corruption.
Here are the steps to follow to run system file checker:
- Press the Windows key
- In the Start Search box, type cmd
- Right click Command Prompt and then select Run as administrator
- Type the following command and press Enter
- Wait for System File Checker to scan the system files and fix any reported error
Solution 10 – Network Reset
Some Firewall configurations or network restrictions can prevent Windows from connecting to the internet. Similarly, if some network configurations have become outdated, you may not be able to access the web. In both these situations, a simple network reset can solve the issue.
Here are the steps to follow:
- Press the Windows key and I key simultaneously
- In the Windows Settings window, click Network and Internet
- Click Status
- Now click Network Reset and then click Reset Now
No check if you are able to connect to the Internet.
Solution 11 – Reset Network Adapter
In some cases, the network adapter acquires certain wrong configurations, which in turn prevents the system from connecting to the internet. Resetting the network adapter should fix this issue.
Here are the steps you must follow to reset network adapter:
- Press the Windows key and R key simultaneously
- In the run dialog box, type npa.cpl and then click the OK button
- Right-click Network Adapter and choose Disable
- Wait for a minute and then right-click network adapter and click Enable
Now check if the problem is solved. If not, try the last solution in the list, enabling Custom 3D Support.
Solution 8 – Enable Custom 3D Support
This solution is mainly for those users who use MSI Afterburner along with Riva Statistics Tuning Server for monitoring how their hardware is performing. Sometimes, you need to enable this setting in Riva Statistics so that everything works seamlessly with the overlay.
- Click System Tray
- Double click Riva Tuner Statistics Server
- In the Settings window, turn on Custom 3D Support
Now check if the problem is resolved.

Leave a Reply