A computer crash, marked by a black or blue screen or a sudden freeze or repeated shutdowns, can be disruptive and frustrating. Fortunately, the issue is easily fixable.
If your Windows 11 keeps crashing, try not to panic. Help is on the way. This blog post teaches you 7 ways to fix the “Windows 11 keeps crashing” issue.
So, let’s dive right in and get that computer of yours up and running.
Why is my Windows 11 crashing frequently?
This could because of a number of reasons. The following are the most common causes:
- Bad driver installation or an outdated driver
- Malware or virus attack
- A recent system update might cause issues
- An outdated Windows build version
- Corrupted or broken system files
- Your system is overheating
- Outdated graphics card driver
- RAM-related issues
How to Resolve the “Windows 11 keeps crashing” issue?
Now that you have an idea about why system crashes occur, let’s look at the most probable fixes.
Solution 1 – Check for new system updates
As said above, your system may crash repeatedly if the Windows build version is outdated. To keep incompatibility issues at bay, check for updates, and if they are available, then install them. Here’s how:
- Type settings in the Search bar and press Enter
- Click Windows Update
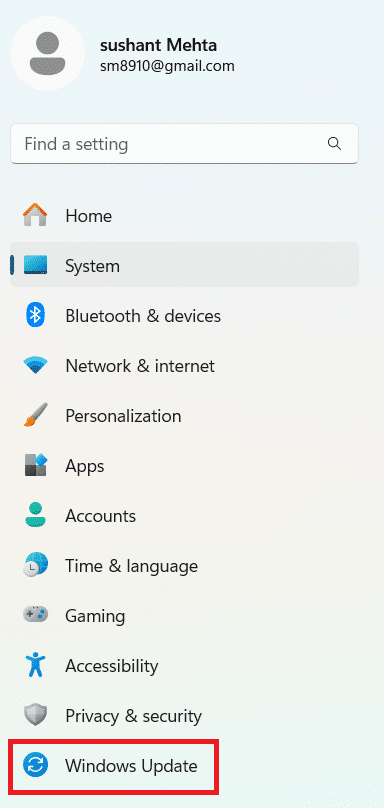
- Let it check for new updates
- If updates are available, download and install them
Solution 2 – Run a virus scan
If no updates are available, or if installing new updates doesn’t fix the issue, then scan your computer for viruses. Open your antivirus’s user interface and run a full system scan.
Once the virus scan is complete, restart Windows.
Solution 3 – Run DISM and SFC scan
DISM is a command-line tool that helps repair Windows images while SFC scan is a built-in tool that checks for and repair missing or corrupted system files.
Here’s what you need to do to run a SFC scan:
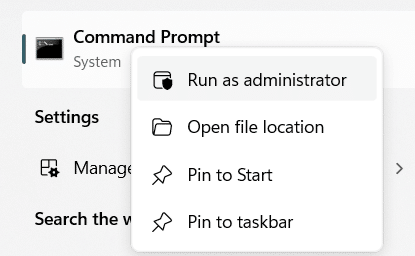
- Type command prompt in Search bar in the taskbar
- Right-click Command Prompt in the search results and select Run as administrator

- In the Command Prompt, enter the following command:
SFC /Scannow
- Press the Enter key and wait for Windows to finish the scan
The SFC scan will check for damaged or missing system files. If it doesn’t find any, give the DISM method a try. Here’s what you need to do.
- Type command prompt in the Search bar in the taskbar
- Right-click Command Prompt in the search results and select Run as administrator
- In the Command Prompt, type the following command:
DISM /Online /Cleanup-Image /ScanHealth
- Hit Enter and wait for the scan to complete
- In case no violations are found, close Command Prompt
- In case violations are found, type the following command:
DISM /Online /Cleanup-Image /RestoreHealth
- Hit the Enter key and wait for Windows to restore the files
Solution 4 – Perform a clean boot
When you perform a clean boot, Windows launches itself with bare minimum startup programs and drivers. This in turn makes it easier for you to determine if a background program is interfering with another program, much like the Safe Mode. However, a clean boot provides you better control over which programs and services to launch at startup to help you diagnose the root cause.
Here’s what you need to do to perform a clean boot.
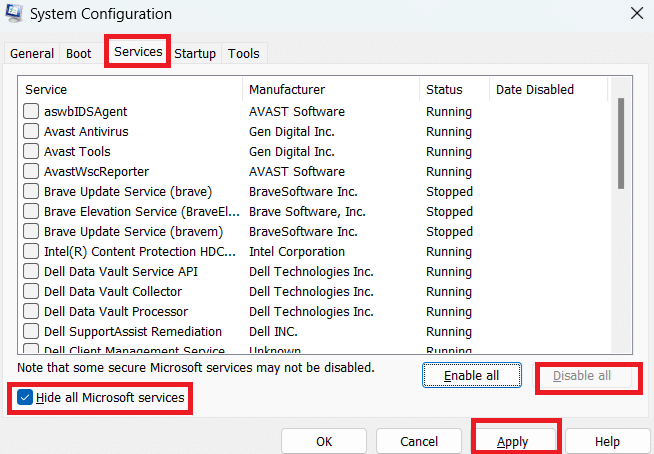
- In the search bar in the taskbar, type msconfig and hit Enter
- Click the Services tab
- Select Hide all Microsoft services and then select Disable all
- Click Apply
- Now click the Startup tab and select Task Manager
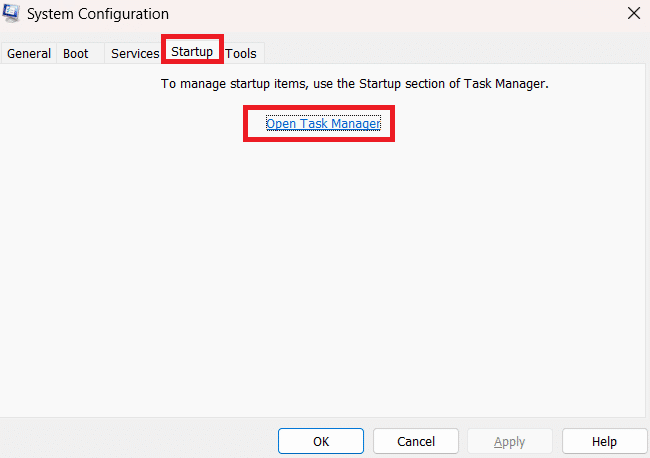
- Select each Enabled item one by one (Check the Status field for a process or app to see if it’s disabled or enabled), right-click it, and select Disable
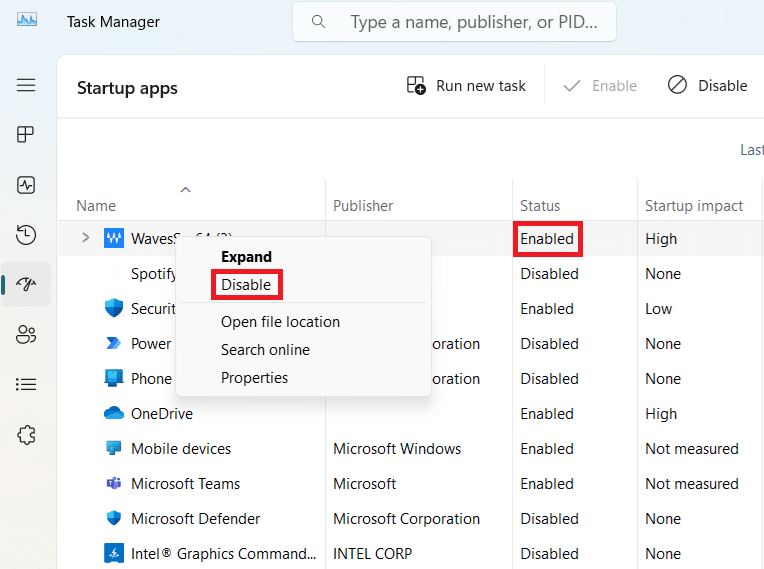
- Keep track of all items you’ve disabled as you’ll require this information later
- Close the Task Manager window
- Click OK in the Startup tab
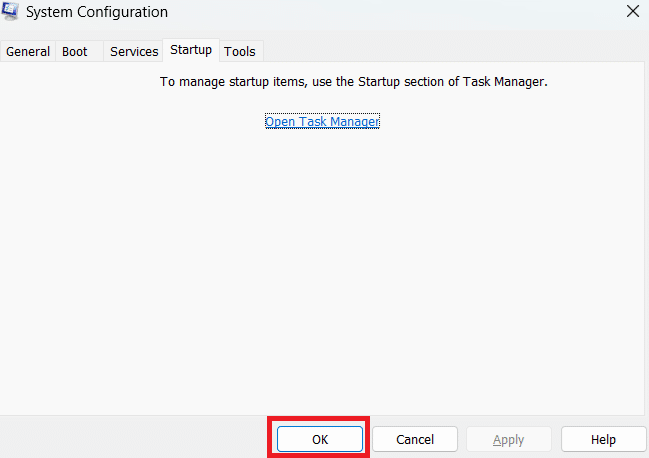
- Restart your computer
If the issue was caused by a newly installed service, driver, or software, it will likely be resolved. In which case, enable the first software or service that you disabled and restart Windows and check if the error reappears. If it doesn’t, enable the next item and restart Windows. Do this for all other items until you find the service or software that’s causing the problem.
Solution 5 – Reduce overheating
Overheating is one of the most common reasons for computer crashes. When the computer’s internal temperatures becomes too high, sluggish performance, unexpected shutdowns, crashes, or slowdowns occur. Tell-tale signs of PC overheating are increased fan noise, sluggish performance, and frequent restarts. If not fixed, overheating can even lead to hardware damage.
So, why does your PC become overheated?
Well, this could happen due to many reasons, but the most common ones are:
- Dust build-up – Dust can clog the fans, heat sinks, and vents, reducing the airflow and your system’s capacity to cool down.
- Running too many programs – When multiple applications are active at the same time, the processor has to work harder. As a result, it generates more heat than the system’s cooling system can handle, leading to an increased internal temperature.
- Outdated software – Outdated software may fail to optimize hardware usage effectively. This, in turn, forces the CPU to work harder and causes overheating.
To fix the overheating issue, try the following solutions:
- Close unnecessary programs
- Make sure software is up-to-date
- Clean the computer’s air vents, which are typically located on the bottom or sides. To clean the air vents, first shut down the computer, use compressed air to clean dust, let the system cool down for about 10 minutes, and then restart it.
Solution 6 – Update graphics card driver
Sometimes the Windows keep crashing is caused by outdated graphics card driver. Upgrading the graphics driver can fix the problem.
You can update a device driver manually. Or you can do it automatically using a reliable driver update software. Most users prefer the second option, as it is not only faster but also doesn’t require any technical knowledge.
We recommend you give Driver Updater a try. It is one of the best driver update software out there and can update your graphics card (and other device drivers) in a jiffy with just a few mouse clicks. You can find more information about Driver Updater and its download link at the bottom of the post.
However, if you would rather take matters in your hand, here’s how to update the graphics card driver manually:
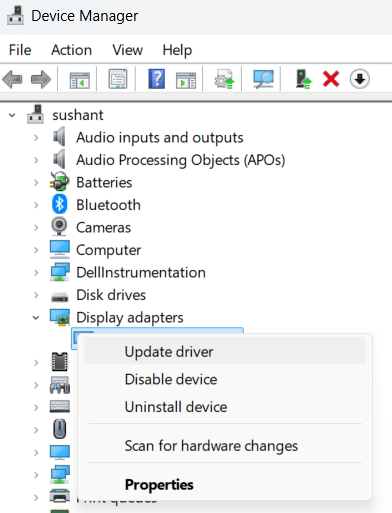
- Press Win + R to open the Run dialog box
- Type devmgmt.msc and hit Enter
- In the Device Manager window, locate and expand Display adapters
- Right-click your graphics card and select Update driver
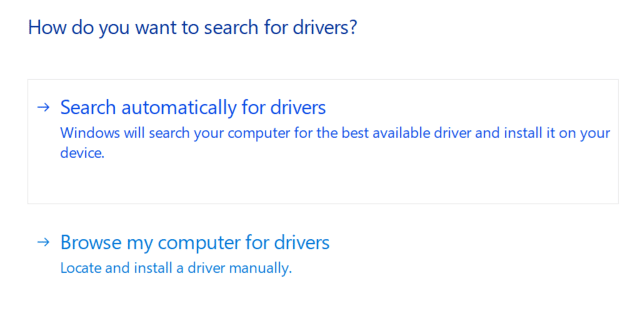
- In the next window, select the first option “Search automatically for updated driver software”. Windows will now search the system for the latest driver. If it finds one, it will install the updated driver. If it doesn’t find an updated version, you’ll receive a message stating the current driver is up to date
- Select Close to close the Update drivers window
If Windows fail to locate the latest driver, it might be worth checking the manufacturer website if a new driver update is available. To do so, open a web browser, go to the manufacturer’s website, locate Support and Driver section, and search for the latest driver for your graphics card model. If you find a new driver version, download it and then install it by double-clicking the .exe file.
Solution 7 – Reset your computer to factory settings
If nothing has worked for you, as a last resort reset the computer to its factory settings. But before you do that, make sure you back up all important data.
You can back up important data to an external drive by connecting it to your computer and completing the following these steps:
- Type file explorer in search bar in the taskbar and hit Enter
- You should see the external drive in the left-side panel
- Now copy the folders and files you want to back up by pressing Ctrl + C or right-clicking them and selecting Copy
- Now paste the copied folders and files into the external drive by opening it and pressing Ctrl + V
Now that you have backed up important data, follow these steps to reset your computer to factory settings.
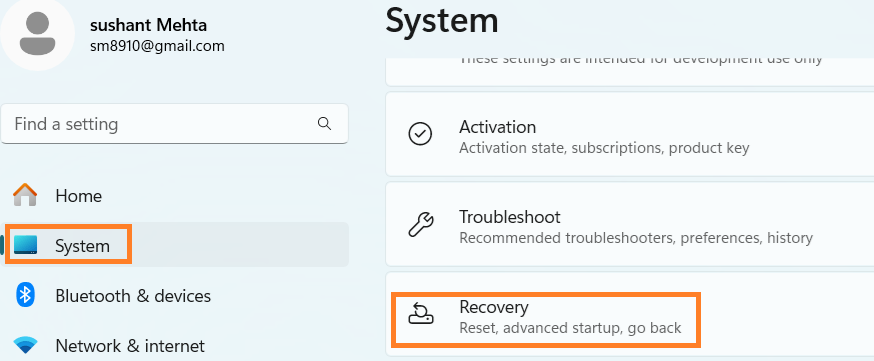
- Type settings in the search bar in the taskbar and press Enter
- Click System > Recovery
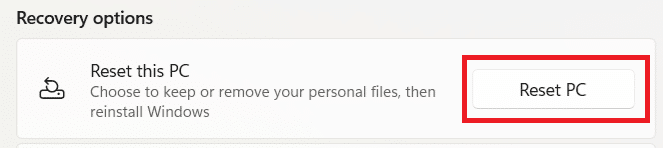
- Click the Reset PC button under the Recovery Options section
- Select the preferred option for keeping or removing files
- Wait for the computer to restart and reset
How to update graphics card (and other device drivers) automatically?
Updating device drivers on a regular basis helps prevent various issues and errors and ensure your computer performs optimally. As said before, the easiest (and the best) way to update device drivers is by using an advanced driver update tool, such as Driver Updater.
Automatic driver update tools offer many benefits, the most important ones being:
- You can update device drivers automatically
- The software scans and updates all outdated or missing drivers at one go
- The tool picks the right drivers for your device and operating system, so you won’t have to worry about installing an incorrect driver by mistake
- Automatic driver updates are 100% safe
Driver Updater is one of the best driver update tools out there. Outbyte Driver Updater will give you access to a database of over 1 million drivers. It will regularly scan your PC, suggesting new driver versions to install. Driver Updater contains drivers for a variety of Windows devices. With just one click, you can update drivers in your system.
Step 1
Click here to Install and launch the app
Step 2
Scan all devices
Step 3
Install or update drivers automatically
Leave a Reply