Microsoft provides regular updates and fixes to enhance performance of Windows 10 and to fix any bugs. But sometimes the updates don’t work as intended and may cause problems that include random system freeze-ups.
If you are facing problems like windows freezing randomly, we have some simple solutions for you.
You don’t need to try all these solutions. Just start with the first solution and work your way downwards till the issue is fixed.
Solution One- Update Drivers
Outdated or corrupt drivers can cause a lot of issues in Windows 10, include system freeze-ups. Therefore, before trying other troubleshooting steps, we recommend you first ensure all your device drivers are up-to-date.
The easiest way to do this is by using a reliable driver update tool.
Automatic driver update tools offer many benefits, the most important ones being:
- You can update device drivers automatically
- The software scans and updates all outdated or missing drivers at one go
- The tool picks the right drivers for your device and operating system, so you won’t have to worry about installing an incorrect driver by mistake
- Automatic driver updates are 100% safe
Driver Updater is one of the best driver update tools out there. Outbyte Driver Updater will give you access to a database of over 1 million drivers. It will regularly scan your PC, suggesting new driver versions to install. Driver Updater contains drivers for a variety of Windows devices. With just one click, you can update drivers in your system.
Step 1
Click here to Install and launch the app
Step 2
Scan all devices
Step 3
Install or update drivers automatically
Solution Two- Delete all temporary files
Over time, the volume of temporary files in Windows can grow to big volumes and this might lead to space shortage.
Windows creates temporary files every time you boot and use the computer. If there is insufficient space in C drive, your computer may freeze and become unresponsive.
In such cases, deleting temporary files is the easiest solution available. Here are steps to follow.
- Press Windows key and R on the keyboard simultaneously to bring up the Run command console
- In Run command box, type temp and click OK
- The above step will open the Window’s temp folder where you can see all temp files stored in your system
- Press Ctrl+A on the keyboard to select all files in the Temp folder and press Delete button on the keyboard
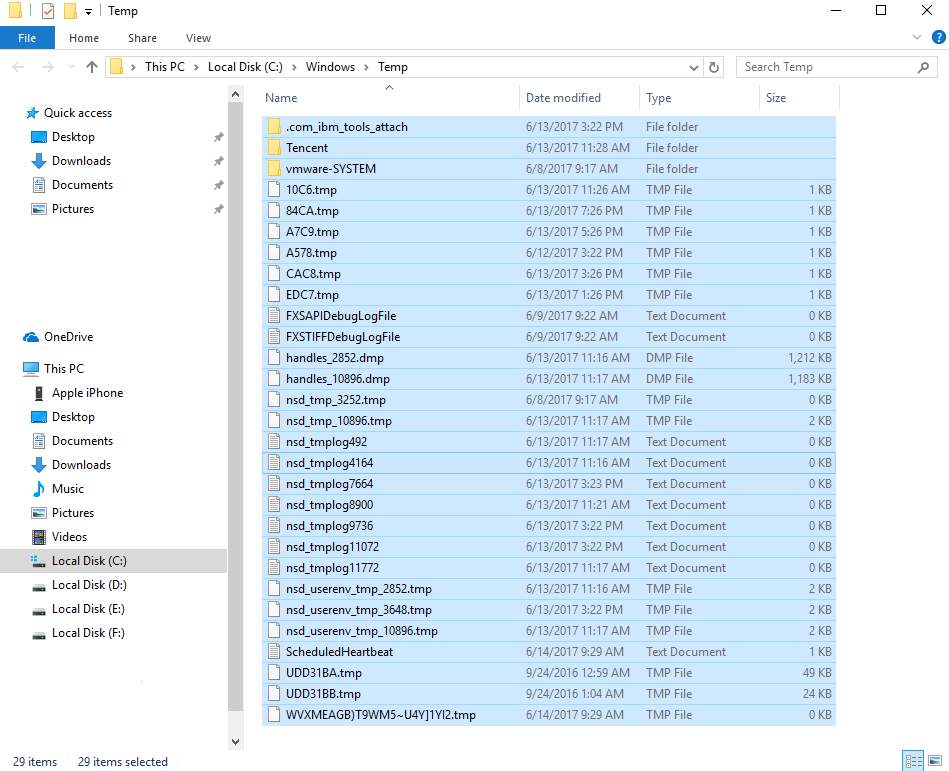
- If your computer still freezes after clearing all temp files, try the next solution.
Solution Three- Check RAM module for any faults
A faulty RAM module can be one of the reasons behind Windows OS freezing. This is because Windows need to access physical RAM to store several files during operation.
If the memory module is faulty, it creates problems in normal Windows operation that might freeze your Windows 10 system.
Windows have an inbuilt memory diagnostic tool that can check RAM module for any faults.
Here are the steps you need to perform.
- Press Windows key and R button simultaneously on the keyboard to access Run command console
- In the Run command window, type mdsched.exe
- You will get two options- 1) Restart now and check for problems (recommended) and 2) Check for problems the next time I start my computer.
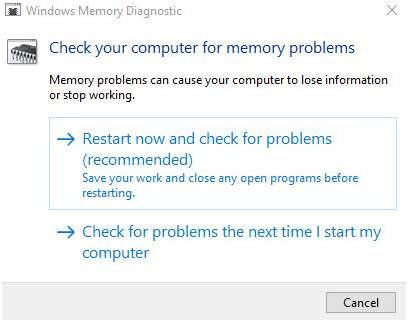
- If you want to immediately check memory, select the option one; else select the option two
- If you have selected the first option, the computer will restart and you will see Windows Memory Diagnostic tool in action checking RAM module for any faults
- If you select the second option, the Windows Memory Diagnostic tool would run when the computer reboots the next time.
- If Windows Memory Diagnostic tool finds any faults, it will report an error. If the Windows Memory Diagnostic tool completes the process without reporting any error, you can draw a conclusion the RAM modules are in perfect condition.
- Start the PC and see if the issue is resolved. If the issue still persists, try next solution.
Solution Four – Increase Virtual memory
Virtually memory refers to the capability of the Windows OS to use a combination of hardware and software to compensate for the shortage of physical memory.
If your Windows OS is running some resource-intensive tasks, it will use more virtual memory to compensate for physical memory shortages.
By default Windows sets the size of virtual memory equivalent to physical memory size. For example, if you have 2GB RAM installed, the size of the page file (virtual memory) is limited to 2GB. However, you can increase the virtual memory to some extent and, in process, increase the memory available to Windows.
Here are the steps to follow.
- Press Windows key and Pause/Break key simultaneously on the keyboard. This will open the Control Panel Home window
- On the left panel, select Advanced System settings
- Click the Advanced tab and then click Settings
- In Performance Options window, click the Advanced tab and click Change
- Ensure the option “Automatically manage paging file size for all drives” is not checked
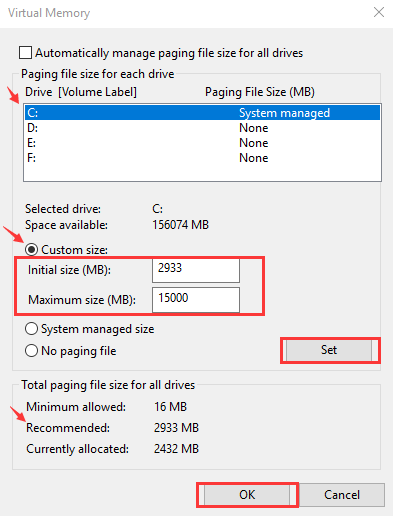
- Select drive where Windows is installed. By default, it is C drive for most Windows systems.
- Click Custom size and enter the initial size and maximum size for the virtual memory
- Initial size – If you are unable to decide the right value for initial size, you can enter the recommended value
- Maximum size- It varies from computer to computer and mainly depends on the size of Physical RAM installed. Microsoft recommends maximum size anything between 1.5 times to 3 times of the physical RAM size installed. If you have 2GB RAM(2048 MB) installed, the recommended maximum size can be 2048×1.5 = 3072 MB
- Once you have entered an initial and maximum size for virtual memory, click Set and then click OK
- If your Windows 10 system still freezes, try next solution
Solution Five- Check Hard disks for errors
If you have ensured there is no problem with RAM modules and the computer has enough virtual memory and still Windows 10 freeze-ups occur frequently, you should check the hard disk.
Windows had an inbuilt tool to check and resolve hard disk errors. Here are the steps to follow.
- Close all files and programs
- Go to Desktop and double- click This PC icon else Click Start-> File Explorer -> This PC
- Right-click the hard drive partition you would like to check and select Properties
- Go to Tools tab and click Check
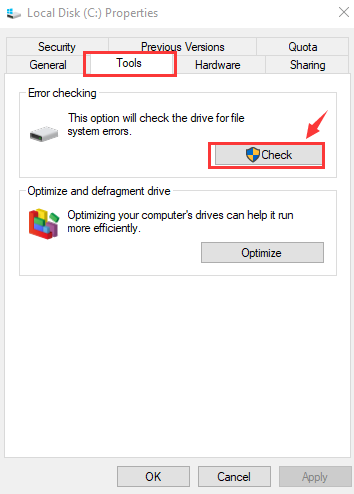
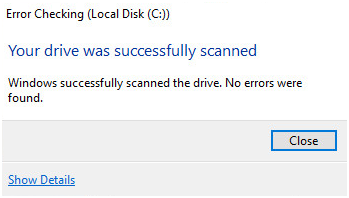
The Windows OS will check hard drive for any errors and fix them. If the end result of checking hard disk is like the one shown below, you can draw a conclusion that the hard disk is in good condition and not the cause for Windows freezing.
Solution Six-Run SFC (System File Checker)
Missing or corrupt system files can be the reason behind Windows freezing. However, there is nothing to worry about as Microsoft has provided an easy-to-use tool known as SFC which can fix such problems.
The System File Checker tool checks the integrity of system files and uses the cached versions or restores original files to replace corrupt and missing files.
Here are the steps to use SFC.
- Press Windows + R key simultaneously on the keyboard to bring up Run command console on the screen
- In the Run command box, type cmd
- Right-click command prompt from the list of results and select Run as administrator
- In the User Account control pop-up, click Yes
- In the command prompt window, type sfc /scannow and hit Enter
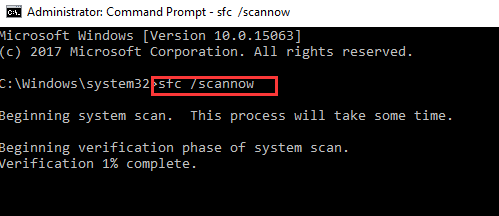
Windows will scan for corrupted files and restore the right versions of the file. If it does not find any corrupt files, the SFC completes the whole process of scanning for corrupt files without reporting any errors. In the latter case, you can safely draw a conclusion that system files are in good condition and you might need to try the last solution in the list.
Solution Seven- Disable C-State in BIOS
In order to make processors and motherboard green and eco-friendly, manufacturing companies use different technologies to reduce power consumption. The C-State refers to a procedure where the CPU enters low power mode when idle.
Though these technologies do a commendable job of saving power, they may also cause performance problems. There is a possibility that C-state might be the cause behind Windows freezing randomly.
(Note: The C-state discussed here is an Intel Power saving technology used to reduce power consumption in Intel CPUs. AMD CPUs have a C1E power management state that works on similar lines. You need to check which processor is fitted in your device and see the steps to disable power saving feature in BIOS)
The steps given here are applicable to devices that use Intel CPUs. Here are the steps to disable C-State in BIOS.
- Restart PC and press F2 key to enter BIOS setup. (the key to enter BIOS differ with BIOS manufacturers and it is listed on the logo screen that you see when PC starts)
- Once you are inside the BIOS setup, go to the Advanced Configuration tab
- Select CPU configuration using the up and down arrow keys
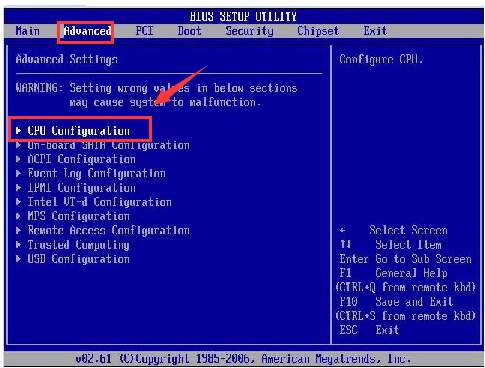
- Once the CPU configuration is highlighted, hit enter
- Look for C1E and Intel® C-State tech and disable these options using the navigation keys
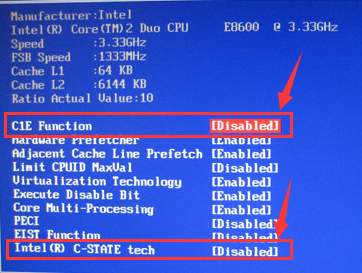
- Now, save and exit settings in BIOS
- Restart your computer
In most cases, you should see the Windows freezing problem is resolved and you can use your computer without worrying about system becoming not responsive.

Leave a Reply