The file explorer in Windows 10 is far from perfect. Many users have complained of experiencing problems with Windows 10 file explorer. The most common issue is “Windows 10 file explorer crashes”.
What happens is that the File Explorer as well as taskbar closes the moment you open any folder, and then reopens after a gap of just few seconds.
To fix the issue, Microsoft has released several updates, but more than a few users have still reported the problem.
If the “Windows 10 file explorer crashes” issue is troubling you as well, we recommend you try these workarounds. They have worked for many people and there’s no reason why they will not help you solve this issue.
Other problems with Windows Explorer or File Explorer
Before we look at the solutions to the “Windows 10 file crashes” problem, let’s check out other issues that are similar to it. It is possible that you might not be experiencing the “Windows 10 file crashes” problem but one of these issues.
The solutions listed in this post work just as well for these similar issues as for the “Windows 10 file crashes” issue.
So here are other problems similar in nature to the above problem.
- File Explorer Hangs – Frequent slowdowns is another problem with File Explorer reported by users. Many users say that often frequent File Explorer slowdowns precede crashes.
- File Explorer Crashes Upon Right-Click – This is simply a variation of the listed problem. What happens is when you right-click something, File Explorer crashes. More often than not, third-party apps cause this issue. That said, steps listed in this post will help you fix this issue.
- File Explorer Quick Access Crashes – So in this case File Explorer crashes occur when you use the Quick Access feature.
- File Explorer Frequently Closes – At times the File Explorer closes unexpectedly. Many users have stated that closing of the File Explorer app at random intervals can be a huge problem.
- File Explorer not working, not responding – Sometimes File Explorer abruptly stops working or responding. In such cases, the only solution is to close File Explorer by force.
- Windows 10 File Explorer Crash Loop – Compared to many others in this list, this problem is more serious. What happens is that File Explorer crashes constantly. At times, Explorer goes in a crash loop, completely preventing you from using it.
- Windows 10 Explorer Takes a Long Time to Open – Another common problem is File Explorer taking a very long time to open. Users state this is a serious issue.
- File Explorer Won’t Open – In the previous issue, Explorer opens but only after a long time. But in this case, File Explorer doesn’t open at all. As you can guess, this is a big problem. However, the fixes given here can solve this issue. So try them if you’re facing this problem.
- Windows 10 Explorer Opens and Closes Immediately – Some users have reported that in their case the file explorer opens but only to close immediately. Because of this, they are unable to use the app.
Solution to the Windows 10 File Explorer Crashes Problem
Here are some solutions to this problem. You can start with the first solution and move your way down until the issue is resolved.
Solution 1 – Run netsh and winsock reset
Here are the steps to follow.
- Click the Windows icon in the taskbar and then type cmd in the start search box
- Under Best match right-click Command Prompt and then select Run as administrator
- This will open Command Prompt. Type netsh and then press Enter
- Now type winsock and then press Enter
If you want, instead of running these commands separately, you can run them in a single command netsh winsock reset
Solution 2 – Change File Explorer Options
Here are the steps to follow.
- Press Win Key + S, type folder options, and then click File Explorer Options
- Click the View tab
- Check the box before Launch folder windows in a separate process
- Click the Ok button
Solution 3 – Take Full Permission to Access folder content
Here are the steps to follow.
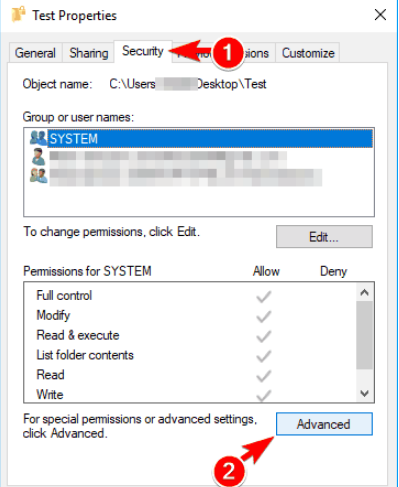
- Open File Explorer. Now right-click the folder in which files are located, and then click Properties
- Click the Security tab and then select the Advanced tab
- In the Advanced Security window, click Change
- A new window will open. Click Advanced
- In case you are aware of the username which you wish to add, just type the username in the ‘Enter the object name to select’ field
- In case you click Advanced, you will have a new window open on your screen. Click Find Now. You will now be able to all users and groups
- From the list, choose the name you want to add. Click OK
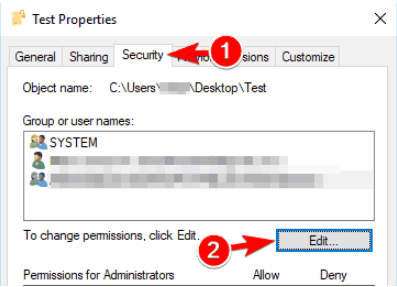
- Give complete access to the selected file folder for your account. You can do so by right-clicking the folder, then clicking Properties, then Security and then Edit
- In Allow column, set permission as Full control. Now click Apply and then click OK
You should perform this action as at times Windows 10 installer fails to manage the file permissions properly.
Solution 4 – Clear File Explorer History
Some users have claimed that they were able to resolve the issue by cleaning File Explorer history. Therefore we believe this step is worth a try, more so because it doesn’t take much time.
Here are the steps to follow.
- Press Win Key + S, type folder options, and then click File Explorer Options
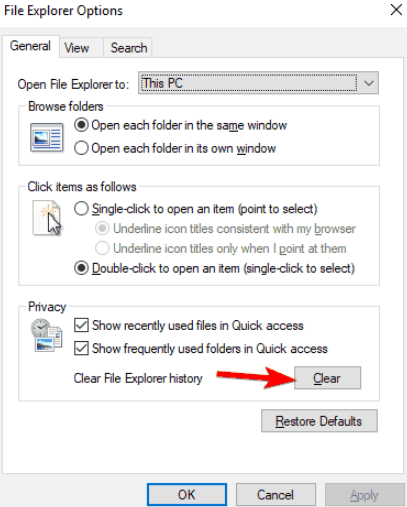
- In the File Explorer Options window, click the Clear button (located in the General tab under Privacy)
If this issue is being caused by File Explorer history, this step will resolve it. However, this is at best a temporary solution. In case the problem reappears, again clean the file history.
Solution 5 – Change text size
Some users claim that in their case the File Explorer was crashing because of incorrect font size. Users can adjust font size as per their preferences. However, at times some specific values can lead to problems with File Explorer.
Here are the steps to follow to fix the problem.
- Press Win Key + I
- This will open Settings app
- Browse to System
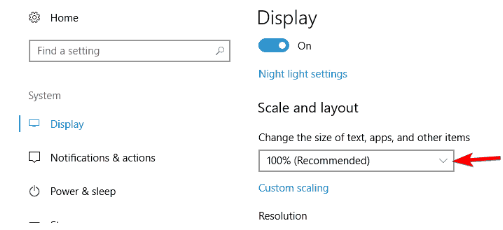
- On the right-hand side, you will see Scale and Layout. Using the drop-down menu here, set font size to 100%. If you wish, you can set it to 200%.
Now check if the issue is resolved. If not, move on to the next solution.
Solution 6 – Install New Windows Updates
Microsoft regularly releases updates for Windows to improve its functionality, boost security, and fix existing bugs and problems.
That’s why you might be able to resolve this issue if you install the newest updates. By default Windows downloads new updates on its own. Windows Update works in the background and downloads and installs new updates.
That said, it is possible an important update wasn’t downloaded. Therefore, check manually for new updates. If any update wasn’t downloaded, do it and see if the issue is resolved.
Here are the steps to follow.
- Click the windows icon in the taskbar, type windows update in the start search box and then press Enter
- Click the check for updates button
- Now Windows will check if there are any updates available. In case, updates are available, you need to just reboot Windows. Upon reboot, Windows will automatically latest updates
In case the issue still exists, move on to the next step.
Solution 7 – Tweak Settings in the Quick Access Section
There’s a Quick Access section in File Explorer. It allows users to access recent folders and files quickly.
However, at times, for reasons unknown, File Explorer can crash because of Quick Access. An effective workaround is to change the settings of Quick Access in such a way that recently-opened folders and files don’t appear in the Quick Access.
Here are the steps to follow.
- Press Win Key + S, type folder options, and then click File Explorer Options
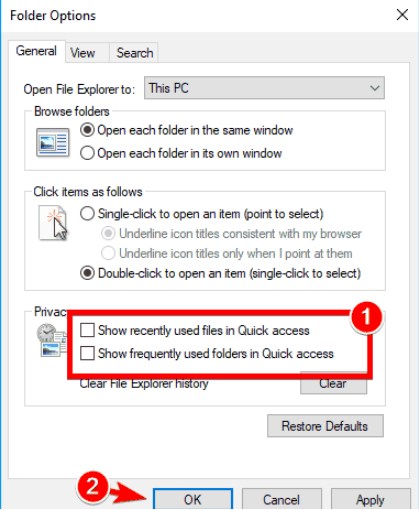
- Go to the Privacy section. Here disable Show recently used files in Quick access
- Next you need to disable Show frequently used folders in Quick access
- Click Apply
- Finally click OK
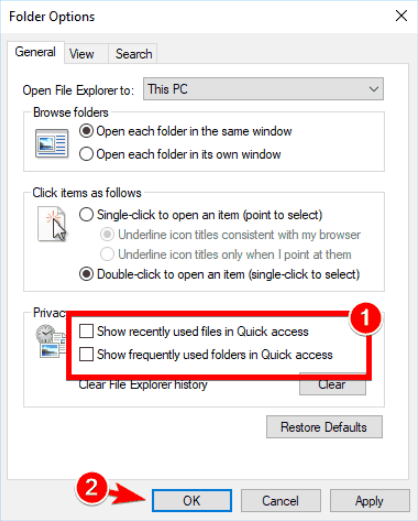
Now recently-used folders and files will no longer feature in the Quick access section. So the issue should be fixed. More than a few users have said that it is better to clear the File Explorer history once this step is complete. We recommend you do that as well.
Solution 8 – Change File Explorer settings
File Explorer, by default, is set to open the Quick Access. However, users have stated that the latter can cause File Explorer to crash.
One way of circumventing this issue is by changing the settings of File Explorer to open This PC in place of the default Quick Access.
Here are the steps to follow.
- Press Win Key + S, type folder options, and then click File Explorer Options
- In the General tab, use the drop-down menu next to Open File Explorer to This PC
- Click the Apply button and then click OK
Solution 9 – Disable preview handlers and preview pane
It has been reported that preview pane can cause File Explorer to crash. Disable preview handlers and preview pane and check if this helps fix the problem.
- In the File Explorer open any directory
- Click View
- Ensure Preview Pane is unselected
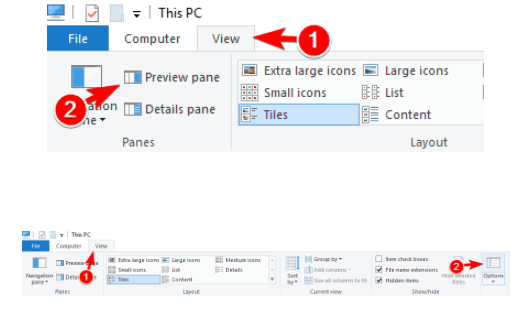
- Click View again and then click Options
- So now you will see Folder Options. Here click View and deselect Show preview handlers in preview pane
- Click the Apply button
- Click OK
Solution 10 – Reinstall the graphics driver
One of the reasons for crashing of File Explorer is graphics card driver. You can fix the problem by reinstalling the graphics driver.
You can reinstall graphics driver manually or automatically. The second option is better because it removes the risk of downloading a wrong driver by mistake.
However, we’ve listed both options.
Reinstall Graphics Driver Manually
Here are the steps to follow.
- Press Win key + R to open the Run dialog box
- Type msc and then press Enter to open the Device Manager window
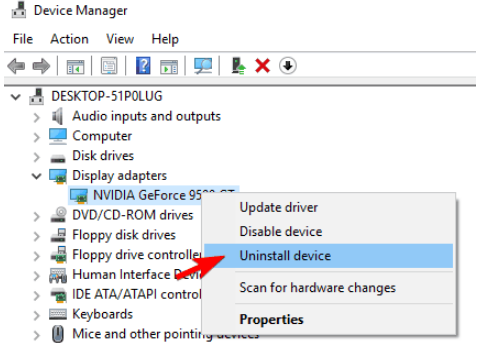
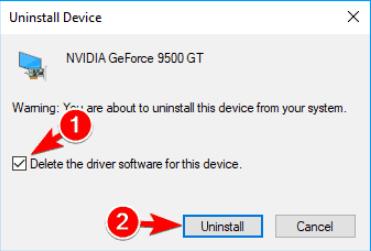
- Here browse to your graphics card. Right-click it and then select Uninstall device
- In the Uninstall Device box, check the box before Delete the driver software for this device
- Now click the Uninstall button
Windows will now uninstall the current graphics card driver. Now visit the official website of your graphics card’s manufacturer, and look for the latest driver. Before downloading the driver, ensure it is compatible with your Windows operating system.
Once you’ve downloaded the latest driver, double-click the executable file to install it. Restart Windows so that changes can take effect.
Update Graphics Driver Automatically
In case you’re worried about installing a wrong driver, which is a genuine worry, you should use a driver update tool. Installing a wrong driver can make your PC unstable and cause a host of other problems.
Automatic driver update tools offer many benefits, the most important ones being:
- You can update device drivers automatically
- The software scans and updates all outdated or missing drivers at one go
- The tool picks the right drivers for your device and operating system, so you won’t have to worry about installing an incorrect driver by mistake
- Automatic driver updates are 100% safe
Driver Updater is one of the best driver update tools out there. Outbyte Driver Updater will give you access to a database of over 1 million drivers. It will regularly scan your PC, suggesting new driver versions to install. Driver Updater contains drivers for a variety of Windows devices. With just one click, you can update drivers in your system.
Step 1
Click here to Install and launch the app
Step 2
Scan all devices
Step 3
Install or update drivers automatically
Solution 11 – Temporarily Disable Antivirus Program
It is important that you use a reliable antivirus software tool. Such a tool will keep your PC protected from hackers and other sorts of online threats. However, at times, an antivirus tool might interfere with other programs.
Some users have reported that their antivirus programs were causing File Explorer crashes. That’s why we recommend that you temporarily disable your antivirus tool to check if it is behind this issue.
We’ve given steps to temporarily disable Avast protection tool. If you’ve another antivirus, steps might vary. Check the help manual, if you have one, or browse the net to find the steps to follow to disable your antivirus tool.
- Right-click the Avast icon in the Windows system tray
- Highlight Avast Shield Control
- Select the duration for which you want to disable Avast antivirus program
In case the File Explorer starts working fine after you disable your antivirus tool, it means the latter is the cause of File Explorer crash. Contact your antivirus manufacturer for a solution or switch to another antivirus protection tool.
Solution 12 – Run a virus scan
You can also get the File Explorer is crashing issue if your PC is infected with virus or spyware. To rule out this possibility, we recommend you run a boot scan.
Remember a boot scan can take up to a couple of hours, maybe even more. Therefore, run it when you can comfortably stay away from your laptop or desktop pc for such a long time period.
Solution 13 – Disable trouble-causing context menu items
Another reason for this issue could be some specific context menu items. What happens typically is that 3rd party apps add their own features in your context menu and these additional features, in turn, cause the File Explorer to work erratically.
You can fix this issue by using ShellExView feature. A freeware tool, ShellExView allows users to disable trouble-causing context menu items.
Here are the steps to follow.
- Download ShellExView from the Internet. As this is a portable software application, users don’t need to install it to run it
- Now once ShellExView starts, you should click Options. Next pick Filter by Extension Type
- Click Context menu
- And then click OK
- Browse through the list and find a 3rd party application which you wish to disable. Then right click this 3rd party application and click Disabled Selected Items. If you need, you can select more than one items simultaneously
- You will get a message to confirm your action. Click the Yes button
- Once you’ve disabled the necessary applications, click Options and then click Restart Explorer
- Again a confirmation message flashes on your screen. Click the Yes button
After File Explorer restarts, you will notice that these disabled apps will no longer show up in the context menu. The issue should be fixed.
Users have reported that these items have caused the File Explorer Crashes problem on their PCs. That’s why ensure you disable them.
- AVG Antivirus
- WinRAR
- SpyBoy Search And Destroy Shell Extension
- Format Factory
- Carbonite Context Menu
- ConvertToPdf Class by Foxit Software
- Nvidia’s OpenGLshExt Class
If the problem persists even after finishing this action, we recommend you try the last solution in the list.
Solution 14 – Do Away With IDT Audio
There are several PC manufacturers who use IDT Audio. Examples include, among others, HP and Dell. Typically, IDT Audio comes preinstalled. Some users have complained that this application caused problems with File Explorer.
The resolution in this case is to uninstall IDT Audio. Here are the steps to do this.
- Press Win Key + I. This will open Settings app
- Click Apps to open the Apps section
- Here every installed app will appear. Choose IDT Audio. Next click Remove
- Once you’ve done that, all you need to do is follow on-screen instructions to uninstall this application
You can also uninstall this application without using Settings app by using control panel. Here are the steps to follow.
- Open Control Panel
- Click Programs and Features
- Here you’ll see all the programs installed on your computer. Browse to IDT Audio. Then double-click it.
- Just follow onscreen instructions to uninstall it.
Some users have reported that they were able to solve the File Explorer Crashes issue without uninstalling IDT audio. This they were able to changing the name of IDT audio Control Panel applet. If you wish, you can give this method a try before uninstalling IDT audio.
Here are the steps to follow.
- Click the Windows icon in the taskbar and then type run
- Next type cmd in the Run box and then press Enter
- In Command Prompt, enter the following command: ren IDTNC64.CPL IDTNC64.CPL.old
- After you’ve entered this command, press Enter
The issue should be resolved now.


Leave a Reply