Sometimes your PC is connected to Wi-Fi but you cannot surf the Internet. This problem has been reported by many Windows 10 users and we have provided solutions that could fix the issue. There are two different scenarios for such Internet connectivity problem.
- None of the devices connected to Wi-Fi can surf the Internet
- All devices except PC can surf the Internet
Now let’s look at the solutions for each scenario.
Case 1 – None of the devices connected to Wi-Fi can surf the Internet
If something of this kind happens, the problem lies in the Internet connection and the networking devices. To resolve the issue you should perform troubleshooting steps to fix the problem in networking devices like modem and router. Here are the steps to follow.
Solution– Restart Modem and Router
- Switch off the modem and router
- Unplug the power chord of both devices from the electrical socket
- Wait for some time
- Plug-in the power chord back of the modem first in the electrical socket.
- Wait for the lights on the modem to stabilize
- Now, Plug-in the power chord back of the router
- Wait for some time until the Internet connection light starts blinking on the router
- Connect your PC or other devices to the Wi-Fi network and see if you can surf the Internet
If you are still not able to surf the Internet you need to contact your ISP and inform about the problem.
Case 2 – All devices except PC can surf the Internet
Since other devices can access websites and your PC can’t, you can draw a conclusion the problem lies in your PC. Here are some solutions that could fix the issue.
Solution One – Delete Temporary files
- Press Windows logo key and X simultaneously on the keyboard to access the Context Menu(black)
- Select File Explorer from the list
- In the File Explorer address bar, type C:\Windows\temp and hit enter on the keyboard

- If you are prompted for administrator permission to access the folder, click Continue

- When the Temp folder opens, press Ctrl+A on the keyboard to select all contents in the folder
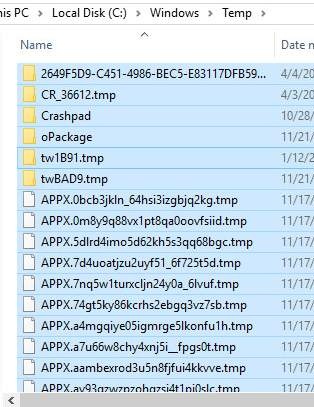
- Press the Delete button on the keyboard
- Now connect your PC to Wi-Fi and see if you can surf the Internet.
If the problem is not resolved, move to next solution.
Solution Two- Change DNS settings
DNS settings play an important role in your ability to surf the Internet. The computer and the servers don’t understand the website name you type in the address bar. The DNS server converts the websites names into IP addresses which are then used to find and load the website in your browser.
If there is some problem with DNS settings, you might not be able to surf the Internet. A simple solution to this problem is – Change DNS settings. Here are the steps to follow.
- Go to Desktop
- right-click on the Wi-Fi icon or network icon that appears on the bottom right-corner of the task bar

- Select Networking and Sharing Center
- In the Networking and Sharing Center window, select Change adapter settings in the left pane
- In the next window, right-click on your Wi-Fi connection
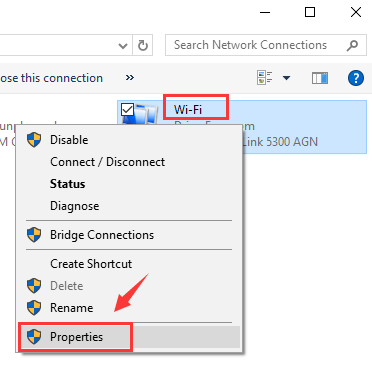
- Select Properties
- In the Wireless Network connection properties window, select Internet Protocol Version 4(IPv4)
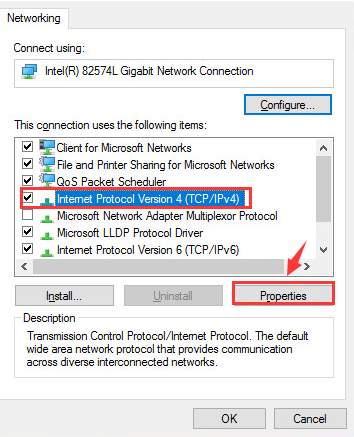
- click Properties
- In the Internet Protocol Version 4(IPv4) properties window, go to the General tab
- Click the option Obtain an IP address automatically
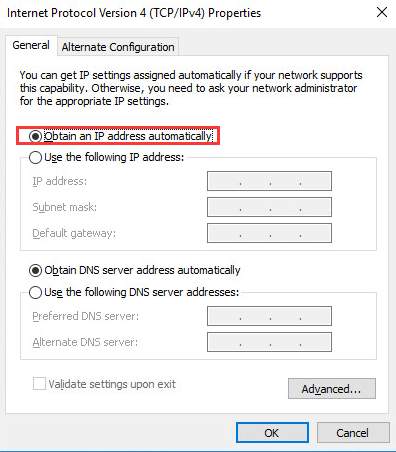
- Next click the option Obtain DNS server addresses automatically
- Click Ok
See if you are able to surf the Internet.
- Go to Internet Protocol Version 4(IPv4) properties window, go to the General tab
- Now click the option Use the following DNS server addresses
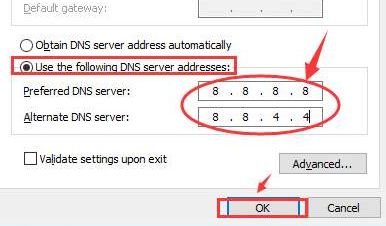
- Enter the following DNS server addresses
- Preferred DNS server: 8. 8. 8. 8
- Alternate DNS server: 8. 8. 4. 4
- After you have entered DNS server addresses, click Ok
- close all windows
Launch the browser and try to visit any website to see if the problem has been resolved. If you still can’t surf the Internet, move to next solution.
Solution Three- Run Networking commands
You cannot ignore the possibility of some networking problem that might be the cause of this issue. Windows offers several networking commands that resolve various network related problems. You need to execute these commands through an elevated command prompt window. Here are the steps to follow.
- Click Start and type cmd in Cortana search box
- right-click on command prompt from the list of results and select Run as administrator
- In the command prompt, type following commands one after another. Press Enter on the keyboard after typing each command. Wait for the command operation to complete before typing next command in the line
- ipconfig/flushdns
- nbtstat –R
- nbtstat –RR
- netsh int ip reset c:\resetlog.txt
- netsh winsock reset
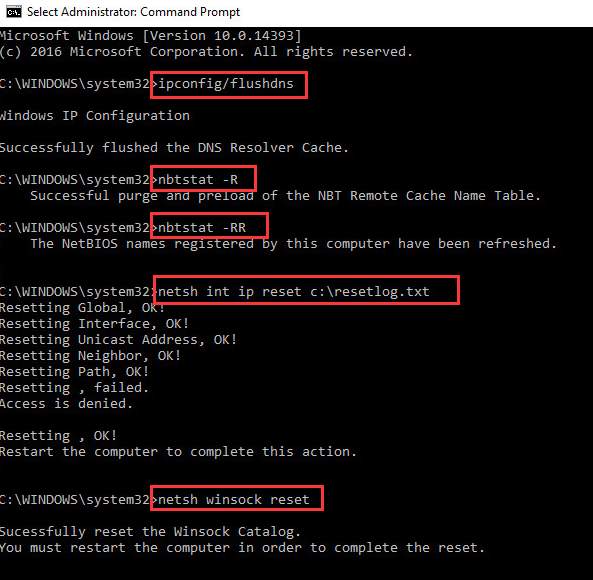
- After all, commands are successfully executed, close command prompt window
- Reboot the computer to let changes take effect
After rebooting the computer, perform steps given below
- right-click on the Wi-Fi icon or network icon that appears on the bottom right-corner of the task bar
- Select Networking and Sharing Center
- In the Networking and Sharing Center window, select Change adapter settings in the left pane
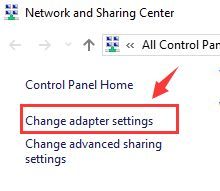
- In the next window, right-click on your Wi-Fi connection
- Select Disable
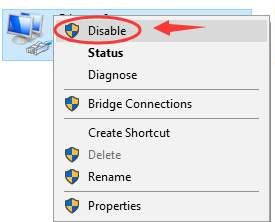
- Wait for some time
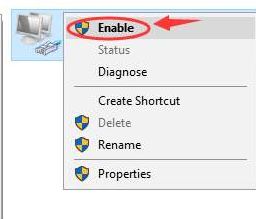
- Again right-click on your Wi-Fi connection
- Select Enable
Try to open a website to check whether the problem has been resolved. If the problem persists, move to next solution.
Solution Four – Update Drivers
You can get this error if your drivers are outdated or corrupt. Updating your network drivers can help you fix the issue.
You can update drivers manually, but this approach is not only time-consuming but also less than perfect. Therefore, we recommend you to use a driver update software program.
Automatic driver update tools offer many benefits, the most important ones being:
- You can update device drivers automatically
- The software scans and updates all outdated or missing drivers at one go
- The tool picks the right drivers for your device and operating system, so you won’t have to worry about installing an incorrect driver by mistake
- Automatic driver updates are 100% safe
Driver Updater is one of the best driver update tools out there. Outbyte Driver Updater will give you access to a database of over 1 million drivers. It will regularly scan your PC, suggesting new driver versions to install. Driver Updater contains drivers for a variety of Windows devices. With just one click, you can update drivers in your system.
Step 1
Click here to Install and launch the app
Step 2
Scan all devices
Step 3
Install or update drivers automatically
Solution Five- Make changes to McAfee settings
This solution is given specifically for McAfee users. If you have anti-virus software installed, do not perform steps in the solution. Many McAfee users have complained of inability to connect to the Internet after installing/upgrading McAfee security suite in their computer. Here are the steps you need to follow to resolve the issue.
Step One
- Double-click M shield icon in the system tray(bottom right corner of the task bar)
- Click Web and Email Protection.
- Click Firewall link.
- In the Firewall options window, make sure the Firewall is On.
- Click Program Permissions drawer.
- Scroll through the list and make note of any program rules or exception you may have created, especially block rules.
- Allow outbound access to any application that needs network connectivity
- You need to specifically allow programs like
- exe- Internet Explorer
- exe- Google Chrome
- exe- Microsoft Edge browser (This is a Windows 10 default browser.)
- exe- Mozilla Firefox
- exe- Printer Spooler Subsystem (This allows you to print to a network printer.)
- exe- Microsoft Outlook (This is an email client.)
- exe- Microsoft Outlook Express (This is an email client.)
(Note- none of the applications above should appear in the blocked list)
Step Two
- Click Restore defaults
- After you have clicked Restore defaults, the Security Center might prompt for an application or network permissions. Click Confirm or Yes when prompted.
Try opening a website to check whether you are able to surf the Web. If the problem remains unresolved, follow the steps given below
Step Three
- Double-click M shield icon in the system tray(bottom right corner of the task bar)
- Click Web and Email Protection.
- Click Firewall link.
- In the Firewall options window, click Turn Off button.
- the security status will change from green to red, don’t panic. this is normal.
Try opening a website to check whether you are able to surf the Web. If the problem is resolved the cause of the issue is the McAfee security program. In that case, you can uninstall the McAfee program and install another good anti-virus program. You can also contact McAfee customer service or tech support and explain the problem and seek a solution.

Leave a Reply