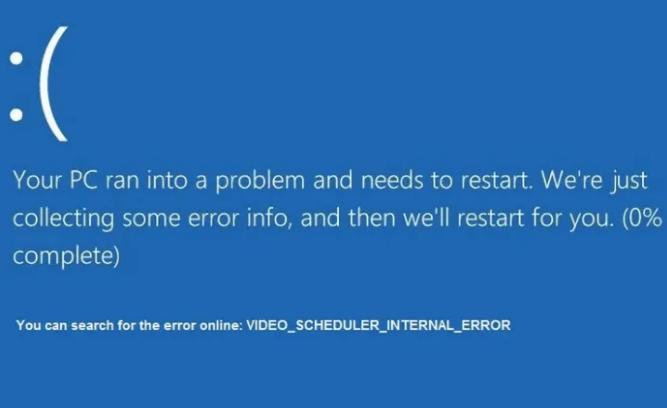
When you are working on an important project, the last thing you want is a Blue Screen of Death error. BSODs errors are not only frustrating but also hamper productivity. Many Windows 10 users have complained of Video Scheduler Internal Error BSOD that shuts their system abruptly.
If you are getting this error, keep your worries aside. Here we have presented a few easy-to-follow solutions that can resolve the Video Scheduler Internal Error BSOD error in Windows 10.
What is Video Scheduler Internal Error?
As mentioned earlier, Video Scheduler Internal Error is a BSOD error when Windows detects a fatal violation error. Its big check value is 0x00000119. As the name suggests, the error is mostly related to the graphic card and its drivers. However, you cannot rule out the possibilities of other causes behind this error.
Other reasons behind this error could be old, outdated drivers or corrupt system files, or bad sectors on the hard disk. There is also a possibility that some malware infection might be causing the error. Many times newly installed hardware and software are not compatible with Windows OS and this could result in a fatal error in the form of Video Scheduler Internal BSOD Error.
The solutions shared in the post focus on each of these issues. Since finding out the exact reason behind the Video Scheduler Internal Error is difficult (if not almost impossible), you should start with the first solution in the list and then move on to the next one and so on until the issue gets fixed.
Solution One – Run an anti-virus scan
To eliminate the possibility of malware, you need to run an anti-virus scan on your system. If you have a 3rd party antivirus, refer to its documentation and learn how to run an anti-virus scan. If you are using a built-in Windows Defender to protect your system, follow the steps given below.
- Go to the Start menu and type Windows Defender
- In the list of search results, double-click Windows Defender to launch the anti-virus
- In the Windows Defender window, click Virus & threat protection.
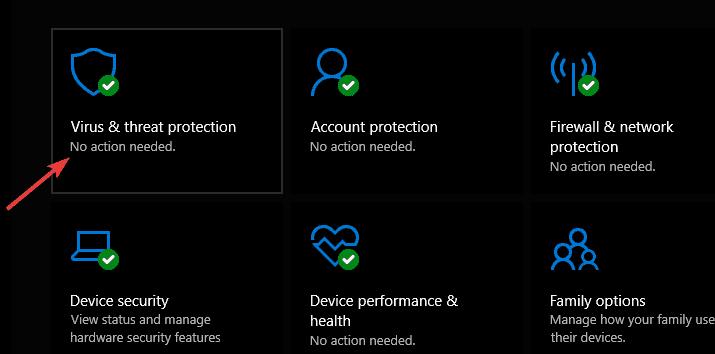
- In the new window that pops up, click the Advanced scan option
- Check the Full Scan option to launch a full system scan
Wait for the scan to complete. Use your Windows normally and see whether you encounter Video Scheduler Internal Error after running a full system scan.
If the error persists, move on to the next solution.
Solution Two – Check your system drive
With the threat of viruses out of the way, it’s time to check your hard drive or SSD for corruption. Here are the steps to follow.
- Click Windows key and type cmd., but don’t press Enter.
- Right-click cmd in the search results and select Run as administrator
- Windows will show a User Account Control pop that asks you whether you want the app to make system changes. Click Yes
- Type the following command and press Enter
- chkdsk /f /r
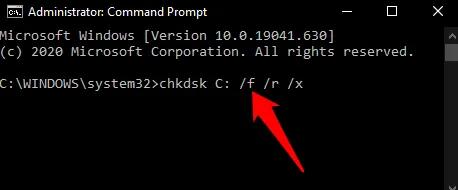
- Windows will show a message that says it cannot run check disk as files are in use. It will also ask you whether you want to run chkdsk at the next OS restart. Click Yes.
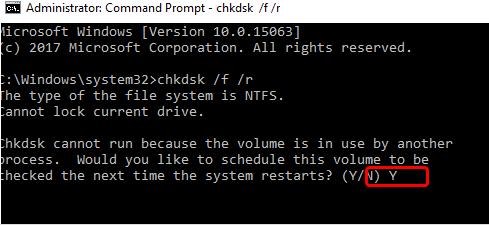
- Close all windows and restart your computer
- After Windows restarts, it will inform you a check disk has been scheduled. It will give you an option to abandon the check disk scan and proceed with booting. Don’t press any key until Windows starts Check Disk.
- Wait for Check Disk to complete
Windows will fix any errors it finds and boot. Use the computer like you normally do. If you encounter Video Scheduler Internal Error after running the check disk scan, move to the next solution.
Solution Three – Run SFC scan
As mentioned earlier, corrupt system files could be the reason behind Video Scheduler Internal error. Windows 10 comes with an in-built maintenance tool (SFC) that can fix the corruption of system files. SFC is an acronym for System File Checker. The SFC scan checks the integrity of the system files and replaces the corrupt files with good cached versions.
Here are the steps to run an SFC scan.
- Click Start and type cmd in Cortana search
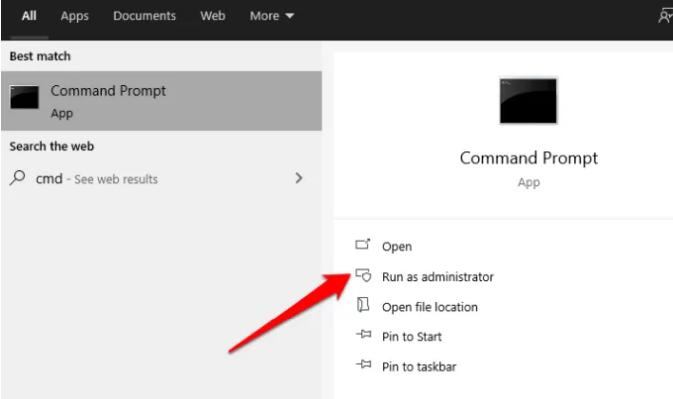
- From the results, right-click Command Prompt and select Run as administrator
- Click Yes in the User Account Control Menu prompt
- When you see a blinking cursor appears in the command window, type SFC /scannow

- Press the Enter key
Wait for the SFC scan process to complete. The tool is designed to find and perform file fixes automatically and you don’t need to do anything.
After the SFC scan is complete, restart your computer. Check whether you are still getting Video Scheduler Internal Error BSOD. If the problem persists, move on to the next solution.
Solution Four- Run DISM scan
Since the SFC scan did not help fix the issue, you need to use another Microsoft in-built maintenance tool that helps fix corrupt and missing system files. The tool is called Deployment Image Servicing and Management (DISM).
DISM command with CheckHealth option
The CheckHealth option in the DISM tool allows you to quickly determine if there is any corruption in the local Windows image. However, it does not fix any errors it finds. Here are the steps to follow.
- Click Start and type cmd
- Right-click cmd and select Run as administrator
- In the command prompt, type the following command and press Enter
- DISM /Online /Cleanup-Image /CheckHealth
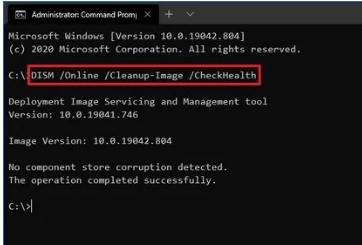
Allow DISM to scan the windows image and verify data corruption that needs to be fixed
DISM command with ScanHealth option
The ScanHealth option is an advanced scan that determines if the Windows image has any problems. Here are the steps to follow
- Open Command prompt with administrator rights
- In the command prompt, type the following command and press Enter
- DISM /Online /Cleanup-Image /ScanHealth
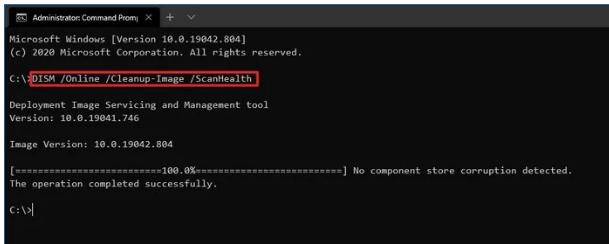
Wait for the scan to complete. The advanced scan may take several minutes to scan your windows image for problems. If any CheckHealth and ScanHealth option detects problems with Windows image, use the next step to repair the Windows image.
DISM command with RestoreHealth option
DISM has a RestoreHealth command that can fix problems in Windows image that could help resolve Video scheduler internal error. Here are the steps to follow
- Open Command prompt with administrator right
- In the command prompt, type the following command and press Enter
- DISM /Online /Cleanup-Image /RestoreHealth
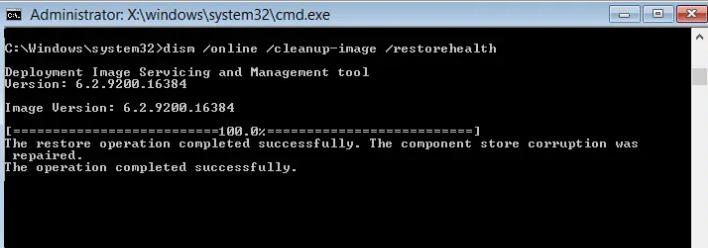
After you complete the above steps, the Deployment Image Servicing and Management tool will connect to the Window Update server to download and replace damaged or missing files.
After DISM completes its operation, restart the computer. Check whether the computer still generates Video Scheduler Internal error. If the issue remains unresolved, move on to the next solution.
Solution Five – Install all available Windows updates
Microsoft is always releasing updates to fix bugs and performance issues in Windows 10. There is a possibility the Video scheduler internal error is the result of some Windows bug that has been fixed by the latest update. You need to check whether your PC has all the latest Windows 10 updates. Here are the steps to follow.
- Click Start – > Settings(gear icon)
- In the Setting window, click Update and Security settings
- In the next window, click Windows Update in the left column.
- If you see Updates available on the right side, it means you need to install pending updates.

- Click download and install all important updates
Use your computer normally and check whether you still get Video Scheduler internal error. If the error remains unresolved, move to the next solution.
Solution Six – Update your graphics driver
Windows 10 installs the latest drivers through Windows updates. Since installing Windows update has not helped resolve the issue, you need to manually update your graphics drivers following the steps given below.
- In the search bar on the taskbar, type device manager
- Select Device Manager from the list of results
- In the Device Manager window, go to the Display adapters section and expand the list
- Right-click video adapter and select Update driver
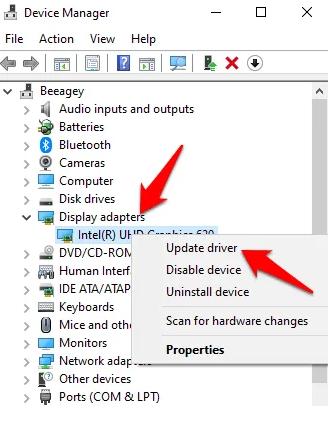
- Follow the prompts on your screen to update the graphics driver.
- Restart your computer
If Windows is not able to find any driver update, you need to check the hardware manufacturer’s website for driver updates. If you are using a laptop, you need to visit the OEM website to check for graphic driver update. If a driver update is available, download and install.
If updating the graphics driver did not help resolve the Video scheduler internal BSOD error, move on to the next solution
Updating Drivers Automatically
Automatic driver update tools offer many benefits, the most important ones being:
- You can update device drivers automatically
- The software scans and updates all outdated or missing drivers at one go
- The tool picks the right drivers for your device and operating system, so you won’t have to worry about installing an incorrect driver by mistake
- Automatic driver updates are 100% safe
Driver Updater is one of the best driver update tools out there. Outbyte Driver Updater will give you access to a database of over 1 million drivers. It will regularly scan your PC, suggesting new driver versions to install. Driver Updater contains drivers for a variety of Windows devices. With just one click, you can update drivers in your system.
Step 1
Click here to Install and launch the app
Step 2
Scan all devices
Step 3
Install or update drivers automatically
Solution Seven – Reinstall faulty drivers
Faulty drivers can also cause Video scheduler internal BSOD error. To rule out this possibility follow the steps given below.
- Open Device Manager
- In the Device Manager window, click the Help menu above
- Click scan for hardware changes option
- Go to the Other devices section and expand it
- You are more likely to see devices with a yellow exclamation mark that indicates it has faulty device drivers.
- Right-click on the device with faulty drivers and click Uninstall
- When Windows prompts you for confirmation, click OK
- Go to the device manufacturer’s website and download the latest driver and install it.
Solution Eight – Remove recently installed hardware/software
Not all hardware and software available in the market will work well with Windows 10. Can you recall when you encountered a Video scheduler internal BSOD error on your system for the first time? Have you installed any hardware or software recently? If the answer is yes, you need to remove recently installed hardware and software from your computer and see if that helps.

Leave a Reply