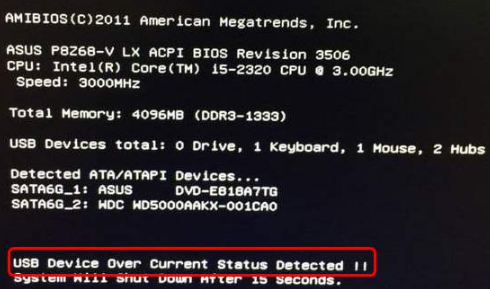
This is one problem that many Asus users have reported. What happens is that the computer shuts itself down after the user has been playing video games for some time. The following error message is likely to appear on the screen.

So what can you do to get rid of this error? Well, try the solutions in this post. They have worked for other users, and we are positive at least one of these will do the trick for you as well.
Let’s dive right in.
Error Introduction
Before we look at the solutions, first let’s understand what “USB Device Over Current Status Detected” means in the first place?
As you may have guessed, the error has something to do with the USB devices. Specifically speaking, at least one of the USB devices is facing some sort of overlading issue. Because of this, the computer shuts itself to protect it against further damage. However, in some cases, this preemptory action is a minute too late and much damage has already been done. In these cases, you’d be able to smell something burning.
The precise issue may vary from one case to another. Sometimes something is wrong with the BIOS while other times faulty devices are the culprit. Still other times the real reason be mangled USB ports or faulty USB devices.
Now let’s see the troubleshooting steps.
Solution 1 – Connect the USB devices one at a time
Here are the steps to follow:
- Turn Windows off
- Now unplug every USB device
- Wait for a couple of minutes and then power on the computer
- Now plug one USB device at a time, and restart Windows after plugging every USB device
- This method may help you find the faulty device. If you’re able to identify the guilty device or bad USB port, stop using it
Solution 2 – Disconnect USB ports
A problematic plugged-in USB device can lead to this issue. To check if the culprit is indeed a USB device, follow these steps:
- Turn Windows off
- Unplug your PC from the electrical socket (if it is attached to one)
- Disconnect every USB device, particularly those attached to front ports
- Remove case of the system unit
- Detach front USB plug from the motherboard
- Reboot Windows and check if things run fine
- If everything is back to normal, don’t use front USB ports
In case nothing’s changed, try the last solution in the list.
Solution 3 – Ensure there’s no missing jumper
A lot of users have reported that the real cause in their case was a missing jumper. As a last resort, check if that’s not the case with you as well.
Here are the steps to follow.
- Power off your computer
- Unplug all plugs from the wall
- Now remove the case of the system unit
- Now check the USB internal port
- Do you see a missing jumper? If yes, insert it to short 1 and 2
- Reboot windows and check if the issue is resolved

Leave a Reply