“The RPC Server is Unavailable” is a common networking error in Windows that occurs in a variety of situations, like when two computers try to communicate with each other on a local network.
The error is generated by the client machine when it is trying to communicate on a network.
If you are looking for a solution to “The RPC Server is Unavailable” error, this post is for you.
Let’s look at the error in detail and different solutions.
What is RPC?
RPC stands for Remote Procedural Call.
It is a mechanism that enables Windows processes to communicate with each other.
RPC is used by numerous Windows components. Remote Procedural Call mechanism uses a dynamic port for communications between systems.
However, the RPC needs to use a static port (TCP Port 135) to initiate communication.
Why you are getting “The RPC Server is Unavailable” error?
Some of the possible reasons for the error “The RPC Server is Unavailable” include the following:
- Connectivity issues
- RPC service is not running
- The firewall is blocking traffic
- Name resolution issues
Now that you know the possible causes, let’s take a look at the solutions that could resolve “The RPC Server is Unavailable” error.
Solution One- Check RPC service
The RPC service should be running for the RPC mechanism to work properly.
You can get this error when the RPC service is not running or there is some problem with the RPC service.
You must check the RPC service to ensure everything is fine.
Here are the steps to follow.
- While holding the Windows logo key down, press R on the keyboard to invoke Run command box
- In the Run command box, type services.msc and click OK
- In the Services window, you need to look for following services in the list Remote Procedure Call (RPC), COM Server Process Launcher, and RPC Endpoint Mapper

- You need to ensure all the above-mentioned services are running and their startup type is set to Automatic.
If you do not find these services running or their Startup Type is not set to automatic, move to Solution 4.
If you do not see any problem with Services, move to the next solution.
Solution Two-Configure the Firewall on your PC
Sometimes, the Firewall can block the connections requested by RPC, which in turn can lead to the aforementioned error message.
In that case, you need to configure the firewall in a way that it does not block RPC connections.
Here are the steps to follow.
- While holding the Windows logo key down, press R on the keyboard to bring up the Run command box
- In the Run command box, type control and click OK
- In the Control Panel window, under Windows Firewall, click Allow an app through Windows Firewall

- In the next window of Firewall communications permissions, scroll down and locate Remote Assistance
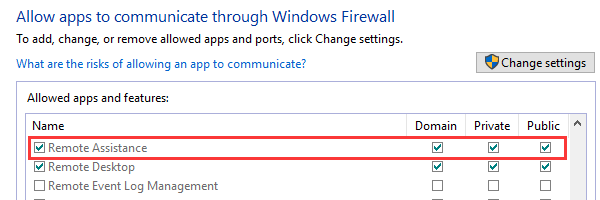
- Make sure the options like Remote Assistance and Remote Desktop are checked
- Also ensure there is a check mark in boxes for Domain, Private, and Public for Remote Assistance and Remote Desktop
- If these options are not checked, make the necessary changes(check the options mentioned above)
- Save changes and close all windows
Check whether the issue is resolved.
If you are still getting “The RPC Server is Unavailable” error, move to the next solution.
Solution Three – Check Network Connection
Sometimes the network connection is not configured properly, leading to issues like “The RPC Server is Unavailable”.
To check your network connection, follow the steps given below.
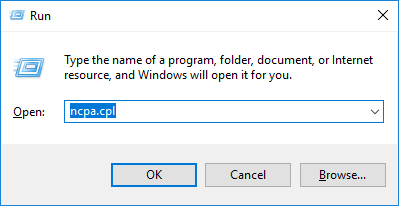
- Press Windows key and R at the same time to bring up the Run command console
- In the Run command box, type ncpa.cpl and click OK
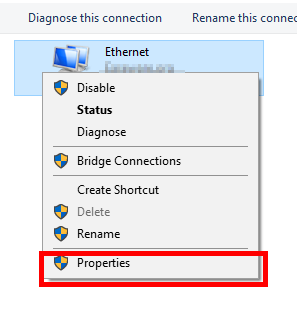
- In the network connection window, right-click on the network connection that is active
- Click Properties
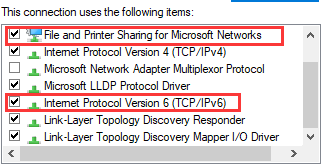
- In the Properties window, check the following options – Printer Sharing for Microsoft Networks and Internet Protocol Version 6 (TCP/IPv6)
- Close all windows
Check if “The RPC Server is Unavailable” error is resolved. If you are still getting the error, move to the next solution.
However, before that you can try resetting file and printer sharing by reinstalling network adapter driver, because this solution has worked for some users in the past.
There are two ways to reinstall/update network adapter driver – Manual update method and Automatic update method.
Here we have given steps to update the network adapter driver both ways.
How to update Network adapter driver manually?
- Press Windows logo key and R to bring up the Run command console
- In Run command box, type devmgmt.msc and click OK
- In the Device Manager window, go to the Network adapters category and expand it
- Right-click on Network Adapter item in the list and click Properties
- In the Network Adapter properties window, go to Driver tab
- Note down details like Driver Provider, Driver version and name of the Network adapter
- Open Internet browser
- Go to Device manufacturer website and find the latest driver for Network adapter
- Check the latest driver update and download
You need to check the compatibility of the driver in terms of operating system and system architecture. For example, you have Windows 7, 32-bit OS installed, you need to download a network adapter driver suggested for 32-bit Windows 7. If you have Windows 10, 64-bit OS, you need download network adapter driver suggested for Windows 10 64-bit OS.
The driver file is either available in exe format or zip format.
If the driver file is in exe format, you can straightway double-click on the downloaded file to start the driver installation.
If the driver file in zip format, you’ll need to first unzip the contents in one folder and then double-click on the .exe file to install the network adapter driver.
If you find the manual driver update method lengthy and difficult, you can use a driver update tool that can update the network adapter driver with a click of a button.
How to update the network adapter driver automatically?
Automatic driver update tools offer many benefits, the most important ones being:
- You can update device drivers automatically
- The software scans and updates all outdated or missing drivers at one go
- The tool picks the right drivers for your device and operating system, so you won’t have to worry about installing an incorrect driver by mistake
- Automatic driver updates are 100% safe
Driver Updater is one of the best driver update tools out there. Outbyte Driver Updater will give you access to a database of over 1 million drivers. It will regularly scan your PC, suggesting new driver versions to install. Driver Updater contains drivers for a variety of Windows devices. With just one click, you can update drivers in your system.
Step 1
Click here to Install and launch the app
Step 2
Scan all devices
Step 3
Install or update drivers automatically
Solution Four- Modify registry entries
If the RPC service is not running properly, it could lead to errors like “The RPC Server is Unavailable”.
In Solution One, we mentioned the RPC service startup type should be set to Automatic.
If the Solution One was not able to resolve the error, you’ll need to make some changes in the registry.
Here are the steps to follow
(Note- Make sure you are logged in as an administrator before performing the steps and take a registry backup before making these changes. )
- Open the Run dialog( Refers steps given in above solution)
- In the Run dialog box, type regedit and click OK
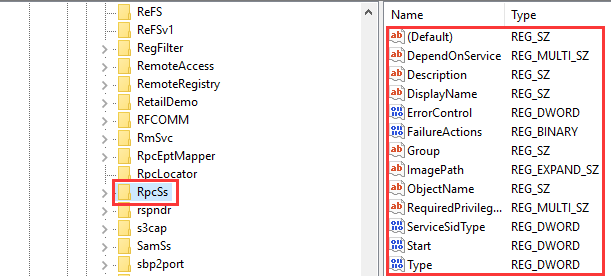
- In the Registry window, navigate to following registry key- HKEY_LOCAL_MACHINE\SYSTEM\CurrentControlSet\services\RpcSs
- Look at the image below and check whether all items marked in the red box of the left column also exists in your Registry. If any item is missing, you need to re-install Windows.
- If you had seen Remote Procedure Call service was not set to start automatically in Solution One. You need to make changes to the registry key Start
- In the left pane, double-click on Start key
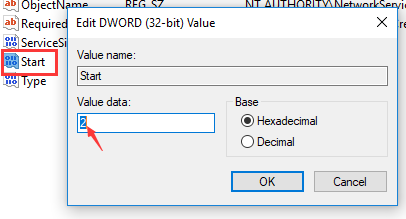
- Type 2 in its Value Data box and click OK
- Now go to following key – KEY_LOCAL_MACHINE\SYSTEM\CurrentControlSet\services\DcomLaunch
- If the Com Process Launcher process was not set to start automatically in Solution One, you need to make some changes to the registry key
- With DcomLaunch highlighted in the right pane, look for Start key in the left pane and double-click on it
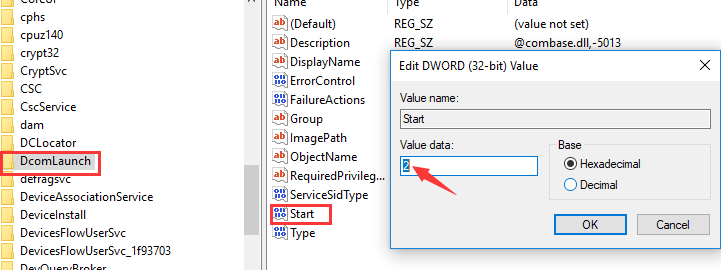
- Type 2 in its Value data box and click OK
- Now go to HKEY_LOCAL_MACHINE\SYSTEM\CurrentControlSet\services\RpcEptMapper
- If the RPC Endpoint Mapper was not set to start automatically in solution One, you need to make changes to its registry key

- Click RpcEptMapper and then double-click Start key in the left pane
- Type 2 in the value data field and click OK
- Close Registry editor
Check if the issue is resolved.
In most cases, “The RPC Server is Unavailable” would be resolved by one of the solutions given above.

Leave a Reply