Network issues are annoying, regardless of when or on which Windows version they occur. One such irritating network issue is the remote device won’t accept the connection.
If you run Windows 10 and are looking for an effective way to fix this error, you’ve come to the right place.
In this post, I’ll show you 4 ways to fix this error.
What causes this error?
Let’s first understand why this network error occurs. Several reasons can lead to this issue. For instance, if a proxy setting has been enabled, this error can occur in Windows 10. Another reason is changes made in Microsoft Edge web browser app.
Further this error can also occur if you’ve changed your antivirus program’s default settings or Firewall settings are not properly configured. Last but not the least, if something is amiss with IP config, this error can appear.
In any of these cases, you will not able to open your favorite sites. As a matter of fact, you will fail to establish any sort of network connection.
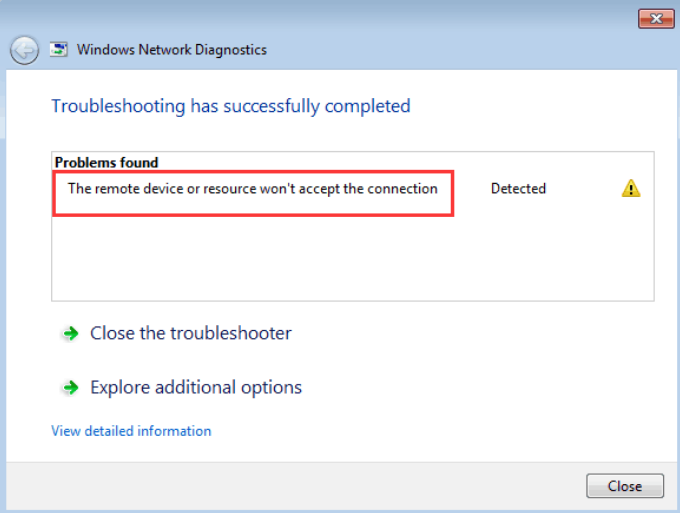
This scenario is likely to occur. When you try to open a site, an error message will flash on your screen stating the webpage/site can’t be displayed. Then if you run diagnostic sequence as indicated by the browser you’re using, the following message will appear: The remote device or resource won’t accept the connection.

This issue is not browser specific. You can get the error with Google Chrome or Microsoft Edge or any other web browser.
Fix The Remote Device Won’t Accept The Connection Error
Here are 4 solutions to this problem. Of course, there’s no need for you to try all of these solutions. Start with the first one, and if it doesn’t work, move to the next one and so on and so forth.
First Solution: Turn Off The Proxy Settings
Here are the steps to follow.
- Press Window + R to open the Run box
- Type cpl and then press Enter to open the Internet Properties window
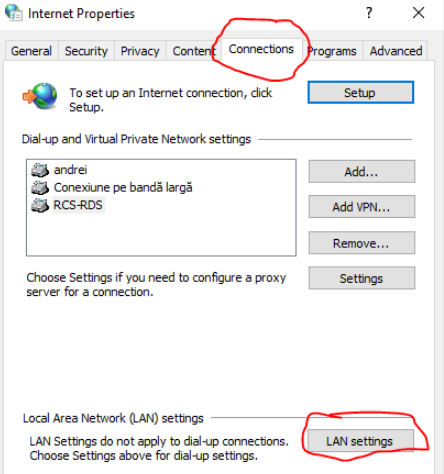
- Click the Connections tab
- Click the LAN settings button displayed towards the bottom

- In the Local Area Network Settings box, ensure the box before Automatically detect settings is checked. Now uncheck the box before Use a proxy server for your LAN
- Click OK in the Local Area Network Settings box
- Now in the Internet Properties window, click Apply and then click OK
Now check if the problem is solved. If no, move on to the next solution.
Second Solution – Reset Microsoft Edge To Its Default Settings
- Press Window + R to open the Run box
- Type cpl and then press Enter to open the Internet Properties window
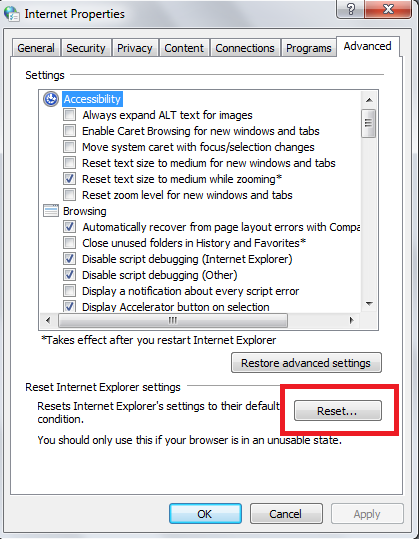
- Click Advanced (the last tab in the menu)
- Click Reset (the button towards the bottom of the window)
- In case an alert message flashes on your screen, click Ok. Then click Reset (If you don’t get an alert message, simply click Reset in the window that appears.
Now the Internet Explorer will be reverted to its factory settings. Check if the issue is fixed.
Third Solution – Reset Gateway IP Address
Here are the steps to follow.
- Press Window + R to open the Run box
- Type cpl and then press Enter to open the Internet Properties window
- Click the Connections tab
- Click the LAN settings button displayed towards the bottom
- In the Local Area Network Settings box, ensure the box before Automatically detect settings is checked. Now uncheck the box before Use a proxy server for your LAN
- Click OK in the Local Area Network Settings box
- Now in the Internet Properties window, click Apply and then click OK
- Now press Window + R
- Type cmd and press Enter to launch command prompt
- In the command prompt window, type ipconfig/release and then press Enter
- Once this command is executed, type ipconfig/renew and then press Enter
- Close command prompt and now check if you’re able to connect.
If not, try the last solution.
Fourth Solution – Temporarily Disable Firewall and Antivirus Program
At times this issue can occur in case there’s some problem with the settings of your antivirus program. To check this, simply disable the antivirus protection. Also disable Firewall protection temporarily. If the error is fixed, then you can safely conclude that there’s some problem with your antivirus protection software. Contact the software manufacturer and ask for a solution. Otherwise simply switch over to another antivirus program.
You can disable Windows Firewall Protection by following these steps:
- Press Windows+R. Now type “cpl” and then press the OK button. This will open the Windows Firewall window
- In the left-pane, click Turn Windows Firewall on or off
- Under private network location settings, select Turn off Windows Firewall (not recommended). Now under Public network location settings, select Turn off Windows Firewall (not recommended)
- Click the OK button
The exact steps for disabling antivirus software vary from one program to another. Below we’ve listed the steps to disable Avast antivirus. If you run any other antivirus tool, check the manual or search the Internet to learn about the steps you need to perform to disable your antivirus program.
- Right-click the Avast icon in the Windows system tray
- Highlight Avast Shield Control
- Select the duration for which you want to disable Avast antivirus program


Leave a Reply