Are you getting “the application was unable to start correctly” error?
If yes, this post is just for you. In this post, we will show you how you can resolve this error.
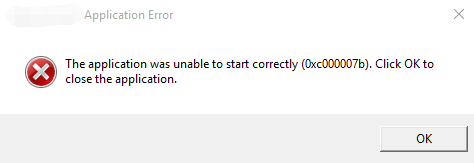
“The application was unable to start correctly” is accompanied by an error code – 0xc00007b. The error generally occurs after you upgrade Windows version. It is believed that incorrect changes in files and programs cause this error.
We have provided you with seven solutions to fix the issue. You need not try all solutions given in this post. Start with the first solution in this post and if it does not work, try next solution. You need to keep on trying the next solution in the list until the issue gets resolved.
Solution One- Reboot your computer
There is a possibility “The application was unable to start correctly” is a low-level error and a simple restart can fix the problem. When you restart Windows, all components of the system are loaded again that could resolve the issue. If rebooting computer does not help, try next solution.
Solution Two- Run application with administrative privileges
Many applications need special access permissions to function properly that is not available when you launch the application in normal mode. The simple solution to this problem is run the application as administrator. Here are the steps to follow.
- Click Start
- Right-click the application you want to open and click Properties

- In the Properties window, click the Compatibility tab
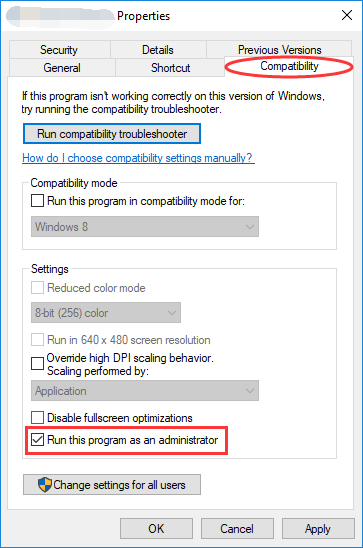
- Check the box- Run this program as administrator and click Apply followed by OK
- Try running the application and see if the issue is resolved. If you are still getting “the application was unable to start correctly”, try next solution.
Solution Three- Reinstall Problematic Application
There is a possibility the files of the problematic application have become corrupt that is causing the “the application was unable to start correctly” error. An easy solution to this problem is reinstalling the problematic application again that will replace the corrupt files with new versions and resolve the error.
You need to first uninstall the application and reinstall the application.
Here are the steps to follow.
- Click Start -> Control Panel
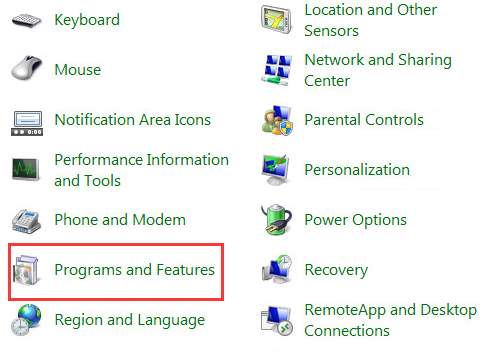
- Click Program & Features
- Right-click the application you want to install and click Uninstall

- Follow on-screen instructions to uninstall the application.
- If Windows operating system prompts you to restart the computer to delete the remaining files and remove the application completely, restart the computer.
- Once the application is removed, double-click on the application setup file to reinstall the application
- Try running the application to see if the issue is resolved. If you still get “The application was unable to start correctly” error, try next solution.
Solution Four- Reinstall Microsoft .NET framework
Many application Developers use some version of Microsoft .NET framework and its libraries to create applications more easily. If the .NET framework files are missing or corrupt, it can lead to “The application was unable to start correctly” error. To rule out this possibility, reinstall Microsoft .NET framework by following steps given below.
Note – These troubleshooting steps are only applicable to Windows 7 and earlier versions. From Windows 8 and onwards, the .NET 4.5 frameworks is part of the Windows operating system and Windows 8 and 10 users cannot uninstall or update it manually. To update Microsoft .NET framework on their Windows 8 and 10 systems, they need to install all pending updates provided by Microsoft.
Many older applications need Microsoft .NET Framework 3.5. Windows 7 and earlier version users can directly download .NET Framework 3.5 from the link given in steps below. The steps to install Microsoft .NET Framework 3.5 is a bit different which are given separately in this post.
For Windows 7 and earlier Windows versions
- Press Windows logo key and R simultaneously on the keyboard to bring up a Run command box
- Type control in the Run command box and click OK
- In the Control Panel window, scroll down to find Programs and Features and click on it
- Right-click on Microsoft .NET framework entry in the list and click Uninstall

- Follow on-screen instructions to remove Microsoft .NET framework completely from the computer
- Repeat above two steps to remove all Microsoft .NET framework versions from the computer.
- Now, go to Microsoft .NET framework download page to download the latest .NET framework.
- Click Download .NET Framework 7.2 Runtime option

- If the application needs .NET 3.5 or earlier version, go to Microsoft .NET Framework 5 download page and click Download
- Click Save File to save the .NET framework setup file to your computer
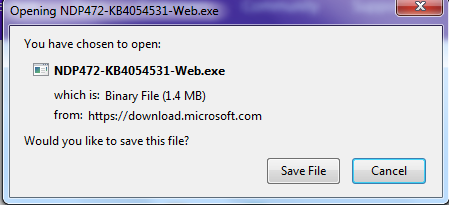
- After the .NET framework setup file is downloaded, double-click on it to start the installation
- Follow on-screen instructions to install Microsoft .NET framework.
- After the installation completes, restart the computer.
- Try launching the application and see if the issue is resolved. If you still get the error, try next solution.
For Windows/8/8.1/10 users – to install Microsoft .NET 3.5 Framework
- Press Windows logo key on the keyboard and type Windows features in the Search box and press Enter
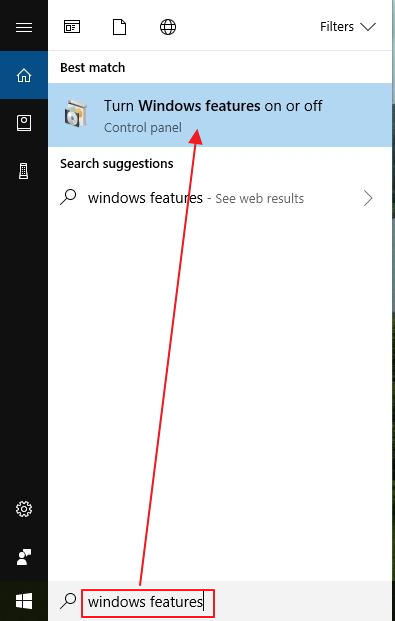
- Click Turn Windows features on or off from the list of results
- In the Windows features pop-up dialog, click .NET Framework 3.5(includes .NET 2.0 and 3.0) option and click OK
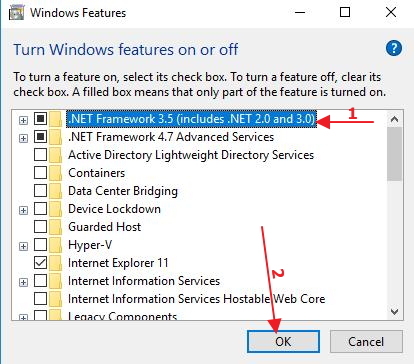
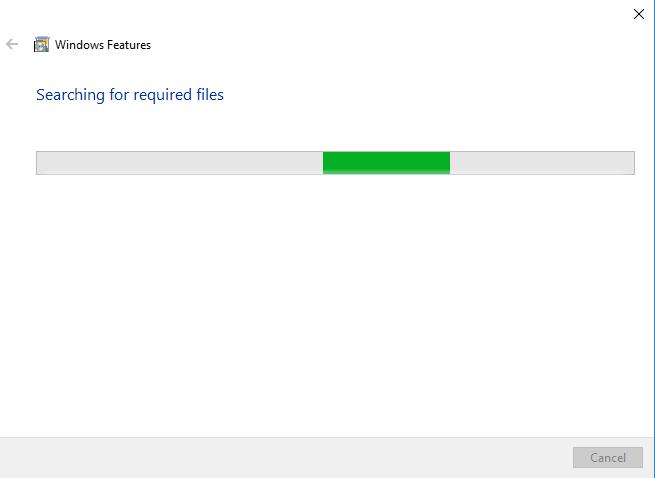
- Windows will now start the search for required files. Wait till the search completes
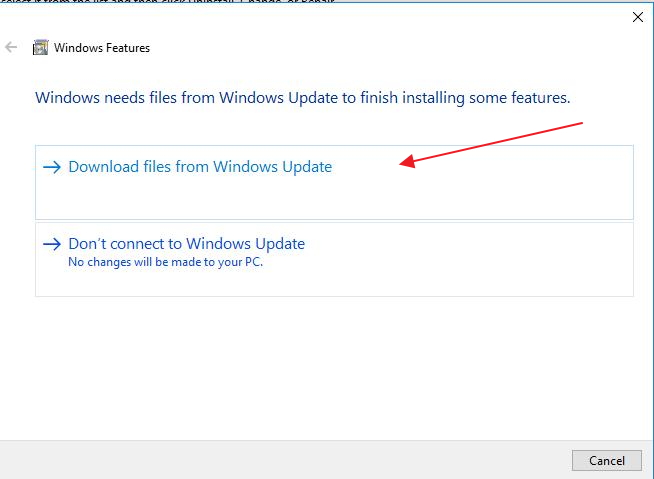
- In the next window, click Download files from Windows update
- Wait till the process completes. Restart the computer after Windows has finished installing the NET Framework 3.5 package on your computer
- Launch the application to see if the issue has been resolved. If the issue still persists, try next solution.
For Windows 10 users – to get latest Microsoft .NET Framework through Windows update
- Click Start button
- Click Settings(gear icon)-> Update & Security -> Windows Update
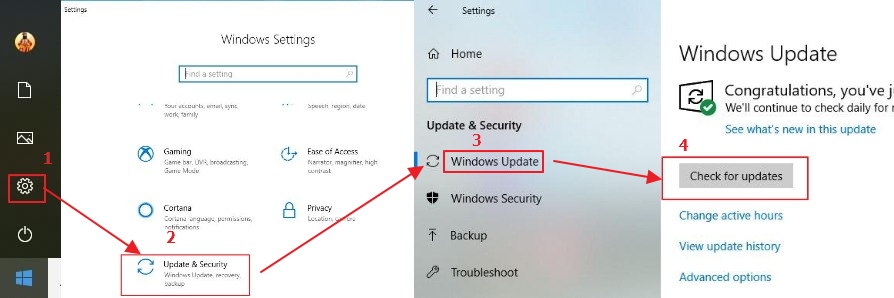
- Click Check for Updates
- Wait for the process to finish. Restart the computer if required
- if Windows update says your device is up to date, you have the latest Microsoft .NET Framework installed

- Now try running the application and see if you get “The application was unable to start correctly” error. If the error persists, move to next solution.
Solution Five- Reinstall Microsoft Visual C++ Redistributable Packages
Microsoft Visual C++ is an integrated developed environment used by application developers to create programs in C, C++, and C++/CLI programming languages. The programming environment provides many shared code libraries that allow developers to use the already available code in different application procedures instead of writing the program code from scratch.
Application developers have two choices- either include all DLLs in the application setup file itself or use a standard distributable package of shared code in the form of Microsoft Visual C++ Redistributable Packages. Many application developers choose the latter option. If the problematic application was created using C, C++, and C++/CLI programming languages it will need Microsoft Visual C++ Redistributable Packages for proper functioning.
There is a possibility the files and shared code libraries of Microsoft Visual C++ Redistributable Package have become corrupt due to some reason which could result in “The application was unable to start correctly” error.
The solution to this problem is reinstalling Microsoft Visual C++ Redistributable Packages that will replace the corrupt files with their new versions and resolve the error. Here are the steps to reinstall Microsoft Visual C++ Redistributable Packages.
- Press Windows logo key and R simultaneously on the keyboard to invoke Run command console
- Type control in the Run command box and click OK
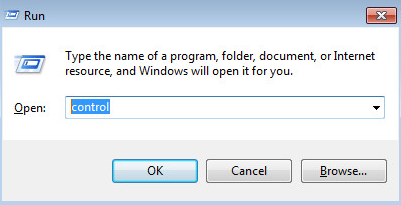
- In the Control Panel window, scroll down to find Programs and Features and click on it
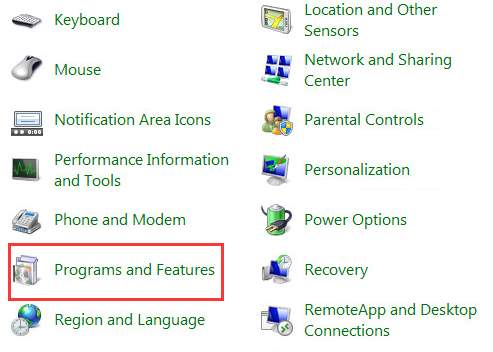
Note- Your computer may have multiple Microsoft Visual C++ 2*** Redistributable packages installed required by different applications. Before uninstalling Visual C++ Redistributable packages, note down the name of the Visual C++ 2*** Redistributable packages and the version (32-bit or 64-bit). This information is needed to download right VC++ redistributable packages from the Internet.
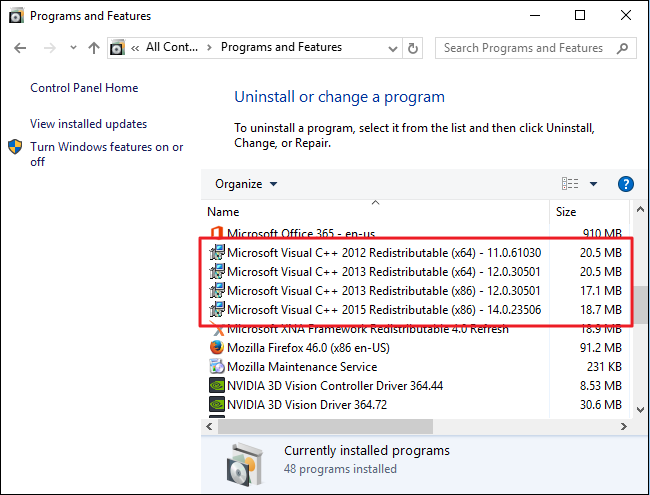
- Right-click on Microsoft Visual C++ 2*** Redistributable entry in the list and click Uninstall
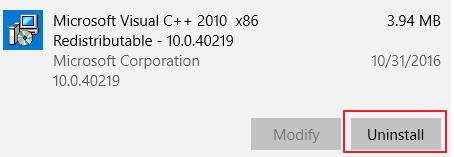
- Follow on-screen instructions to remove Microsoft Visual C++ 2*** Redistributable package completely from the computer
- Repeat above two steps to remove all Microsoft Visual C++ 2*** Redistributable packages from the computer.
- Now, go to Microsoft Visual C++ 2*** Redistributable download page to download the latest .NET framework.
- Download right Microsoft Visual C++ 2*** Redistributable packages and install them
- Restart your computer after you have installed VC++ Redistributable packages and see if the issue is resolved
- if you are still getting “The application was unable to start correctly” error, try next solution
Solution Six – Update Windows
Microsoft provides regular updates for Windows 7/8.1/10 operating systems. The updates are provided to fix bugs and other issues. There is a possibility the “The application was unable to start correctly” error is related to one of the Windows bug. You can fix the bug by updating Windows which could resolve the application related error. Here are the steps to follow.
For Windows 7 users
- Press Windows logo key and type updates in the search box
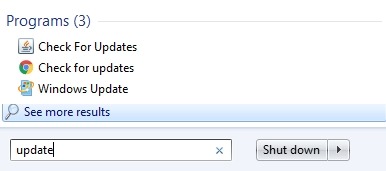
- Click Windows update from the list of results
- In the Windows update, click Check for updates
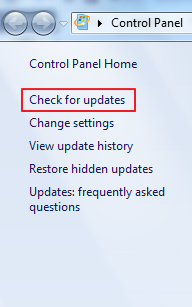
- Windows will download and install all pending updates
- Wait for the update process to complete. After all pending updates are installed, restart your computer
- Try running the application and see if the error is resolved. If the error persists, move to next solution.
Windows 10 users need to follow the troubleshooting steps given in Solution Four under “For Windows 10 users – to get latest Microsoft .NET Framework through Windows update” to update their Windows 10 operating system.
Solution Seven-Run Check disk
“The application was unable to start correctly” error could be due to some hardware issue like bad sectors in the hard disk. In such case, Windows is unable to retrieve information stored in bad sectors and cannot launch the application correctly.
Microsoft offers a check disk program that can check the hard drive for any errors and resolve problems due to bad sectors. Here are the steps to follow.
- Click Start
- Type cmd in the search box
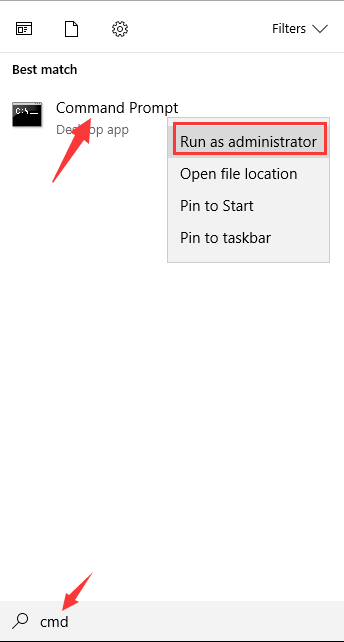
- Right-click command prompt in the list of results and click Run as administrator
- In the command prompt window, type chkdsk c: /f /r and hit Enter. Here the c: refers to the system drive where your application files reside. If the operating system or the application is installed on a different drive, you need to substitute c: with a right drive letter in the command.

- Wait for the Check Disk program to complete the process.
- After the chkdsk process is completed, try running the application. In most cases, “The application was unable to start correctly” error should be resolved by now.

Leave a Reply