Windows 10 users experiencing issues like sluggish response time may check their Task Manager to find what is using up the computer resources. Task Manager offers loads of useful information about active processes. One of the most useful things you can monitor via Task Manager is your system’s disk usage.
If you find disk usage of 100%, it means your system’s disk usage has maxed out. This, in turn, affects your computer performance and unless you take some corrective measures, this will cause problems.

The “disk usage of 100%” issue can occur at any time. Many users encounter it after they upgrade to Windows 10.
In this post, we’ll share with you 10 different methods by which you can solve the disk 100% usage issue. So let’s get started.
Solution 1 – Restart Windows 10
The first thing you should do is turn your computer off and on again. While restarting Windows sounds simple, it often cures issues that you might otherwise spend hours investigating.
If you use Windows 10, remember to use the Start option rather than the Shut Down. When you select the latter, Windows 10 saves the system state to boot up faster the next time. As you may guess, that means the problems you are experience will reappear on reboot.
Solution 2 – Update Device Drivers in Windows 10
Outdated drivers can cause all sorts of issues including disk 100% usage. Therefore, before you proceed to more complicated solutions, you should consider updating your device drivers.
Automatic driver update tools offer many benefits, the most important ones being:
- You can update device drivers automatically
- The software scans and updates all outdated or missing drivers at one go
- The tool picks the right drivers for your device and operating system, so you won’t have to worry about installing an incorrect driver by mistake
- Automatic driver updates are 100% safe
Driver Updater is one of the best driver update tools out there. Outbyte Driver Updater will give you access to a database of over 1 million drivers. It will regularly scan your PC, suggesting new driver versions to install. Driver Updater contains drivers for a variety of Windows devices. With just one click, you can update drivers in your system.
Step 1
Click here to Install and launch the app
Step 2
Scan all devices
Step 3
Install or update drivers automatically
Solution 3 – Disable the Antivirus Software Temporarily to Fix 100% Disk Usage
Sometimes, your antivirus software may interfere with other programs and in turn cause the disk space to max out. Therefore, we recommend you to temporarily disable your antivirus software. Windows come with built-in protective software called Windows Defender. By default this program is enabled, so you don’t have to worry about your system being unprotected for the time duration you turn your third-party antivirus software off. If, for some reasons, you’ve disabled Windows Defender, enable it before you disable your antivirus tool.
Please refer to your antivirus software’s documentation to check the steps for disabling it. After you’ve disabled the antivirus tool, check the computer’s disk usage again.
To do so, type “task manager” in the Start Search box and then click Task Manager. In the Processes tab, check the disk usage.
In case the reading in the Disk column shows less than 100%, you can safely assume your antivirus software was the culprit. In that case, you can consider using another third-party antivirus software or contacting the vendor of your antivirus software for help.
Solution 4 – Disable SuperFetch to Fix Disk Usage problem
With the help of SuperFetch, it’s possible to bring down boot time. SuperFetch also ensures the must-load programs get launched more efficiently. That said, many Windows 10 and Windows 8 users have complained about it causing the disk usage to max out. For this reason, we recommend you disable SuperFetch and then check the disk usage.
To disable this service, perform the following steps:
- Press the Windows logo key on your keyboard. In the Start Search box, type command prompt and then select Run as administrator option
- In the User Access Control window, click the Yes button
- Type the following message

- Press the Enter key
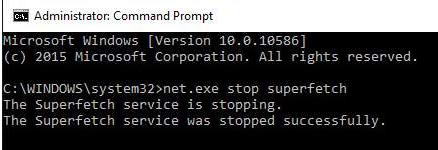
- If you get a message stating something like “the command you’ve put is invalid”, try this command

- Now go wait for a few minutes and then open task manager window and check the disk usage percentage
Solution 5 – Perform Disk Check in Windows 10
Windows come with a tool called Check Disk utility which scans your hard disk for errors and fixes them automatically.
Here’s how you can check your hard disk for errors and get them fixed:
- Press the Windows logo key on your keyboard. In the Start Search box, type command prompt and then select Run as administrator option
- In the User Access Control window, click the Yes button
- Type the following command

- Press the Enter key. Next type Y to confirm you want the system to check the disk when Windows boots next
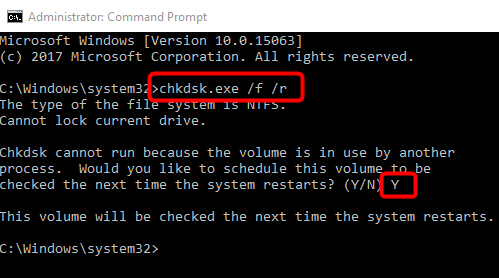
Note: Windows will now run a disk scan the next system you start the system. This tool may take a long time to finish its job, so ensure you can afford not using your computer for a couple of hours (maybe even longer). But if you can’t, skip disk check when system reboots. You can reschedule the scan for the next time following the steps shown above.
- After disk check is complete, wait for a few minutes and then open task manager and check the percentage of disk usage
If the problem persists, go to the next solution.
Solution 6 – Reset Virtual Memory
Windows uses a section of the hard drive to temporarily store files when the available RAM doesn’t suffice. Many users claim they were able to resolve the issue by resetting virtual memory, so it’s worth giving it a shot.
Here are the steps to follow:
- Press Windows key and Pause/Break key simultaneously
- Click Advanced system settings in the left panel
- Click the Advanced tab
- Click Settings
- Click the Advanced tab once more. Select Change… in the Virtual Memory Section and deselect the checkbox before Automatically manage paging file size for all Drivers
- Choose the drive on which you have Windows installed (in most cases it’s the “C” drive). Now set a Maximum size and an Initial size for the virtual memory:
Initial Size – This figure varies from one computer to next. We recommend you to go along with whatever number appears in the recommended category.
Maximum Size – Avoid entering a too high number. We recommend not exceeding 1.5 times the size of RAM. For example, if your PC has a RAM of 4GB, you should set this value greater than 6,144 MB.
- After you’ve set the values, click the Set button and then click the OK button
- Now remove all temporary files. Press Widows key and R key simultaneously. In the run dialog box, type temp and press the OK button. This will open the Temp folder. This is where all the temp files reside.
- Select all temp files and delete them
Wait for a few minutes. Go to task manager and check the disk usage percentage. If it’s less than 100%, the issue is resolved. If no improvement is seen, go to the next step.
Solution 7 – Update Windows 10
Updating Windows fixes many problems, so it’s worth giving a shot. To make sure Windows is up to date, perform the following steps:
- Click the Start icon
- Go to Settings > Update & Security settings > Windows Update
- Check for new updates and install them if available.
Solution 8 – Check for Malware
Your system may be infected with virus or malware that’s causing the disk usage to max out. To rule out this cause or fix it if that’s what’s triggering the problem, scan your hard disk for a malware infection.
The antivirus software you use may take some time to finish scanning, as your hard disk is already reporting high usage, so be patient.
Solution 9 – Disable Windows Search
Sometimes high disk usage issue crops up because of a known bug in Windows that causes a search loop. To fix the problem, you can temporarily stop the Windows Search facility.
Here are the steps to follow:
- Press the Windows logo key on your keyboard. In the Start Search box, type command prompt and then select Run as administrator option
- In the User Access Control window, click the Yes button
- Type the following command

Now wait for a few minutes and check if the disk usage percentage has come down below 100%. If so, you can safely assume Windows Search was causing the Windows 10 disk usage 100% issue and choose to permanently disable it.
Here are the steps to follow:
- Press the Windows key and R key simultaneously
- In the run dialog box, type services.msc and press the OK button
- In the Services window, select Windows Search entry and then double-click it
- Under Startup type, choose Disabled and then click the OK button
Solution 9 – Change Energy Options to High Performance from Balanced
Changing the energy settings have worked for several users who were plagued by the 100$ disk usage issue.
Here’s what you need to do:
- Click Power Options > Change plan settings > Change advanced power settings
- Choose High-performance from drop-down box. Ensure all plan settings are set to their defaults
Solution 10 – Fix StoreAHCI.sys Driver
This issue might also rear up because of an Advanced Host Controller Interface PCI-Express model using inbox StoreAHCI.sys driver. There’s a firmware bug which causes this error.
Here’s what you need to do:
- Press Widows key and R key simultaneously. In the run dialog box, type devmgmt.msc to launch Device Manager
- Expand IDE ATA/ATAPI Controllers category
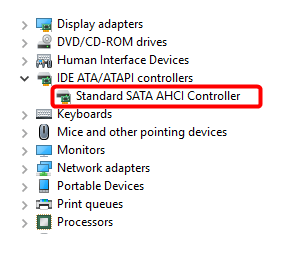
- Double-click AHCI controller
- Click the Driver tab and then select Driver Details. In case storachi.sys is saved in a path that has system32 in it, that means you’re using inbox AHCI driver
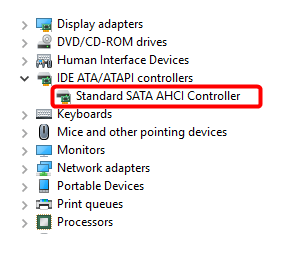
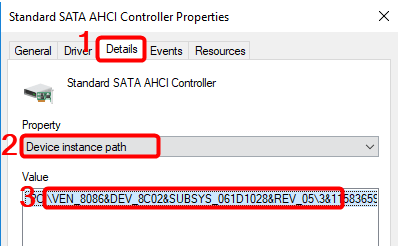
- Now close Driver details. Click the Details tab, select Device Instance Path in the drop-down menu, and then note down the path (starting from VEN_)
- Press Widows key and R key simultaneously. In the run dialog box, type regedit and press Enter to launch Registry Editor
- Now go to:

The <Random Number> varies from one device to the next
The <AHCI Controller> refers to the name you saw in Step two.

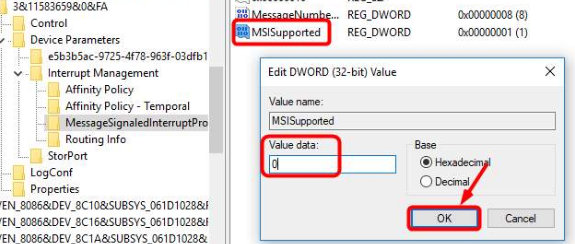
- Double-click MSISupported key and alter the value to 0
- Reboot Windows. Open Task Manager and check the Disk Usage percentage under the Process Tab. Hopefully, it would be less than 100% now.

Leave a Reply