Recently, many Windows users have reported experiencing an issue in which their disk utilization shows as 100%. This in turn leads to lagging and a severe drop in the system’s performance.
Are you experiencing the same issue?
If yes, you’re at the right place. In this post we’ll discuss 14 different solutions. So let’s dive straight in.
Solution #1 – Run Disk Check
Most commonly, this issue shows up when you’re trying to search for a file or program using Windows Search or complete any action that puts the drive under a bit of strain.
To ensure the ‘computer slowdown’ is because of 100% disk usage, press Ctrl+Alt+Del when you experience a problem. Next, choose Task Manager.
Look at the Disk column in the Processes tab. If there’s a problem with drive performance, you’re likely to find disk usage at 100% and this whole entry shaded in red.

The issue can occur because of some problem in certain sectors on the HDD, but the good news is that the built-in disk check tool can easily fix it.
Open the Windows Explorer window and choose This PC. Next, check the hard drive and right-click the C drive and click Properties. Look for the Tools tab here and click Check under Error checking.
Click Scan drive in the next window and wait for the scan to complete. Finally, restart Windows.
Solution #2 – Check the Anti-Virus Software
Before proceeding further, it’s important to rule out malware infection. Run a thorough virus scan using your security tool. However, do remember a full scan may take more time than usual since you’re drive is already under a heavy load.
In case the scan reports some threats, follow the security tool’s recommendations and then restart Windows.
Solution #3 – Disable Windows Search
This issue could also be occurring because of some problem with Windows Search. Specifically speaking, a bug may put the Windows Search in Windows 10 in a “search loop”. This in turn puts substantially more load on the system drive.
To put an end to it, as well as prevent it from reoccurring until you reboot Windows, perform the following steps:
- Click the Start button and type cmd
- Next right click and choose Run as administrator
- In the Command Prompt window, type the following and press the Enter key

If you want to disable Windows Search permanently, press the Windows key + R key. In the run dialog box, type services.msc and click the OK button. Next, in the Services window, locate and double-click Windows Search and set the Startup type (under the General tab) as Disabled. Finally, Click the OK button and then click Apply.

Your Windows 10 system should start performing considerably faster after you disable Windows Service. If that’s not the case, move on to the next solution.
Solution #4 – Disable Superfetch Service
According to some users, the Superfetch Service is the main culprit. You can stop this service by performing these steps:
- Click the Start button and type cmd
- Next right click and choose Run as administrator
- In the Command Prompt window, type the following and press Enter

It is a good idea to run Check Disk after performing these steps. To do that, simply type the following command and press Enter.
(Image)

You’ll have to reboot windows for this action to be completed. Therefore, close all applications and save any important work.
Solution #5 – Disable Flash
Another common cause for 100% hard disk usage is flash, especially among users who prefer to use Chrome. For this reason, we recommend you should do away with it.
Here are the steps you need to complete.
- Open Chrome browser
- Click Menu (the three dots on top right-hand corner). Now click Settings and then click Show advanced settings
- Under the Privacy section click Content Settings. Find Flash here and set the corresponding toggle to Block sites from running Flash
- Now click Back
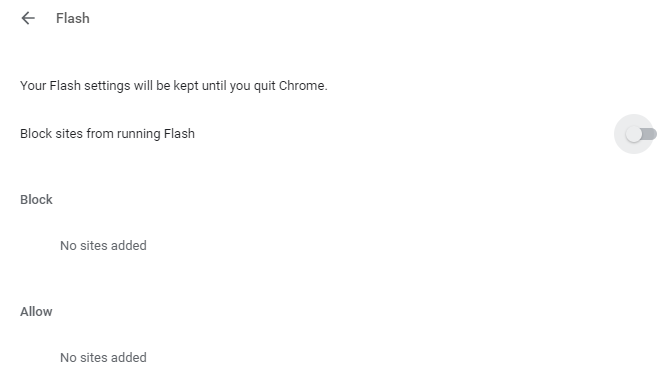
Close the browser window and relaunch Chrome. Your HDD performance should be much better now. If not, move on the next solution.
Solution #6 – Use another browser
It is possible the real culprit is not Flash—but your browser itself, particularly if you run Chrome. In that case, the obvious workaround is to dump Google Chrome and sidle over to another browser.
Which one? That’s up to you entirely. Many users report that the built-in Microsoft Edge is a worthy replacement to Chrome, so you may want to give it a go.
Solution #7 – Update device drivers
Outdated SATA drivers can also cause the aforementioned problem. Chances are your Windows 10 pc uses SATA connections for SSDs, optical drives, and hard drivers. Disk usage problem can creep up in case this driver is not the outdated.
You can fix the issue by updating the SATA drivers.
How to do that? Well, there are two ways to go about this, manually or automatically. The first method requires a fair amount of technical knowledge and patience. If you’re short on either, we recommend going the automatic way.
Update SATA drivers manually
Here are the steps to follow:
- Simultaneously press Win+X to open Power Menu. Now click Device Manager
- Locate and expand Storage controllers. Now find the correct controller. In you can’t seem identify which is the correct one, update both controllers
- Right-click a controller and click Update driver
- Choose the option “Browse my computer for driver software”. Next select “Let me pick from a list of available drivers on my computer”. Now select the Standard AHCI Controller, and follow onscreen instructions (if any)
Restart Windows and check if your disk’s performance improves. If it doesn’t, go to the manufacturer’s website and locate for the latest driver. Next, download the driver file and double-click it to launch the installer. Follow onscreen instructions and reboot Windows after installation is complete.
Update SATA drivers automatically
Automatic driver update tools offer many benefits, the most important ones being:
- You can update device drivers automatically
- The software scans and updates all outdated or missing drivers at one go
- The tool picks the right drivers for your device and operating system, so you won’t have to worry about installing an incorrect driver by mistake
- Automatic driver updates are 100% safe
Driver Updater is one of the best driver update tools out there. Outbyte Driver Updater will give you access to a database of over 1 million drivers. It will regularly scan your PC, suggesting new driver versions to install. Driver Updater contains drivers for a variety of Windows devices. With just one click, you can update drivers in your system.
Step 1
Click here to Install and launch the app
Step 2
Scan all devices
Step 3
Install or update drivers automatically
Solution #8 – Disable Antivirus Software
Sometimes, a protective software tool can trigger high disk usage issue. Therefore, it’s worth disabling your antivirus program temporarily to rule out this possibility. If disabling does the trick, you’d need to contact the vendor for solution. In case help is not forthcoming, worry not. Use Microsoft’s Windows Defender, which comes pre-built in Windows 10, instead.
Solution #9 – Reset Virtual Memory
A part of your hard drive, virtual memory lends a helping hand to your computer’s physical memory—aka RAM—when it’s under the pump. When there’s not enough RAM to complete an action, Windows resorts to storing files, albeit temporarily, in virtual memory. And when it needs those files, it simply swaps them back to RAM.
All the same, you may encounter high disk usage issue when virtual memory is set an unreasonable amount. To fix the problem, reset it. Here’s how you can do that.
- Press Win + Pause/Break keys simultaneously. Then click Advanced system settings in the panel on your left-hand side
- Click Advanced. Next click the Settings tab
- Click the Advanced tab and click the Change button (listed under the section marked Virtual memory)
- Ensure the box before “Automatically manage paging file size for all drives” is unselected. Next select the system drive and set the Initial as well as Maximum size for virtual memory.
- Next click the Set button and then click OK
Initial size – If you’re not sure how much the initial size should be, just enter the recommended value.
Maximum size – Set the maximum size to 1.5 times of your actual RAM. For instance if you’re using 2GB (2,048 MB) RAM, this value should not exceed 3,072 MB.
Not sure how much RAM you’re using? Type msinfo32.exe in the Start Search box and press Enter. In the System Information window, you can find RAM in Installed Physical Memory (RAM).
Once you’ve set virtual memory’s values, it’s time to remove temporary files. To do so, press Win + R keys simultaneously and then type temp in the run dialog box and press Enter. This will take you to the Temp folder. Simply select all the listed files and delete them.
Solution #10 – Disable Windows Update Service
Some users reported that in their case the issue was occurring because of Windows Update Service and disabling it did the trick.
Here’s how you can disable Windows Update Service:
- Click the Start button, type run, and press Enter
- In the run dialog box, type services.msc and then press Enter
- In the Services window, located Windows Update in the right pane and double-click it
- In the Properties window, set the Startup type as Disabled, and click Stop and then OK
Solution #11 – Change File Explorer Options
Here are the steps to follow:
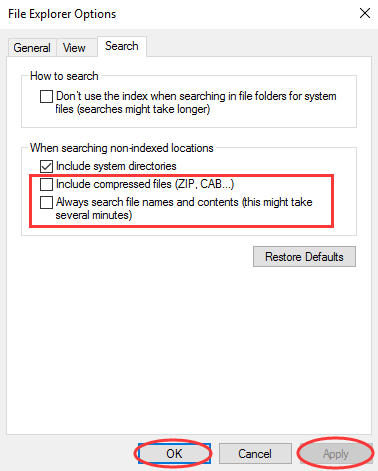
- Open File Explorer and then click the View tab
- Click Options and then click the Search tab
- Unselect the second and third options under When searching non-indexed locations, that is, Include compressed file and Always search file names…
- Click the Apply button and then click OK
Solution #12 – Check Skype Impact
At times Skype can eat disk resources and lead to 100% disk usage. To disable Skype OTT resource requirement, first check whether the software is running or not. Simply look at the System Tray (a bunch of icons located in bottom right-hand corner). If you see its icon there, right-click it and click Quit.
Next, type run in the start search box and press Enter. Now type the following command in the run dialog box and press Enter.

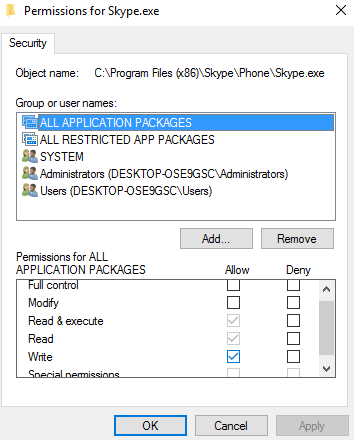
Right-click Skype.exe file and choose Properties. Click Edit in the Security tab and then choose All Application Packages. Tick the box next to Write in the Allow Column and click Apply and then OK.
Solution #13 – Fix PCI-Express Firmware Bug
It’s no secret that some drivers cause problems in Windows 10. A case in point is StorAHCl.sys driver, which has been linked to high disk usage. This driver has a firmware bug and that’s why it can sometimes cause problems.
If you’ve not been able to fix the titled issue so far, fix this driver. However, first check whether you have this driver or not.
- Press Win + R keys to launch the Run box
- Type devmgmt.msc and then press Enter
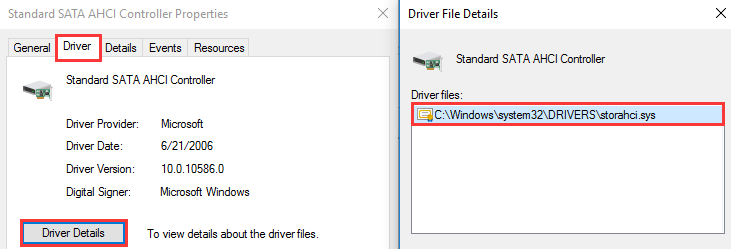
- Expand IDE ATA/ATAPI Controllers, and then right-click Standard SATA AHCI Controller and click Properties
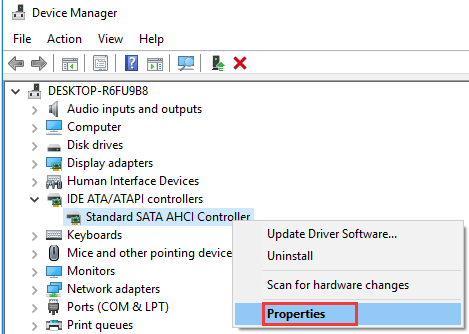
- Click the Driver tab and then click Driver Details
- In case you see storahci.sys in the list, it means you’ve got the said driver
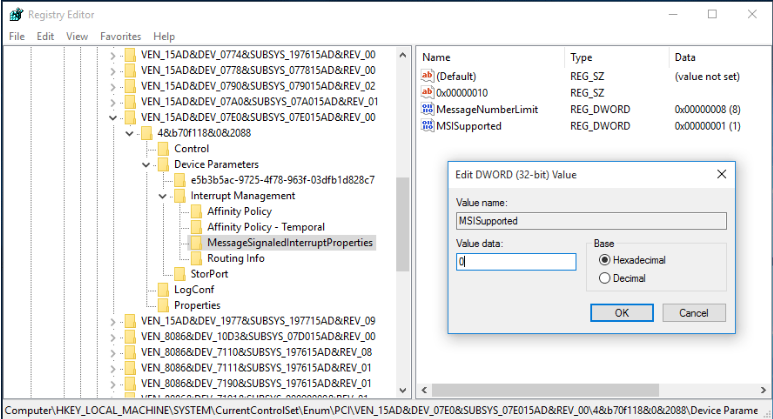
Now you got to disable MSI for the controller in the Windows Registry. Here are the steps to follow.
- Click the Details tab in the Properties window. Choose Device instance path from the first drop-down menu below (below Property).
- Press Win + R keys to call out the Run dialog box
- Type regedit and press Enter
- Browse to HKEY_LOCAL_MACHINE\System\CurrentControlSet\Enum\PCI\<AHCI Controller>\Device Parameters\Interrupt Management\MessageSignaledInterruptProperties. Change the MSISupported key value to “0” from “1”
Solution #14 – Activate High Performance Mode
You can also try changing the Windows power settings as this has worked for more than a few users. Research shows 100% disk usage issue is more likely to occur in case of standard power modes. However, changing to high performance mode can help fix the issue.
That said, remember that your computer will now consume more power. All the same, most modern processor can handle the extra load without breaking a sweat. The same, however, can’t be said for replacement laptops and notebooks.
Here’s how you can turn to high performance.
- Press Win + X and then select Power Options
- Click Additional power settings, choose High performance, and click OK
In case you don’t see this option, create a custom plan by clicking Create a power plan. Next, select High Performance and write the name of this plan.
Solution #15 – Clear the Steam Cache
In some cases, the problem is related to Steam. You can fix the issue by clearing its cache. However, first you need to close Steam, which may not prove that straightforward as it is likely to hang when you try to close it. However, you can use the Windows Task Manager to do the necessary.
Next, press Win + R to open the run dialog box. Now type the following command and press Enter.

A dialog box will open on your screen. Click the OK button, and the steam cache will be cleared.
Your games and saves will not be deleted, so you don’t have to worry about losing them.
We hope one of these 15 solutions would have worked for you. Leave us a comment below to tell us which solution did the trick for you or if you have any questions.

Leave a Reply