Windows come with many useful features. One such feature is System Restore. It allows you to restore your settings to an earlier point, a feature that can come in handy while fixing a range of errors or issues.
But what if System Restore is itself the problem? What do you do when System Restore is not working?
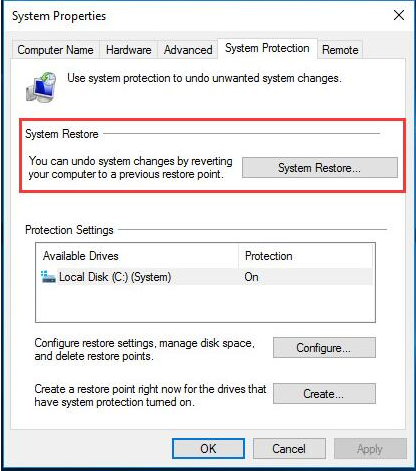
Annoying as this issue is, the good news is that you easily fix it. Here are some solutions to this problem. You don’t have to try all of these solutions; start with the first one and work your way down, until the issue is fixed.
Solution 1 – Check if System Restore is enabled
Here are the steps to follow:
- Press Win + R keys simultaneously to launch the run dialog box
- Type gpedit.msc here and press the OK button or hit Enter
- In the Local Group Policy Editor window, go to Computer Configuration | Administrative Templates | System | System Restore. Double-click Turn off Configuration in the right panel
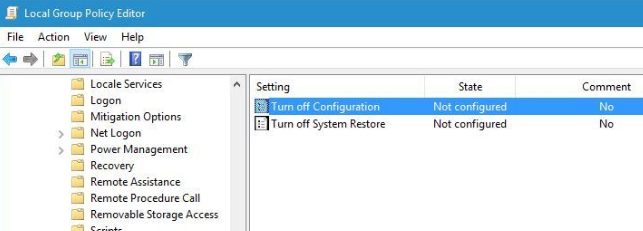
- Check Not Configured and click OK
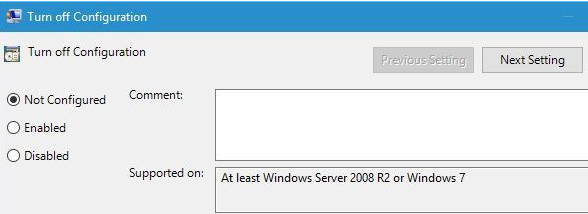
- Double-click Turn off System Restore in the right pane. Check Not Configured and Click OK
Solution 2 – Try to create a restore point manually
In case you’re not able to set a restore point the normal way, you may want to set a restore point manually. Here are the steps to follow.
- Press Win + S. Now type create a restore point, and select create a restore point in the search results
- Now a System Properties box will open. Under the System Protection tab, click the Create button. Type in the name of this restore point.
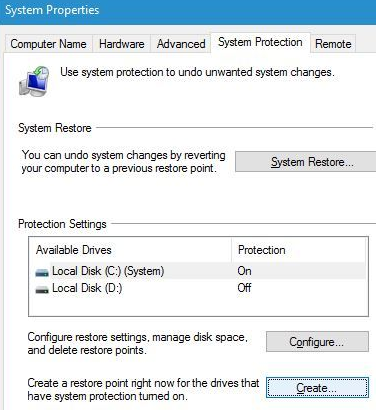
- Now check if this restore point was created. If yes, you can manually create restore points in future
Solution 3 – Temporarily disable the antivirus program
In some case, the culprit is the antivirus program. Sometimes your antivirus program may conflict with other programs, causing all sorts of issues. Therefore, we recommend you to temporarily disable any third-party antivirus program that you may be using. Now check if doing so resolves the problem with System Restore. If yes, contact the antivirus program’s manufacturer and ask them for a solution. Else, you can chuck away this protection tool, and use another one in its place. One good option is the inbuilt Windows Defender.
Solution 4 – Try running System Restore in Safe Mode
If the error persists, boot Windows in the Safe Mode and check if you are able to create a restore point that way.
To launch the Safe Mode, follow these steps:
- Open Start Menu
- Click the Power button
- Hold the Shift key on the keyboard and then click Restart
- When Windows reboots, select Troubleshoot | Advanced Options | Startup Settings and then click Restart
- When Windows restarts again, you need to press F5 to choose Safe Mode with Networking
- Now you will be able to access Safe Mode. Try performing System Restore now
Solution 5 – Ensure the disk usage space is set to at least 300MB
Here are the steps to follow:
- In the search box in Start menu, type system restore
- Select create a resort point in the search results list
- In the System Properties dialog box, click the Configure button under the System Protection tab
- Now move the slider to configure the max usage to at least 300MB
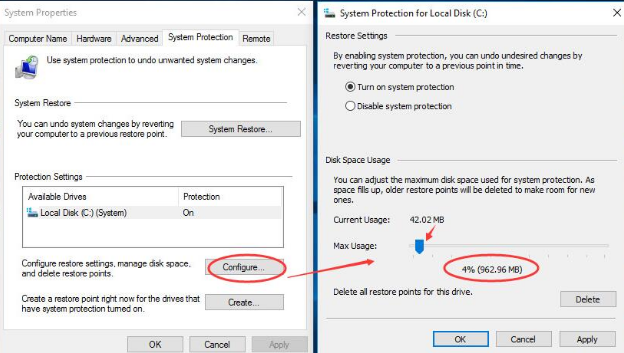
- Finally click the OK button
Solution 6 – Check if Services are running properly
If there’s some problem with certain services, System Restore may not function properly. This is because it depends on certain services.
- Press Win + R keys simultaneously
- In the run dialog box, type services.msc and then click the OK button
- You need to check of these specific services: System Restore Service, Volume Shadow Copy, Microsoft Software Shadow Copy Provider Service and Task Scheduler
- You need to double-click each of the listed services and ensure that their Startup type is configured to Automatic. Also ensure Services status is configured to Running
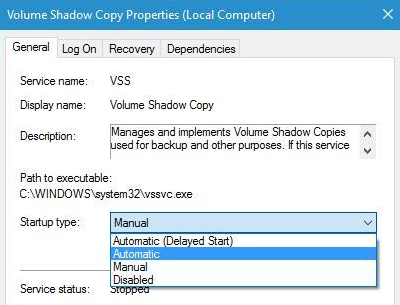
- Click the Apply button and then OK in each case to save the changes. Once you’ve made the necessary changes, reboot Windows
Solution 7 – Check the hard drive for errors
Corrupted folders and files on the hard drive can cause issues with System Restore at times. For this reason, we recommend you check hard drive for corrupted files and fix them.
Here’s all that you need to do.
- Press Win + X simultaneously. Now in the search results, select command prompt with admin rights
- In the command prompt window, type chkdsk /f/r X: and press Enter. Note: (In place of X, use the letter that denotes a hard drive partition on your computer)
- Wait for the process to complete. This may take some time, so try this solution when you have some time on hand. Restart Windows once the process is complete
Solution 9 – Run Sfc scan
In case Windows 10 is corrupted, it is recommended you run sfc scan. Here are the steps to follow.
- Press Win + X keys simultaneously and choose command prompt with admin rights
- Next type sfc /scannow in command prompt and press Enter
- Wait till the process is complete
Solution 10 – Tweak Windows registry
If nothing else works, you may want to try this last solution. However, since it involves modifying the Windows registry, we recommend you proceed only if you are confident about making changes to registry. Also, make sure you make a registry backup before you change anything. A backup can come in handy if some unexpected error or issue crops up because of the changes made.
Here are the steps to follow.
- Press Win + R simultaneously to open the run dialog box
- Type regedit and press Enter
- In the Registry Editor, browse to KEY_LOCAL_MACHINE\SOFTWARE\Microsoft\Windows NT\CurrentVersion\Schedule\TaskCache
- You should first back up this registry key. Right-click TaskCache and choose Export
- Give a name to the backup file and select a suitable location to save it. Next click the Save button
- Now go to HKEY_LOCAL_MACHINE\SOFTWARE\Microsoft\Windows NT\CurrentVersion\Schedule\TaskCache\Tree\Microsoft\Windows
- Right-click Windows key and then click Delete
- Confirm your action by pressing Yes
- Restart Windows

Leave a Reply