Many Windows users have complained of svchost.exe (netsvcs) using all of their Internet bandwidth. If you are facing a similar problem, this post is for you. Before looking at solutions, lets learn more about svchost.exe (netsvcs)
What is svchost.exe (netsvcs)?
Svchost.exe is a generic host process in Windows that runs dynamic link libraries. If you check the Task Manager, you will find many instances of svchost.exe. Svchost.exe is an essential process and killing it can make Windows unstable or your computer might crash without warning
Windows functionality depends a lot on different Windows services. In Windows, DLL files cannot be launched directly and an executable file is needed to run DLL. Svchost.exe serves this purpose. svchost.exe (netsvcs) is also an essential service that is required for a stable and safe Windows operation. In simple words, svchost.exe (netsvcs) is required for Windows to work properly.
Should you disable or remove svchost.exe (netsvcs) process?
No, you should not stop, disable or kill svchost.exe (netsvcs) process from Task Manager. It will make Windows unstable leading to a system crash. In this post, we have discussed solutions to resolve high network usage by svchost.exe (netsvcs).
You can use the solution given below. Many Windows users who were facing svchost.exe (netsvcs) process high Internet usage problems were able to resolve the problem using the solution given below.
What is the solution to resolve svchost.exe (netsvcs) process high Internet usage problem then?
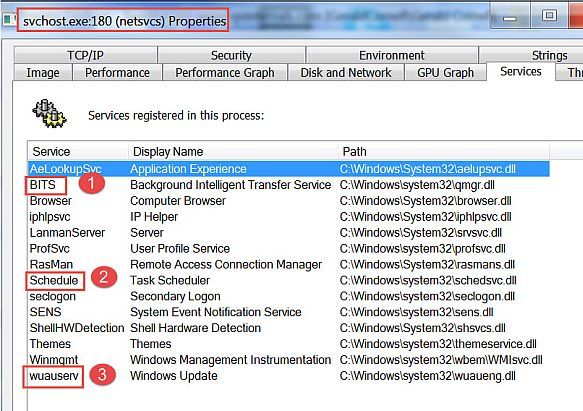
If you look closely in the Task Manager at the svchost.exe (netsvcs) properties, you will see services registered to use this process. Out of these processes, the services numbered 1, 2, and 3 are most likely causing high Internet usage.

Many Windows users were able to resolve the problem by disabling the BITS service. BITS stand for Background Intelligent Transfer Service. According to Windows experts, BITS is known to use all unused Internet bandwidth to transfer update files to the user.
BITS service is related to finding and installing Windows updated. Disabling this service does not affect the stability and performance of the Windows operating system. Hence, you can disable the BITS service and see if it helps.
Solution – Disable Background Intelligent Transfer Service
- To open Run box, press Windows key and R simultaneously on the keyboard
- In the Run command box, type the following – services.msc
- Hit Enter on the keyboard
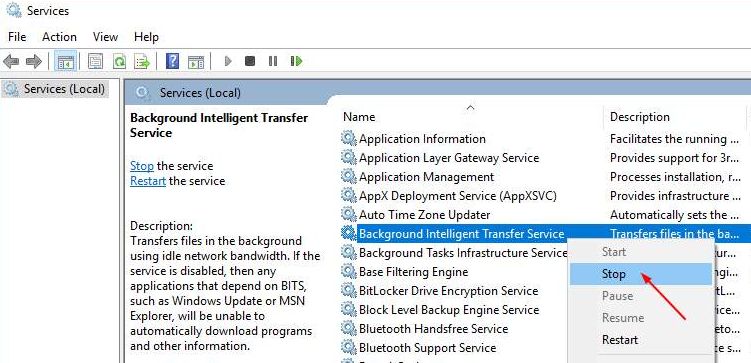
- In the Service window, look for Background Intelligent Transfer Service and right-click on it
- Select Stop from the menu

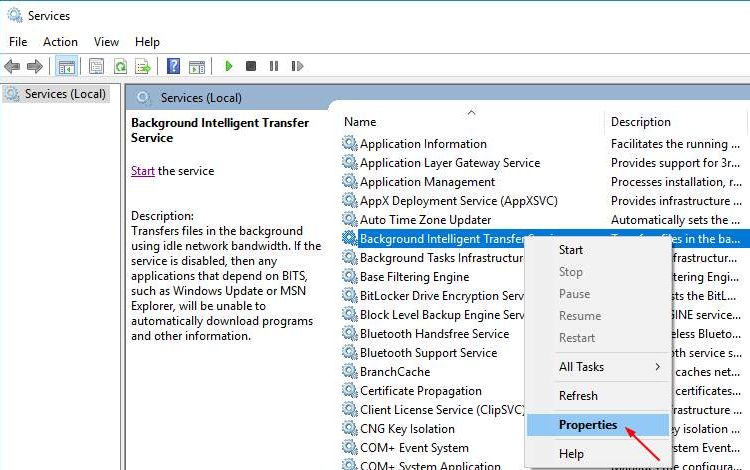
- Now right-click Background Intelligent Transfer Service again and this time select Properties

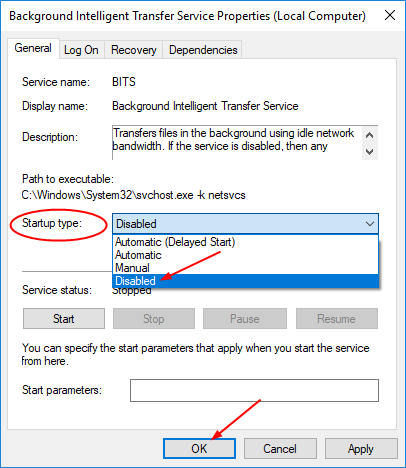
- In the Background Intelligent Transfer Service properties window, go to the General tab
- Go to the Startup type section and click the down arrow to see all options in the drop-down list
- In the drop-down list, select Disabled

- Click Apply -> OK
- Close any open windows and restart your PC
- After the computer reboots, open Task Manager and check whether the problem is resolved.
If the svchost.exe (netsvcs) process continues to hog Internet bandwidth, you need to update drivers and see if it helps.
Pro-tip – Update drivers
As you may know, you can update drivers manually through Device Manager. But did you know that this method is often time-consuming. If you want to update drivers quickly and automatically, using a driver update tool would be the best option.
Automatic driver update tools offer many benefits, the most important ones being:
- You can update device drivers automatically
- The software scans and updates all outdated or missing drivers at one go
- The tool picks the right drivers for your device and operating system, so you won’t have to worry about installing an incorrect driver by mistake
- Automatic driver updates are 100% safe
Driver Updater is one of the best driver update tools out there. Outbyte Driver Updater will give you access to a database of over 1 million drivers. It will regularly scan your PC, suggesting new driver versions to install. Driver Updater contains drivers for a variety of Windows devices. With just one click, you can update drivers in your system.
Step 1
Click here to Install and launch the app
Step 2
Scan all devices
Step 3
Install or update drivers automatically

Leave a Reply