Many Windows 10 users have complained of Start Menu not working after installing Windows update (Windows 10 Fall Creators Update, version 1709).
When users press the Windows logo button on keyboard, it does not invoke the Start Menu. The Start Menu also doesn’t show up when users click the Start button on Taskbar. Additionally, Cortana search fails to give the desired result.
If you are facing a similar problem of Windows logo button not working, this post is for you.
Start Menu is a useful feature in Windows, and if your Windows button is not working you may find it difficult to access various Windows functions.
Here we have provided 8 different solutions that might get Windows button working again.
The exact cause of the problem is likely to differ from one Windows environment to another. So it can be difficult to pinpoint which solution might work for you.
We suggest you to start with first solution and if it does not work move to next solution and so on.
Solution One- Logout and login again into your user account
The Start button not working might be a temporary issue which might just get resolved by re-logging into your user account. Here are the steps to follow.
- Press Ctrl+Alt+Delete keys simultaneously on your keyboard
- From the list, click Sign out
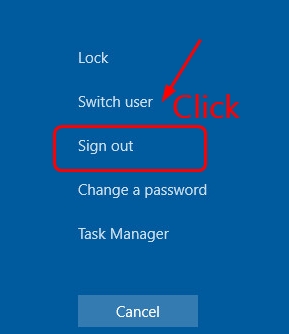
- Select your user account
- Type the password and login into your user account
Click on Start Menu and check whether the issue is resolved. If the problem persists, move to next solution
Solution Two- Create a new local administrator user account
Since Start button is not working, you won’t be able to create a new user account through Windows settings or Cortana. Here are the steps to create new user account.
- Go to Desktop
- Right-click on empty space in Taskbar
- From the menu, click Task Manager
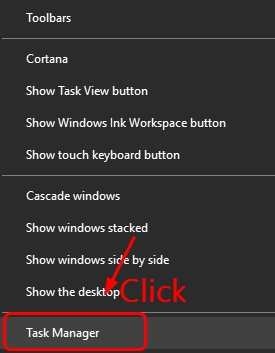
- In the Task Manager window, click File
- Click Run new task
- In the Create new task window, type cmd
- Check the box- Create this task with administrative privileges.
- Click OK
- In the Command Prompt window, type net user admin2 password2 /add
(Note- You can replace the admin1 and password2 with your desired username and password)
- Press Enter on the keyboard and wait for the command operation to complete
- Close the command prompt window
- Restart your PC
- Login into your new account
Check whether Start Menu is working. If the problem is not resolved, move to next solution
Solution Three- Run Start Menu Troubleshooter
Microsoft offers a Start Menu Troubleshooter that might resolve the issue. You need to download the Start Menu Troubleshooter from Microsoft website and run it on your Windows 10 system.
The tool will scan your system and detect potential issues.
If it finds any problems, it might fix them or provide you directions to fix these problems manually. The Start Menu Troubleshooter will check for following problems.
- Application manifest corruption problem
- Tile database corruption problem
- Check whether Start Menu and Cortana are installed correctly
- Registry key permission issues
Here are the steps to run the Start Menu Troubleshooter
- Double-click on the Start Menu Troubleshooter to run it
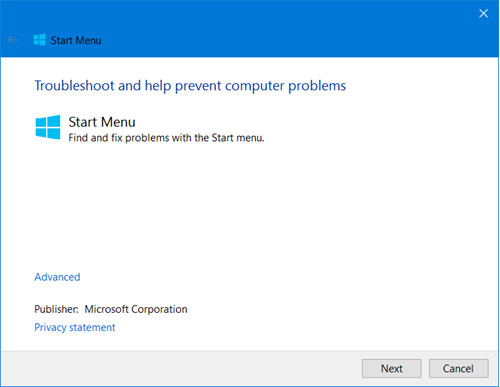
- Click Next
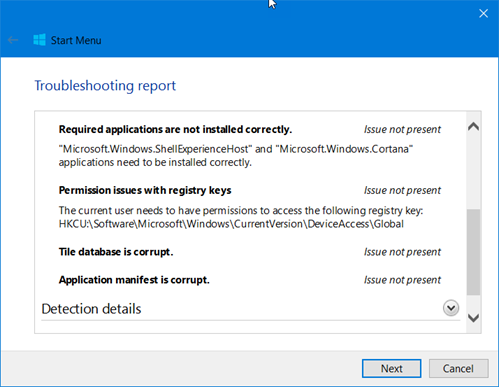
The Start Menu Troubleshooter will check for the problems mentioned above. If it does not find any problems, move to next solution
Solution Four- Reinstall Sound and video card drivers
Many problems in Windows 10 are related to drivers. You cannot rule out the possibility of corrupt or incompatible drivers causing the Start Menu problem. An easy solution to the problem is uninstalling the sound and video card drivers and installing latest drivers for these devices. Here are the steps to follow.
Step 1- Uninstall Drivers
- Press Windows logo key and X simultaneously on the keyboard
- From the menu, click Device Manager
- In the Device Manager window, go to Sound, video and game controllers category and expand it
(Note – Write down the audio device name, you will need to find latest drivers for the audio device)
- Right-click on the audio device and click Uninstall
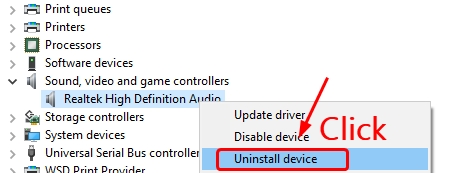
- Wait for the drivers to uninstall. Once the process is completed, go to Display Adapter category
- Expand the Display adapters category
(Note – Write down the display device name, you will need to find latest drivers for the display device)
- Right-click on the display adapter and click Uninstall
- Wait for the process to complete. Close Device Manager
Step 2- Download and install Drivers manually
Launch an Internet browser and go to the sound card manufacturer website and find driver updates for sound cards cars installed in your PC
When you download sound card drivers, you need to download right sound drivers. For example, the audio device manufacturer lists both 32-bit and 64-bit drivers in the device drivers section though they are listed separately.
Check the Windows OS architecture and download right sound card drivers. I.e. 32- bit drivers for 32-bit Windows and 64-bit drivers for 64-bit OS. You need to download display drivers in similar manner.
Once the drivers are downloaded, you need to install them by following instructions given below.
- If the driver setup file is in .exe format, you need to double-click on it to start the installation and then follow on-screen instructions to install the drivers
- If the driver setup file is in zip format, you need to unzip the contents to a folder and then locate the setup file(.exe) and start the installation
- Once sound card and display adapter drivers are installed, restart the PC
Check whether the Start Menu has started working. If the problem still exists, move to next solution. If you find the manual driver installation process complicated, you can use a Driver Update Tool to update drivers automatically
Steps to Update Drivers Automatically
A much simpler and faster way to update device drivers is by using a reliable driver update software tool.
Automatic driver update tools offer many benefits, the most important ones being:
- You can update device drivers automatically
- The software scans and updates all outdated or missing drivers at one go
- The tool picks the right drivers for your device and operating system, so you won’t have to worry about installing an incorrect driver by mistake
- Automatic driver updates are 100% safe
Driver Updater is one of the best driver update tools out there. Outbyte Driver Updater will give you access to a database of over 1 million drivers. It will regularly scan your PC, suggesting new driver versions to install. Driver Updater contains drivers for a variety of Windows devices. With just one click, you can update drivers in your system.
Step 1
Click here to Install and launch the app
Step 2
Scan all devices
Step 3
Install or update drivers automatically
Solution Five- Uninstall/Disable 3rd party anti-virus program
Windows 10 features Windows Defender that is quite good security software. There is a possibility the 3rd party anti-virus software installed in your PC is causing the Start Menu issue. To rule out this possibility, disable the 3rd party antivirus software or uninstall it and switch to Windows Defender.
The steps to disable the 3rd party anti-virus software are unique to every software. The instructions given below are for reference purpose only. You need to check your anti-virus software documentation to know the exact steps.
Go to Desktop and look for anti-virus icon in the right hand bottom corner of the screen. Some ant-virus have temporarily disable option while some anti-virus require you to access the anti-virus main interface to temporary disable the security software.
By default, Windows Defender is On even after 3rd party anti-virus software is installed. If the Start Menu starts working after disabling the 3rd party anti-virus software, you need to contact the software manufacturer, explain the issue and ask for a solution. Till then you can leave the 3rd party anti-virus software disabled as Windows Defender is already active.
If needed you can uninstall the 3rd party anti-virus software and continue using Windows Defender or install another 3rd party anti-virus software. If the Start Screen issue is not resolved after disabling 3rd party anti-virus software, move to next solution.
Solution Six- Uninstall Dropbox
Many users who faced similar issue have mentioned they were able to get Start Menu working after uninstalling Dropbox software. If you have Dropbox installed, you need to remove it to resolve Start Menu issue.
- Hold down the Windows logo key and press R on the keyboard to invoke Run command box
- In the Run command box, type control panel
- Set the view by to Category and click Uninstall a program
- Find Dropbox in the list and select it
- Click Uninstall button
- Wait for the program to get uninstalled and then close all windows
Press Windows logo key and see if the Start Menu is activated. If the problem remains unresolved, move to next solution.
Solution Seven – Check and repair System files
You cannot ignore the possibility of system files being corrupt and causing the Start Menu problem. In that case, you can use the system repair tools like SFC (System File Checker and DISM (Deployment Image Servicing and Management) to scan system files and replace the corrupt system files with good versions.
- Go to Desktop
- Click empty space in the task bar and select Task Manager
- In the Task Manager window, click File
- Click Run new task
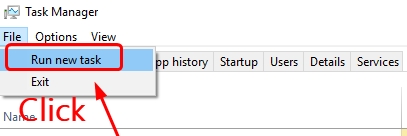
- In the Create new task window, type cmd
- Check the box- Create this task with administrative privileges.
- Click OK
- In the Command Prompt window, type sfc /scannow and hit Enter on keyboard

- Wait for the command operation to complete.
Check whether Start Menu is working. If the problem is not resolved by SFC, you need to use DISM to fix the issue.
In many cases, SFC is not able to resolve some system file corruption issues. In that case, you need to use DISM. It is a command-line tool that is used to service Windows Recovery environment, Windows setup, Windows images. You need to use the use the//ScanHealth and //RestoreHealth command to scan the windows image for corruption and perform repairs automatically. Here are the steps you need to follow.
In the command prompt window, type the following commands hit enters on the keyboard. Wait for first command operation to complete before typing next command
<insert-windows button not working-DISM commands>
- Dism /Online /Cleanup-Image /ScanHealth
- Dism /Online /Cleanup-Image /RestoreHealth
Now check whether the Start Menu is working, if the problem is not resolved, move to next solution.
Solution Eight – Reinstall Cortana
One reason Start Menu and Cortana might not be working is they are not installed correctly. A simple solution to this problem is reinstalling Cortana that will set things right. Here are the steps to follow
- Open command prompt with admin rights (Refer steps given in Solution 7)
- Type Get-AppXPackage -Name Microsoft.Windows.Cortana | Foreach {Add-AppxPackage -DisableDevelopmentMo
de -Register “$($_.InstallLocation)\AppXManifest.xml”}

- Wait for the operation to complete.
- If the above command does not work for you, type the following command
- Get-AppXPackage -AllUsers | Foreach {Add-AppxPackage -DisableDevelopmentMode -Register “$($_.InstallLocation)\AppXManifest.xml”}
- The command will reinstall Cortana.
Check whether the Start Menu is working. In most cases, the windows button not working problem would be resolved by one of the solutions given in this post.

Leave a Reply