In case your Windows 10 system is freezing randomly, this post is for you. Windows 10 is far from a perfect system and Microsoft frequently provides updates and patches to fix newly discovered bugs. The updates do not go well with all users and many have complained about Windows 10 becoming non-responsive randomly.
It can be hard to pinpoint to any specific cause behind the problem which makes troubleshooting more difficult. Here we have presented 11 solutions and one of them might fix the issue. The best strategy to follow is start with Solution One and if it does not work you, try next solution and so on.
Before Anything Else
Incompatible hardware or software could be the reason behind “Windows 10 keeps freezing” issue. Try to recall when this problem started.
- Did it start after installing any hardware?
- Did it start after installing or updating any application?
If you are able to recall any changes that led to this problem, you need to revert back the changes and see if the problem is resolved. For example, removing the new hardware or uninstalling the application.
Solution One – Update Graphic Drivers
Many Windows 10 issues are related to drivers. Updating Drivers can resolve several device related issues. Microsoft offers regular updates for Windows 10. Driver updates for various devices like network adapters, video cards, monitors, printers are automatically downloaded and installed through Windows update.
If you have updated from Windows 7or 8 to Windows 10, it is more likely your computer is still using old graphics drivers. There are two ways to update Graphics driver- Manually and Automatically. Here we have given steps to both methods
Method One – Update Driver Manually
Sometimes the graphics drivers offered through Windows update may not be the latest drivers. In that case, you need to check the device manufacturer website for latest driver update. Here are the steps to follow.
- Press Windows logo key and R simultaneously on your keyboard to invoke Run command
- In Run command window, type devmgmt.msc and click OK
- In the Device Manager window, navigate to Display Adapters category and expand it
- Right-click on Display adapter in the list and note down its name
- Now launch an Internet browser and go to the Display card manufacturer website and find driver updates for graphics cars installed in your PC
When you download graphics drivers, make sure you download right graphics drivers. For example, the device manufacturer lists both 32-bit and 64-bit drivers in the device drivers section though they are listed separately. You need to check the Windows OS architecture and download right graphics drivers. i.e. 32- bit drivers for 32-bit Windows and 64-bit drivers for 64-bit OS.
If you find this method cumbersome, you can use an automatic driver update utility.
Method Two- Update Drivers Automatically
Automatic driver update tools offer many benefits, the most important ones being:
- You can update device drivers automatically
- The software scans and updates all outdated or missing drivers at one go
- The tool picks the right drivers for your device and operating system, so you won’t have to worry about installing an incorrect driver by mistake
- Automatic driver updates are 100% safe
Driver Updater is one of the best driver update tools out there. Outbyte Driver Updater will give you access to a database of over 1 million drivers. It will regularly scan your PC, suggesting new driver versions to install. Driver Updater contains drivers for a variety of Windows devices. With just one click, you can update drivers in your system.
Step 1
Click here to Install and launch the app
Step 2
Scan all devices
Step 3
Install or update drivers automatically
Solution Two- Delete Temporary Files
As you use your computer, Windows creates several files for its operation. If you do not have a habit of deleting temporary files, over the time a large number of temporary files get accumulated in your C drive.
These temporary files not only occupy large disk space but also affect performance of your system. There is a possibility, windows is freezing due to large pile of temporary files. In general, it is safe to delete everything from temp folder. Here are the steps to delete temporary files.
- Hold Windows logo key and X together on the keyboard to access the Context Menu
- Choose File Explorer from the list
- In the File Explorer address bar, type C:\Windows\temp and press Enter on the keyboard
- If Windows prompts for administrator permission to access the folder, click Continue
- In the temp folder, press Ctrl+A on the keyboard to select all contents in the folder
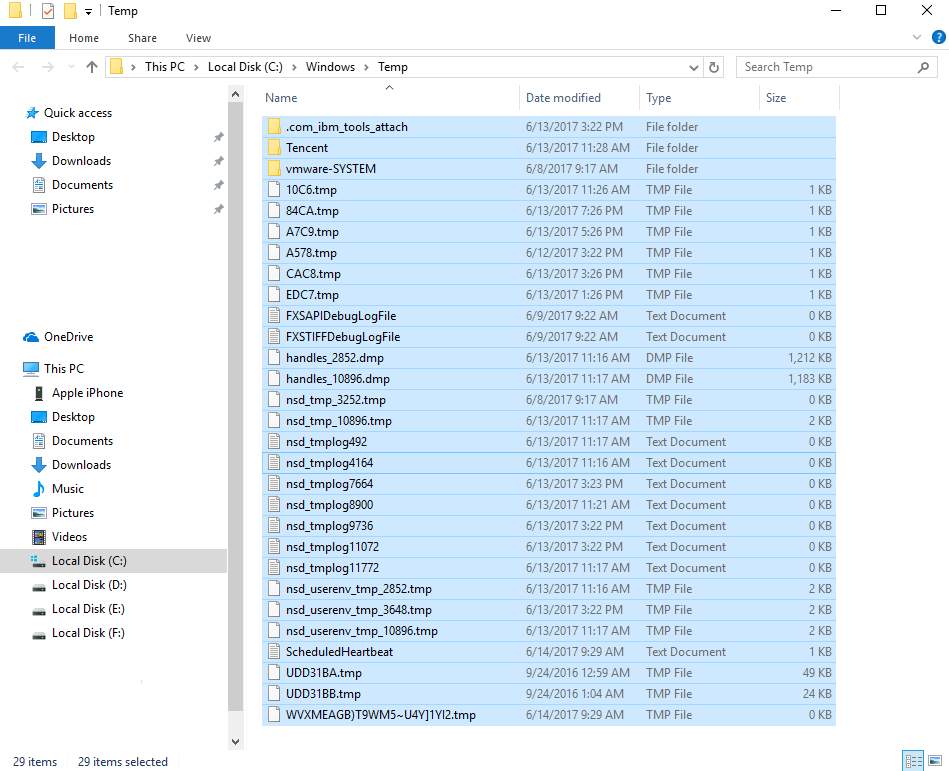
- Press the Delete button on the keyboard
- Close all windows
- Restart your PC
Now use your PC and see if it freezes or becomes non-responsive. If you do not notice any difference in performance of the PC and see it becomes non-responsive often, move to next solution.
Solution Three- Check RAM
RAM is one of the important components of your PC. Windows OS depends heavily on RAM for smooth functioning. You cannot ignore the possibility of faulty RAM behind the “Windows 10 keeps freezing” issue.
Windows has an in-built memory check tool that can diagnose any problems with memory and report them to you. If you find any faults in the RAM, you need to get a new RAM module to make things right.
The Memory diagnostic tool runs at start of Windows. It means you have to close all apps and files and restart your PC to run the Memory diagnostic tool. Here are the steps to follow.
- Hold Windows key and R button together simultaneously on the keyboard to invoke Run command box
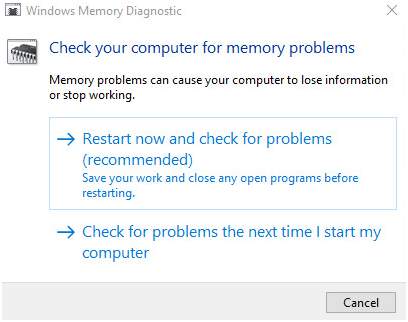
- In the Run command box, type mdsched.exe
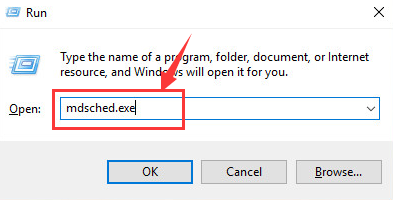
- You will see two options- 1) Restart now and check for problems (recommended) and 2) Check for problems the next time I start my computer.
- If you want to start memory check immediately, select option one else select option two
- If you have selected the first option, the PC will restart and you will see Windows Memory Diagnostic tool in action checking RAM module for any faults
- If you select the second option, the Windows Memory Diagnostic tool would run when the computer reboots next time.
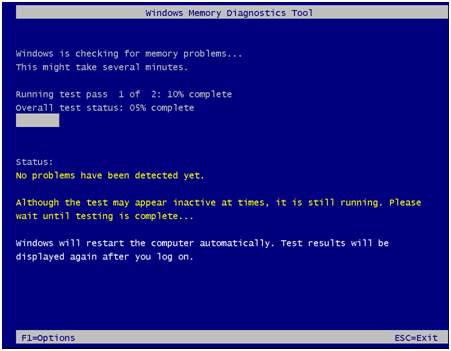
If Memory Diagnostic tool finds any faults, it will report an error. If the Memory Diagnostic tool completes the process without any errors, you can conclude the RAM modules are in good condition. See the image below for reference that shows memory test passed successfully.
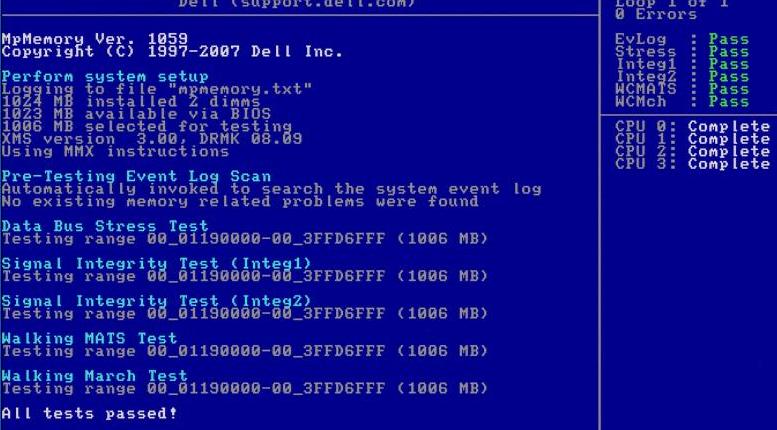
Since the Physical RAM is not at fault and the issue remains unresolved, you can move ahead to next solution.
Solution Four- Increase Virtual Memory
Windows has two types of memory- Physical RAM which we have checked earlier and Virtual memory which is also referred as Paging File. If Windows does not have enough Physical RAM to run programs, it uses Virtual Memory to compensate.
There is a possibility Windows is falling short of memory and that is causing Windows to freeze and become irresponsive. While increasing Physical RAM is an option, it will require you to buy new RAM modules. Increasing virtual memory is easy and you just need to make changes to some settings. Here are the steps to follow.
- Hold Windows key and Pause/Break key together on the keyboard to open the Control Panel Home window
- On the left panel, select Advanced System settings
- Click the Advanced tab->Settings
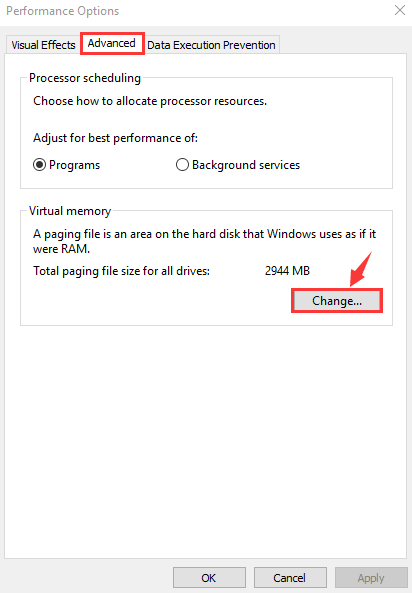
- In Performance Options window, click the Advanced tab- > Change
- Make sure the option “Automatically manage paging file size for all drives” is not checked
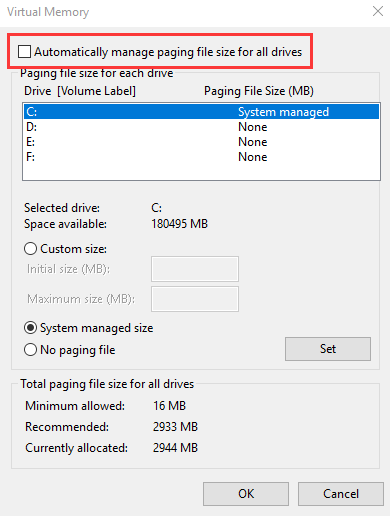
- Select drive where Windows is installed. By default, it is C drive for most Windows 10 unless you have dual boot windows.
- Click Custom size and enter the initial size and maximum size for the virtual memory
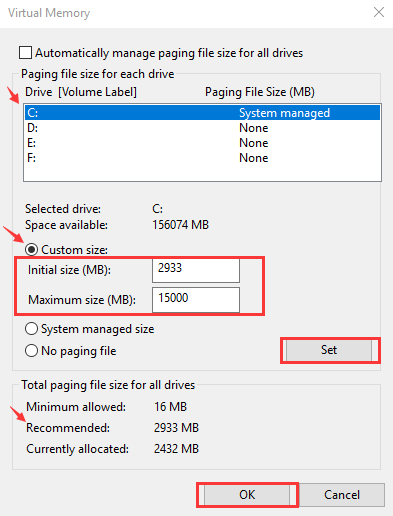
- Initial size – If you are confused about the right value for initial size, you can enter the recommended value
- Maximum size- it varies with a computer and mainly depends on the size of Physical RAM installed. Microsoft recommends maximum size anything between 1.5 times to 3 times of the physical RAM size installed. If you have 4GB RAM(4096MB) installed, the recommended maximum size can be 4096×1.5 = 6144 MB
- After you have types right initial and maximum size for virtual memory, click Set
- Click OK
If your Windows 10 system still freezes after trying this solution, try next solution.
Solution Five- Diagnose Hard Disk for Issue
Bad sectors can develop in hard disks and corrupt data stored in the sectors. In that case, the Windows OS is not able to access data stored in bad sectors which might be important for its functioning. This could make the system irresponsive.
Windows has a hard disk tool that can diagnose hard disk for any errors and fix problems. Here are the steps to follow.
- Close all program and files
- Go to Desktop and double- click This PC icon
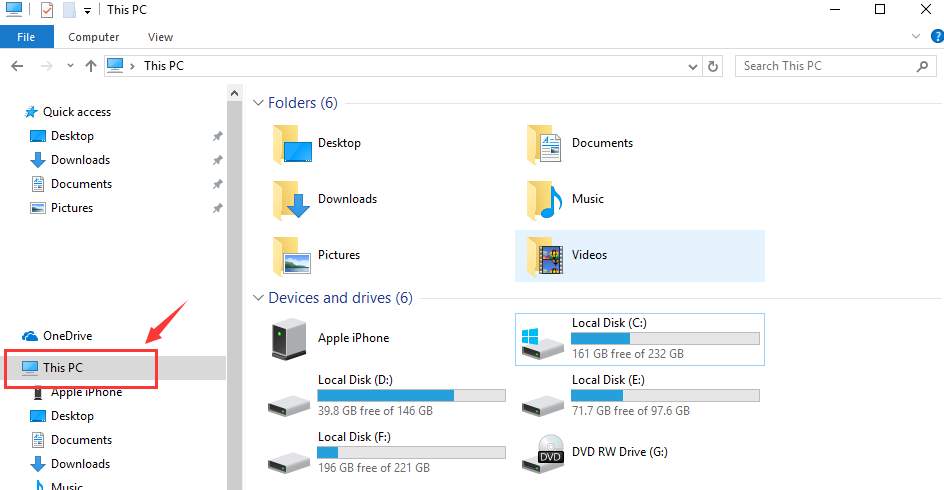
- Alternatively, you can Click Start-> File Explorer -> This PC
- Right-click the hard drive partition you would like to check and select Properties
- Go to Tools tab
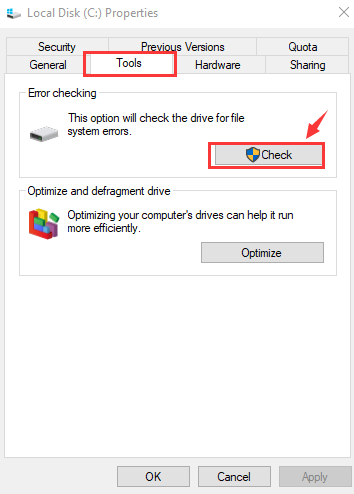
- Click Check
Windows will start hard drive diagnosis and report any error it find. The system will display a message after successful completion of hard disk diagnosis
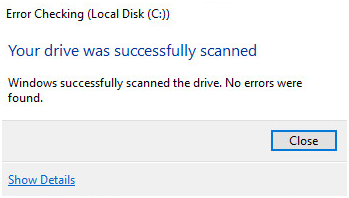
If the system shows message like the one above, you can conclude, the hard disk is in good condition and not the cause behind “Windows 10 keeps freezing” issue. In that case, move to next solution.
Solution Six-Run SFC Scan
SFC stands for System File Checker. SFC is a command-line tool. It means you do not have graphical interface to run the tool. The tool is run through a command. You will need command prompt with admin rights to run SFC command. Here are the steps to follow.
- Hold Windows logo key and R simultaneously on the keyboard to invoke Run command console on the screen
- In the Run command box, type cmd
- Right-click command prompt from the list of results and choose Run as administrator
- In the User Account control pop-up, click Yes
- In the command prompt window, type sfc /scannow and hit Enter
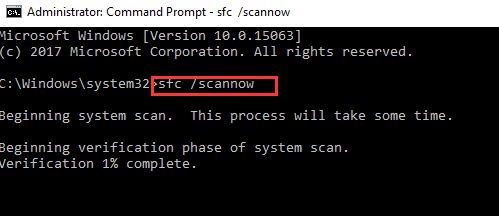
The System File Checker tool will check the integrity of system files and find the corrupted files. It then restores the right versions of the corrupt file. If SFC does not find any problems with system files, the SFC scan completes without reporting any errors. In that case, you can conclude the system files are in perfect condition and you need to move to next solution.
Solution Seven – Disable C-State in BIOS
Today, every company is required to produce green products that save electricity. C-State in computer terminology refers to idle power saving states. During C-State, the processor is idle and nothing is running on your system.
If you look in the BIOS, you will see a C-State option that can be enabled/disabled. In most motherboard BIOS, the option is disabled by default though that might not be the case in your computer.
If the C-State in BIOS is enabled, the motherboard will shut down the processor when system is idle and it might make the Windows irresponsive. Since this setting is causing Windows to freeze, you can go ahead and disable C-State in BIOS.
(Note- Not all motherboards refer the power saving feature as C-State. Intel refers the setting as C-State while AMD refers it as C6 or cstate global control. In some BIOS, you might see this setting with other name. Check the motherboard or processor documentation to know about C-State settings)
- Restart PC
- Press F2 key to enter BIOS setup.

Note: the key to access BIOS differ with BIOS manufacturers and it is listed on the logo screen that you see when PC starts
- After you enter the BIOS setup, go to the Advanced Configuration tab
- Select CPU configuration using the up and down arrow keys
- Once the CPU configuration is highlighted, hit enter
- Look for C1E and Intel® C-State tech and use the navigation keys to disable these options
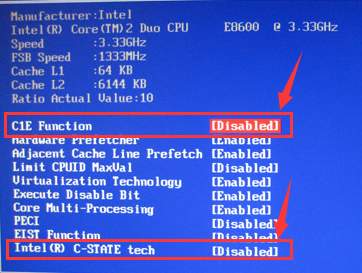
- Save and exit settings in BIOS
- Restart your computer
Now check whether the Windows 10 keeps freezing issue is resolved. If the problem persists, move to next solution.
Solution Eight – Reset Winsock Catalog
Winsock is a programming interface that handles input/output of Internet applications. Sometimes wrong Winsock settings can delay the response to Internet application that can make the operating system irresponsive.
Resetting Winsock catalog resets the Winsock catalog to default state or clean state that could resolve the issue. Here are the steps to follow.
- Hold Windows Key and Press X to bring up Context menu
- Click Command prompt(admin) from the list
- In the command prompt window, type netsh winsock reset and press Enter on keyboard
- Wait for the command operation to complete
- Close command prompt window
Check whether the “Windows 10 keeps freezing” issue is resolved. If the problem persists, move to next solution.
Solution Nine- Turn Off Link State Power Management
The Link State Power Management is part of the PCI-E Specification. It works with active-state power management (ASPM) for power savings. It is a complex subject. Link State Power Management has two levels- Moderate Power Savings and Maximum Power Savings
- In Moderate Power Savings, the power savings are moderate but the time to recover from Sleep state is shorter
- In Maximum Power Savings, the power savings are greater but the time to recover from Sleep state is higher
If your computer is set for Maximum Power Savings, it can cause problems like Windows 10 keeps freezing. A simple solution to this problem is turn off Link State Power Management. Here are the steps to follow.
- Press Windows logo key and R together to bring up Run command
- In Run command box, type powercfg.cpl and click OK
- In the Power Setting window, click Change Plan Settings for your Active Plan.
- Select Change Advanced Power Settings
- Scroll down until you see PCI Express -> Link State Power Management
- Click the option next to Settings and select Off
- Click Apply and then click OK
- Close all windows and restart PC
Check whether problem is resolved. If you still find Windows becomes irresponsive randomly, move to next solution.
Solution Ten- Turn Off Fast Startup
Many users have reported that turning of Windows Fast Startup was the cause of Windows freezing randomly and disabling the option resulted in resolving the “Windows 10 keeps freezing” issue. Here are the steps to turn off fast startup.
- Right-click on Start button to launch Win X menu
- Click Power Options.
- In the right pane, Click Choose what the power buttons do
- Click Change settings that are currently unavailable.
- To disable fast startup – uncheck the checkbox beside Turn on Fast Startup (recommended),
- Click Save changes
- Close all windows
- Restart your PC
Solution Eleven- Switch from Broadcom network adapter to Microsoft Network adapter
Note- This solution applies only to users whose computers have Broadcom network adapters.
Many Windows 10 users were able to resolve “Windows 10 keeps freezing” issue by switching from Broadcom network adapter to Microsoft network adapter software. According to networking experts, the Broadcom network adapter driver software for its network adapters can cause Windows freezing issues.
A simple solution to this problem is using Microsoft driver software for the network adapter. Here are the steps to follow.
- Click on Start button and type device manager in Cortana search box
- Select Device Manager from the list of results
- In the Device Manager window, go to Network adapters and expand the category
- right-click on Broadcom network adapter and click Properties
- Navigate to the driver tab
- Click Update Driver
- Click Browse my computer for driver software.
- Click Let me pick from a list of device drivers on my computer
- You will see two variants of driver software for network adapter, click on Microsoft variant
- With Microsoft driver variant selected, click Next
- Windows will start the installation of Microsoft network driver software. Wait for the installation to complete
- Close all windows and restart your PC
Check whether “Windows 10 keeps freezing” issue is resolved. Like many Windows 10 users, the Windows 10 keeps freezing issue would be resolved by one of the solutions given below.

Leave a Reply