There are several factors that can cause Internet connection issues. One of them is WiFi network not showing up which prevents your Windows computer from accessing the Internet.
If you are facing a similar problem to this, read on and we will hopefully help you to solve it.
Here we have discussed 6 easy-to-follow solutions that can fix your WiFi issue.
Solution 1 – Enable the WiFi on your computer
Note- This solution is specifically directed at laptop users.
Some laptops have a WiFi switch and it needs to be at ON position for WiFi to work on your computer. We have a specific post on enabling WiFi for Acer Laptops here.
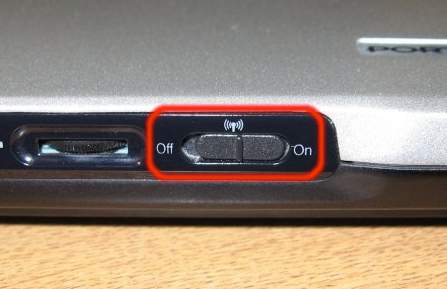
Some laptop has a specific key combination (FN+F5) to enable and disable WiFi on the laptop. Check the key combination or WiFi switch to enable WiFi on your computer.
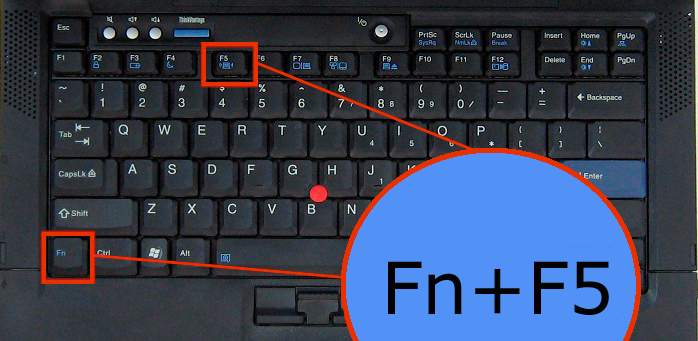
Check whether the Wi-Fi network is showing up. If the Solution One has not worked for you, move to next solution.
Solution 2 – Disable and Re-enable WiFi
Sometimes the WiFi network not showing up is a temporary issue and disabling and re-enabling WiFi can make things right. Here are the steps to follow.
- Go to right-hand bottom corner of the screen and right-click on the Internet icon
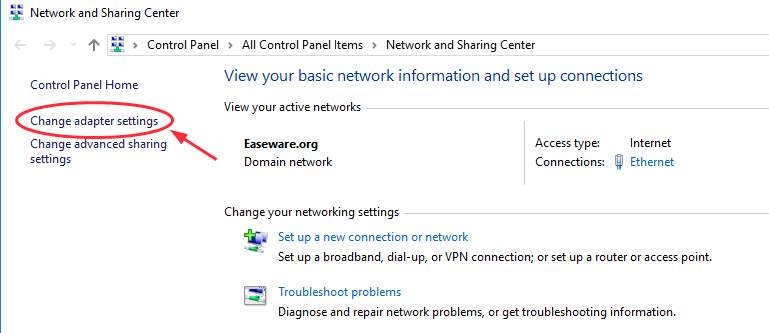
- Click Open Network and Sharing Center

- In the Network and Sharing Center window, click Change adapter settings in left-hand column
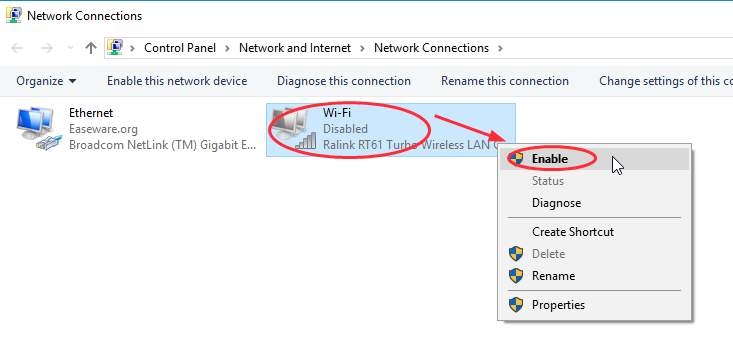
- In the Network Connections window, right-click on WiFi icon
- Select Disable
- Wait for some time and right-click on WiFi icon and select Enable
- Restart your PC and see if you can see the WiFi network.
If this solution has not worked for you, move to next solution.
Solution 3 – Restart Modem and Router
There is a possibility the problem is with the router. Restarting the modem and router would reset the devices and the wireless network issue may vanish. Here are the steps to follow.
- Switch off the modem and router
- Remove the power cables from the wall socket
- Wait for some time and plug back the power cables of modem and router again
- Switch on the modem and router
- Wait for some time and let the devices and connection stabilize
Now check your computer and see if the wireless network is showing up. If the problem persists, move the next solution
Solution 4 – Check the WLAN AutoConfig service
The WLAN AutoConfig service is a built-in tool in Windows to detect and connect to WiFi networks. If the WLAN AutoConfig service is not running, your computer will not be able to detect and connect to WiFi network. Here are the steps to check the state of the WLAN AutoConfig service
- Hold down Windows logo key and press R key to invoke Run command window
- In the Run command box, type services.msc and click OK
- In the Services window, look for WLAN AutoConfig in the right-hand column
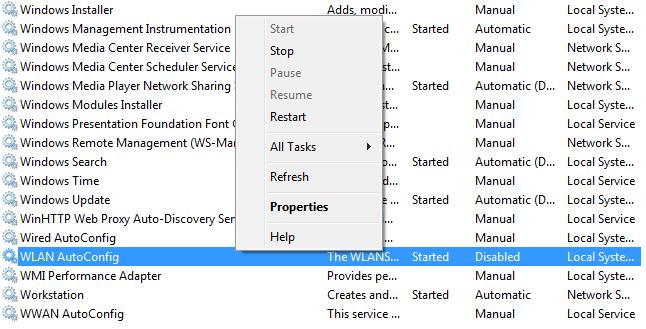
- Right-click on WLAN AutoConfig and select Properties
- In the WLAN AutoConfig properties window, go to Startup section
- Click the downward arrow button to see all Startup option
- Select Automatic
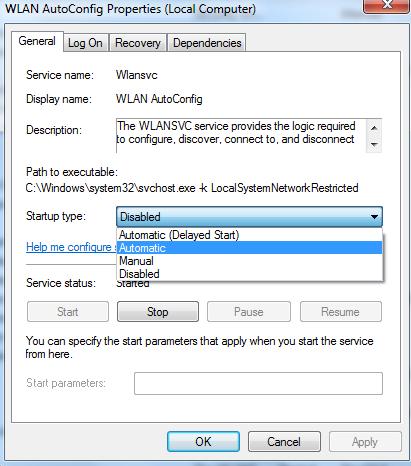
- Click Apply and then click OK
- Close all Windows
- Restart your PC
Click the WiFi icon in the system tray and check whether your WiFi network is showing up. If the problem remains unresolved, go to next solution.
Solution 5 – Check whether the SSID is set to broadcast
There is a possibility that the problem lays in the router settings. Router has an option “Enable SSID Broadcast. The WiFi network will not show if this option is not enabled. You need to access the router settings page and check the SSID broadcast setting. Here are steps to follow
(Note- the steps to access router settings page differ with each make and model of router. Check the router documentation to know exact steps. Here we have shown steps to access TP-Link router settings.)
Since you are not able to connect to wireless network, you need to establish wired connection between your router and computer and then perform the steps given below
- Open Internet browser
- Type the IP address of your router in address bar
- When the router login page is loaded, enter username and password and click Login
- In the router settings page, go to wireless section in the left-hand column
- Click Wireless settings
- Make sure there is a tick in the box- Enable SSID broadcast
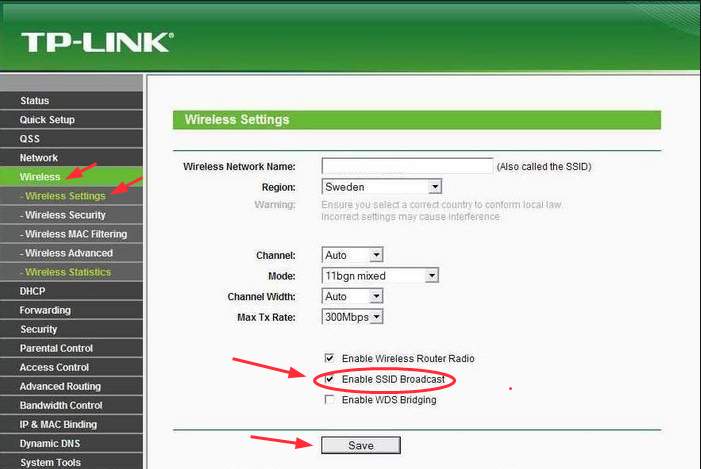
- Click Save
Remove the wired Internet connection and check whether WiFi network is showing up. If you cannot establish a wired connection between router and computer, you can follow the steps given below.
- Right-click the wireless connection icon in the system tray
- Click Open Network and Sharing Center
- Select Setup a new connection or network
- In the box that pops up, click Manually connect to a wireless network and then click Next
- Enter the SSID (name of wireless network)
- Use the drop-down menu to select the correct security/encryption type being used
- Type wireless network password
- Check the box next to Start this connection automatically
- Check the box next to Connect even if the network is not broadcasting
Now check whether your computer is connected to wireless network. If this solution has not worked for you, move to next solution.
Solution 6 – Update WiFi drivers
WiFi issues can also arise due to corrupt or incompatible WiFi driver. An easy solution to fix this issue is updating WiFi drivers. You can update WiFi drivers manually or automatically. Here we have given steps for both methods.
Method 1 – Update WiFi drivers manually
When manually updating WiFi drivers, you are required to know the name of the wireless adapter and the version of the drivers. You can find this information in Device Manager. Here are the steps to get the required information.
Step 1- Find the Wireless Adapter name and driver version
- Click Start
- Right-click on Computer and select Manage
- In the Computer Management window, locate Device Manager in left-hand column
- Click Device Manager
- In the Device Manager window, go to Network Adapters category and expand it
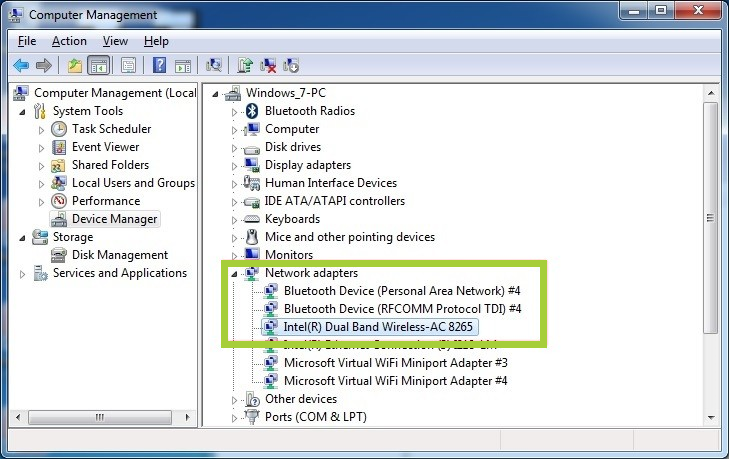
- Look for wireless adapter in the list. Note down its name
- Now, right-click on the wireless adapter and select Properties
- In the properties window, go to Driver tab
- Note down the Driver version
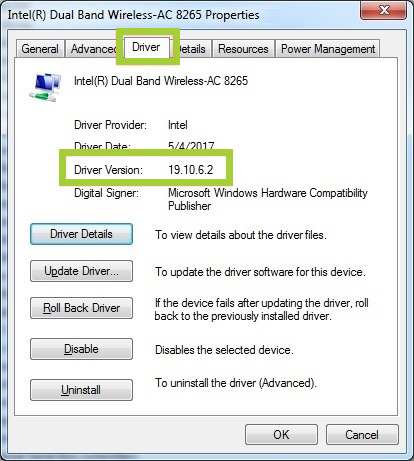
- (Note-You can also choose to uninstall wireless driver)
- Click the Uninstall button
- Wait for the driver un-installation process to complete
- Close all windows
Step 2- Download the latest Wireless Driver
- To download the latest wireless driver, go to wireless adapter manufacturer website
- go to Driver Download section
- Type the driver adapter name in search box
- You will get a list of drivers for the wireless adapter. You may find different versions of the wireless adapter drivers. Since you know the version of the wireless driver installed on your computer, you need to choose the higher version of the driver or the latest version of the driver.
- Once you have selected the latest driver version, you need to ensure you download the right drivers. If your computer is running 32-bit Windows, you need to download driver recommended for 32-bit Windows If your computer is running 64-bit Windows, you need to download driver recommended for 64-bit Windows OS
- Download the wireless driver to your computer
- Double-click on the driver setup file to install wireless driver
- Follow on-screen instruction while installing the driver
- After the driver installation is complete, restart your PC
Now check whether the wireless network is showing up. If the problem is not resolved, move to next solution.
If you find the method of manually updating drivers difficult, you can use a Driver Update Tool to update wireless drivers automatically.
Method 2 – Update Wireless Drivers automatically
You may have noticed that the process of updating drivers manually is tedious and complicated.
Don’t want to go through all that hassle? Want to update the wireless driver in just a couple of minutes, if not less?
Updating Drivers Automatically
Automatic driver update tools offer many benefits, the most important ones being:
- You can update device drivers automatically
- The software scans and updates all outdated or missing drivers at one go
- The tool picks the right drivers for your device and operating system, so you won’t have to worry about installing an incorrect driver by mistake
- Automatic driver updates are 100% safe
Driver Updater is one of the best driver update tools out there. Outbyte Driver Updater will give you access to a database of over 1 million drivers. It will regularly scan your PC, suggesting new driver versions to install. Driver Updater contains drivers for a variety of Windows devices. With just one click, you can update drivers in your system.
Step 1
Click here to Install and launch the app
Step 2
Scan all devices
Step 3
Install or update drivers automatically

Leave a Reply