The “No Internet Access but Connected” is a common Internet-related error experienced by Windows users. If you are facing similar problem and looking for solution, this post is for you. Before we look at the solutions, let’s understand the error in detail and the possible causes.
What is “No Internet Access but Connected” error?
If you are getting this error, it means you are connected to router but you are not able to access Internet. You can get this error in both scenarios- you are connected wirelessly to the router or you have a wired connection between your PC and router.
When you are experiencing this problem, you will see a yellow exclamation mark on the Internet connectivity icon in the system tray. When you hover the mouse pointer over network icon, you will see a message that says “No Internet access”
Possible causes of “No Internet Access but Connected” error
You might be getting this error due to many reasons like
- The Internet connection is having some problem
- Problem with router or modem
- Network driver related issue
- Wrong network settings
You cannot ignore the possibility of other causes behind the “No Internet Access but Connected” error. There are two scenarios in this error.
Scenario One- No device has internet connectivity
If none of the devices connected to router have internet connectivity, you can conclude the problem lies with the internet connection or the networking devices. If the problem is with your internet connection, you need to contact your internet service provider, explain the problem and seek a solution.
If the problem is with your networking devices- Modem and router, you need to follow the troubleshooting steps below.
Solution – Restart Modem and Router
- Unplug the power cord of the Modem and router.
- Remove all cables from the router and modem.
- Wait for some time and plug the cables back again in their respective slots
- Now plug the power cord of the modem and router
- Switch on the modem first and wait for some time until the internet connection is established
- Switch on the router and wait for the internet connection to stabilize
- Start your computer and see if the internet connectivity is restored.
Scenario Two – Only computer has no internet connectivity
If other devices connected to router or modem is having internet connectivity, you can conclude the problem lies in your computer. In that case, you need to perform troubleshooting steps given in solutions below
We have provided six solutions in this post and one of them might work for you. Since we do not know the exact cause behind “No Internet Access but Connected” error, it is difficult to tell which solution is right for you.
The best strategy to follow is start with the first solution and if it does not work, moves to next solution and so on. Now, let’s look at the solutions.
Solution One- Use Network Troubleshooter
Windows 10 has an in-built network troubleshooter tool that can fix network issues. You need to run the Network Troubleshooter and see if it fixes the problem. Here are the steps to follow
- Right-click the network icon in the notification area
- Select Troubleshoot problems
- Follow on-screen instructions
- The Network Troubleshooter will try to diagnose the problem and fix it
- If the Network Troubleshooter is successful, it will display a message mentioning problem fixed
- If the Network Troubleshooter is not successful in fixing the problem, it will display a message about inability to fix the problem.
- Close Network Troubleshooter
Check whether your computer is getting Internet access. If the problem is not resolved, move to next solution.
Solution Two- Disable and Re-enable the Network adapter
The cause behind “No Internet Access but Connected” error could be simple or temporary. Disabling and re-enabling network adapter might help. Here are the steps to follow.
- Press Windows logo key and R simultaneously on your keyboard to bring up Run command
- In Run command box, type control and press Enter on keyboard
- In the Control Panel window, click Network and Sharing Center
- In the next window, click Change Adapter settings that appear in left-hand side menu
(Note- Problematic network adapter will have a yellow exclamation mark)
- Right-click on problematic network adapter and select Disable
- Wait for some time
- Right-click on problematic network adapter and select Enable
Check your computer and see if the Internet access is restored. If the problem still persists, move to next solution.
Solution Three- Disable IPv6
Not all application use IPv6 protocol and you need to check whether disabling IPv6 resolves the issue. Here are the steps to follow.
- Go to Network and Sharing Center (Follow steps given in Solution Two)
- Click Change Adapter Settings on the left sidebar
- Right-click on the problematic Network adapter and click Properties
- In the Properties window, uncheck IPv6 from the list of protocols
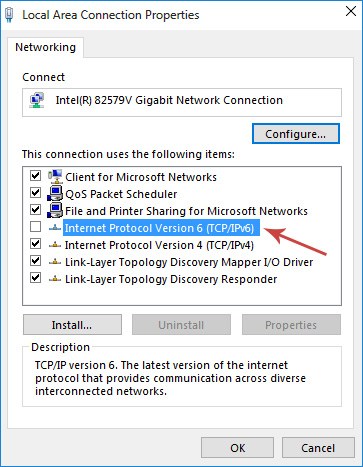
- Click OK
- Close all windows
Check your PC and see if the Internet access problem is resolved. If the problem persists, try next solution.
Solution Four – Remove temporary files
- Right-click on Start button and select File Explorer
- In the File Explorer window, type C:\Windows\temp and press Enter on keyboard
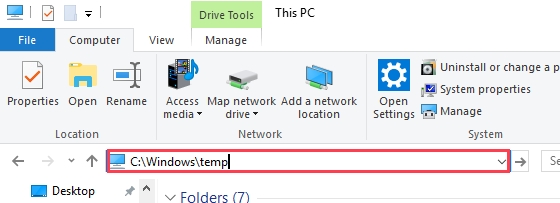
- If Windows prompt you for Administrator permissions to access the folder contents, click Continue
- In the Temp folder, you will lots of files. We have to delete all files from temp folder
- Press Ctrl+A to select all files in the temp folder
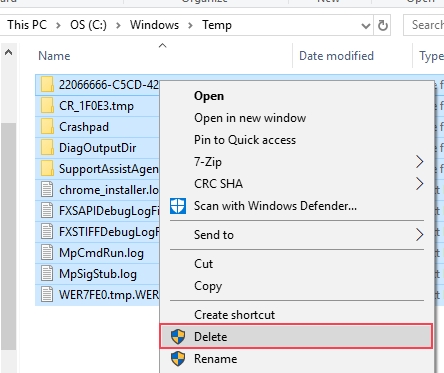
- Press Delete button on the keyboard
- Close all windows
Check whether Internet connectivity is restored. If this solution has not worked for you, move to next solution.
Solution Five – Disable Antivirus
There is a possibility the anti-virus software is blocking the internet connection. A simple solution to this problem is disabling anti-virus temporarily and check whether your computer is getting internet access.
If your computer gets internet access after disabling anti-virus software, you can conclude the anti-virus is the cause of “No Internet Access but Connected” error. You need to contact the anti-virus manufacturer and explain the problem and ask for solution.
Note- After disabling anti-virus, be careful about websites you visit or files you open.
Other solution is using other 3rd party anti-virus software or using the in-built Windows Defender security software that is part of Windows 10. Here are the steps to activate Windows Defender.
Before activating Windows Defender, you need to uninstall anti-virus you are currently using. After you have removed anti-virus software, restart the computer and then activate Windows Defender on your Windows 10 system. Here are the steps to follow.
- Click Start
- Click Settings (gear icon)
- Click Update and Security
- Click Windows Defender
- Scroll down until you see Windows Defender Offline
- Click Scan Offline button
If the computer is still not getting internet access after disabling anti-virus, you can conclude anti-virus is not the cause of the “No Internet Access but Connected” error. In that case, enable the anti-virus before moving to next solution.
Solution Six- Update Network Driver
Microsoft provides regular updates and patches for Windows 10. There is a possibility Windows needs latest network driver for establishing internet connectivity. In that case, a simple solution is updating Network drivers. There are two ways to update Network driver- Manually and Automatically. Here we have given steps to both methods
Method One – Update Driver Manually
- Hold Windows logo key and R together on your keyboard to bring up Run command
- In Run command window, type devmgmt.msc and press Enter on keyboard
- In the Device Manager window, navigate to Network Adapters category and expand it
- Right-click on Network Card in the list and note down its name
Note- Since your computer is not having Internet connectivity; you need to perform the step below on computer that has Internet connectivity. After downloading the network driver, copy the driver setup file to your computer and then perform steps given below.
- Now launch an Internet browser and go to the Network card manufacturer website and find driver updates for network card installed in your PC
While downloading a driver update, make sure you download the right network driver file. Find out which version of Windows 10 your computer is running – 32 bit OS or 64-bit OS. Here are the steps to follow
- Click Start->Settings
- Click System->About
- Note down the System type info
If your computer is running Windows 10 32-bit OS, you need to download a network driver file intended for 32-bit Windows. Similarly, you need to download the right network driver file for 62-bit Windows 10.
- Download the right network driver to your computer
- Open Device Manager window again and go to the Network Adapters category
- Expand the category and right-click the network card and click Uninstall
- Wait for the uninstallation process to complete
- Close Device Manager
- Now navigate to the drive/folder where you have downloaded the network driver file
- If the file is in zip format, you need to unzip the contents. After unzipping the contents, double-click on Driver setup file to start the installation
- If the file is in exe format, double-click on the setup file to start the installation
- Follow on-screen instructions to install the latest network drivers.
- Wait for the process to complete and then restart your computer
Method Two- Use a Driver Update Tool to update Network Driver automatically
Automatic driver update tools offer many benefits, the most important ones being:
- You can update device drivers automatically
- The software scans and updates all outdated or missing drivers at one go
- The tool picks the right drivers for your device and operating system, so you won’t have to worry about installing an incorrect driver by mistake
- Automatic driver updates are 100% safe
Driver Updater is one of the best driver update tools out there. Outbyte Driver Updater will give you access to a database of over 1 million drivers. It will regularly scan your PC, suggesting new driver versions to install. Driver Updater contains drivers for a variety of Windows devices. With just one click, you can update drivers in your system.
Step 1
Click here to Install and launch the app
Step 2
Scan all devices
Step 3
Install or update drivers automatically
Solution Seven- Reset Network
Wrong network settings could be the cause of the “No Internet Access but Connected” error. Resetting network would set the network settings to “default” that could resolve the issue. Here are the steps you need to follow.
- Click Start -> Settings
- Click Network & Internet
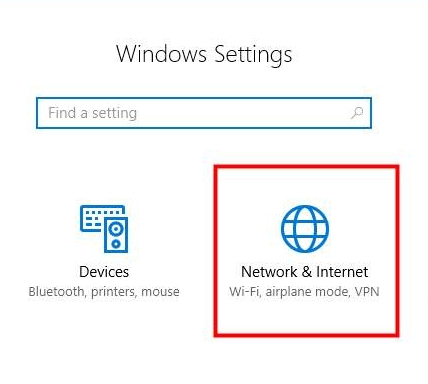
- Click Network Reset
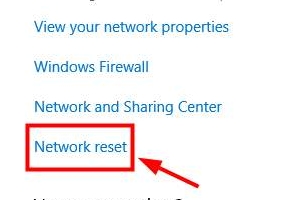
- Click Reset Now
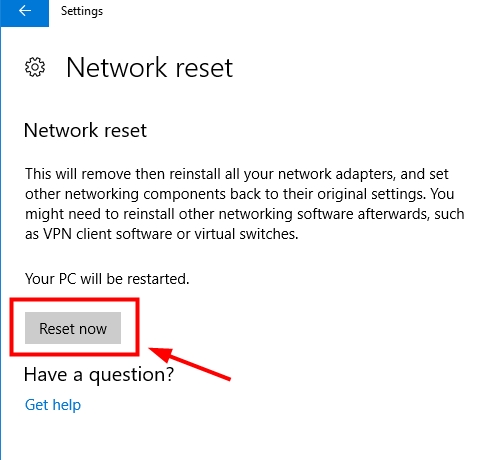
Windows will reset network and restart the computer. After computer restarts, check whether Internet access problem is resolved. If you are still not able to surf the Internet, move to next solution.
Solution Eight- Change DNS
If the DNS server of your ISP is facing issues, it can lead to “No Internet Access but Connected” error. You can resolve this problem by using high-speed DNS servers. Here are the steps to change DNS on your Windows 10 PC.
- Press Windows logo key and R at the same time on your keyboard to bring up Run command
- In Run command box, type control and press Enter on keyboard
- In the Control Panel window, click Network and Sharing Center
- In the Network and Sharing Center, click Change Adapter setting
- Right-click on the problematic Internet connection you are using and select Properties
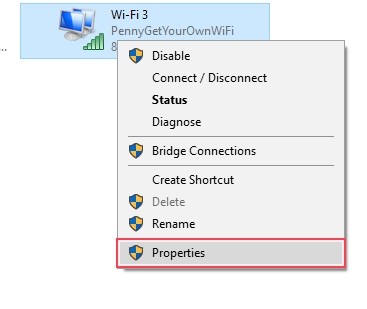
- Click on Internet Protocol Version 4 (TCP/IPv4)
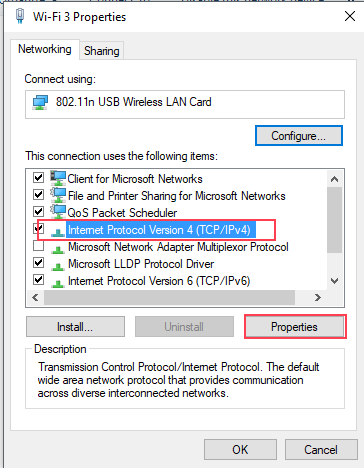
- Click Properties
- In the Internet Protocol Version 4 properties window, click the option Use the following DNS server addresses.
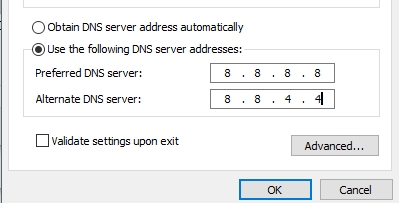
- Type 8.8.8.8 in Preferred DNS server
- Type 8.8.4.4 in Alternate DNS server
- Click OK
- Close all windows
Check whether your computer is getting Internet access. If the problem persists, move to next solution.
Solution Nine – Reset IP address
IP address configuration plays an important role in Internet access. There is a possibility the IP address configuration of your Windows PC is not proper that is causing “No Internet Access but Connected” error. Resetting IP address will override any wrong IP address configuration. Here are the steps to follow.
The IP address is reset in Windows through a series of networking commands that are run through command prompt window. You need to launch a command prompt window with admin rights to run these commands. Now let’s look at the steps.
- Click Start button and type command prompt in Cortana search
- Right-click on the first result in the list and select Run as administrator
- In the User account control window, click Yes.
- You will see command prompt window launched with admin rights.
(Note- you will be typing a series of networking commands one after another in command prompt window. Hit Enter on keyboard to run the command. Wait for the command operation to complete before typing next command in the line)
- Type ipconfig/flushdns and press Enter
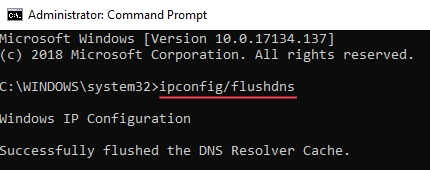
- Type nbtstat -R and press Enter.
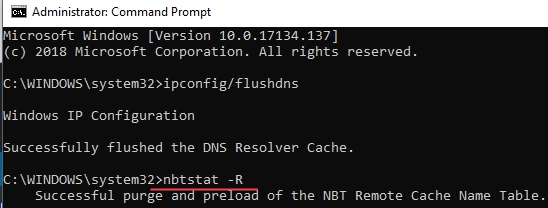
- Type nbtstat -RR and press Enter

- Type netsh int ip reset c:\resetlog.txt and press Enter

- Type netsh winsock reset and press Enter

- Close command prompt window and reboot computer
After computer reboots, check whether Internet access issue is resolved. In most cases, the “No Internet Access but Connected” error would get resolved by one of the solution given in this post.

Leave a Reply