Many Windows 10 users have complained of mouse lag, freeze, and stutters after upgrading.
This is not a bug but some problem related to your system which includes clash or compatibility issues between hardware and software.
Like other Windows issues, there is no single solution to this problem. We have provided 5 solutions that could resolve the mouse lag freeze and stutter issue.
However, it is almost impossible to tell in advance which of these solutions will work for you. This is because this problem can occur because of a myriad of reasons.
Therefore, we recommend you to start with the first solution and work your way downward until you are able to resolve the issue.
Things to remember
Don’t use USB hubs to connect a mouse. You should always connect the mouse to USB ports on the motherboard that are situated at the back of the desktop. Also, do not connect the mouse to from USB ports in desktop as they are not directly connected to the motherboard.
Before Anything Else
You cannot ignore the possibility of a mouse going bad or bad USB port. Before moving to any advanced troubleshooting steps, ensure that is not the case.
- Try connecting mouse to other USB port to rule out the possibility of the problematic USB port.
- Remove all USB devices like a USB disk drive, thumb drives, card readers and let only the keyboard and mouse remain connected.
- To rule out the possibility of the bad mouse, use another mouse and see if you are still facing mouse pointer problems like a lag, stutter, or freeze. If you are not facing any problem with the new mouse, you can conclude the old mouse has gone badly. If you are facing similar mouse problems even with the new mouse, you can conclude the older mouse is good and the problem lies elsewhere.
Now, let’s look at the solutions.
Solution One – Reinstall Mouse Driver
Many times mouse settings change due to some software installation without you knowing about it.
Also, you cannot ignore the problem with the mouse driver. You can resolve this problem by reinstalling the mouse that will set all mouse settings to default and also install a new mouse driver.
Here are the steps to follow.
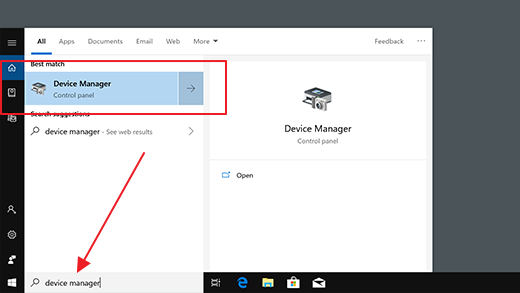
- Click the Start button
- In the Cortana search box, type Device Manager
- From the list of results, double-click on Device Manager
- In the Device Manager window, go to Mice and other pointing devices category and expand it
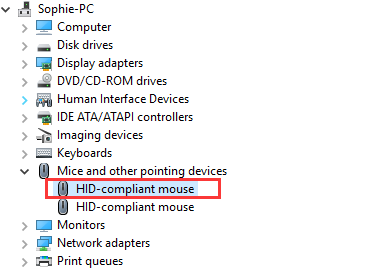
- Right-click the mouse entry in the list and click Properties from the menu
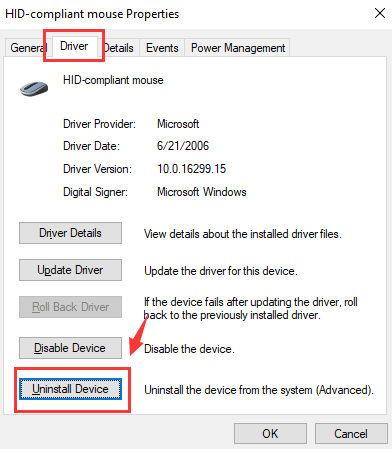
- In the mouse properties window, go to the Driver tab
- Click Uninstall device button that appears at bottom of the window
- Click OK
- When the computer displays a confirmation pop-up for uninstalling the device, click Uninstall
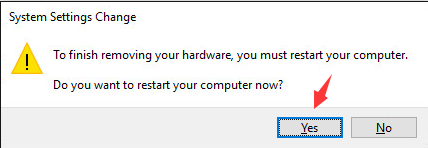
- If you are prompted to restart your computer and you are ready to proceed, click Yes
- If you are into the middle of some important work and don’t want to restart, go to the Toolbar of the Device Manager window
- Click Scan for hardware changes
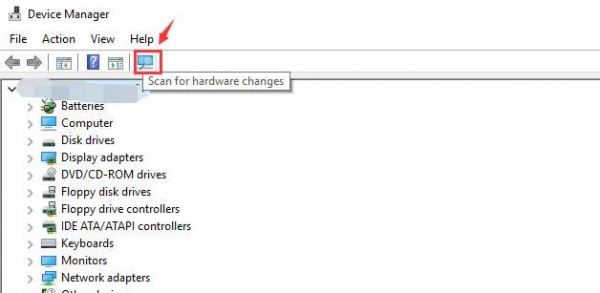
Windows OS will now detect mouse and install a new device driver. Check if the mouse problem of lag, stutter, or freezing has vanished. If the problem still persists, move to the next solution.
Solution Two- Update graphic drivers
The mouse problem can also crop up due to incompatible graphic drivers. In that case, you need to install the latest graphics drivers for Windows 10.
You can update graphics drivers manually or automatically. Both methods are discussed ahead.
Update Graphic Drivers Manually
- Press Windows logo + R
- Type devmgmt.msc in the run dialog box to access the Device Manager window
- Expand Display adapters. You will see the list of installed graphic cards
- Check and note down the name of your graphics cards. Visit the graphic card manufacturer’s site or your computer manufacturer’s site and conduct a search for the newest driver for the graphics card or PC model. If you want, you can also you run a Google search by typing the name and the model number of your graphic card in Google search bar. Once you locate the newest driver, download and save the driver file. That said, you need to do one thing before you start the downloading process. Check whether the driver file corresponds to your PC type. That is, if you use Windows 10 32-bit, the file you download must be for 32-bit Windows 10 PCs. Similarly if you run Windows 64-bit, you need to download the driver file that is for 64-bit Windows 10 version.
- Now go back to the Device Manager window, right-click on your graphics card and then select Uninstall device
- You will see a confirmation dialog box on the screen. Check the box that is located before Delete the driver software for this device. Finally, click Uninstall
- After driver is fully uninstalled, you need to restart the computer
- Now run the video driver’s setup file and follow onscreen instructions to install the new driver.
Update Graphic Drivers Automatically
The easiest way to update graphic drivers is by using an advanced driver update software application.
Automatic driver update tools offer many benefits, the most important ones being:
- You can update device drivers automatically
- The software scans and updates all outdated or missing drivers at one go
- The tool picks the right drivers for your device and operating system, so you won’t have to worry about installing an incorrect driver by mistake
- Automatic driver updates are 100% safe
Driver Updater is one of the best driver update tools out there. Outbyte Driver Updater will give you access to a database of over 1 million drivers. It will regularly scan your PC, suggesting new driver versions to install. Driver Updater contains drivers for a variety of Windows devices. With just one click, you can update drivers in your system.
Step 1
Click here to Install and launch the app
Step 2
Scan all devices
Step 3
Install or update drivers automatically
Solution Three- Disable LAN
Some users who faced similar mouse problem reported disabling LAN helped them resolve the issue. In that case, you can connect the computer wirelessly to the router and disable the LAN.
Here are the steps to follow.
- Press Windows logo key and R at the same time on the keyboard to invoke Run command box
- In the Run command box, type control and click OK
- In the Control Panel window, set the View by Category to small icons and hit Enter on the keyboard
- Locate Network and Sharing Center option and double-click on it
- In the Network and Sharing Center window, go to Change adapter settings and click on it
- In the Network connection window, look for Ethernet option
- Right-click on Ethernet icon and click Disable
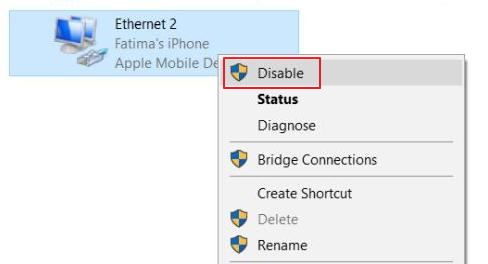
- Close all windows and restart your computer
Check whether mouse lags and stutter problem has been resolved. If it still exists, you can enable Ethernet again and proceed to the next solution
Solution Four- End Realtek audio process
Note – Perform these troubleshooting steps if your computer has Realtek audio
Like the earlier solution, many users were able to resolve the mouse problem by disabling Realtek audio. You can try performing the troubleshooting steps and sees if it helps you too.
Here are the steps to follow.
- Right-click on an empty area of the task bar and click on Task Manager
- In the Task Manager, go to Processes tab
- Look for Realtek audio.exe process and right-click on it
- Click End task from the menu.
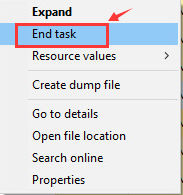
Check whether the above actions have got rid of mouse lag and stutter issue, if the issue still exists, look for application with high disk usage. End the suspected application processes one by one and check whether mouse problem is resolved. If the mouse problem still persists, move to the next solution.
Solution Five – Turn Off Cortana
Like the above two solutions, many users were able to get rid of mouse lag by disabling Cortana. This may work in your case too.
Here are the steps to follow.
- Launch Cortana from the search bar on the task bar
- From the left menu, click the Settings menu
- Under Cortana(first option), slide the pill switch to Off position
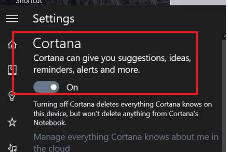
Check whether above troubleshooting steps have got rid of mouse lag and other issues. If the problem still persists, move to the next solution.
Solution Six- Disable ATI Hotkey Poller service
Many Windows users have also reported that ATI Catalysts drivers could be the cause of the mouse lag and stutter problems. The ATI Hotkey Poller service might be related to the problem and disabling it can help you fix the problem once and for all.
Here are the steps to follow.
- On the keyboard, hold down windows logo key and R simultaneously to invoke the Run command
- In the run command, type services.msc and hit Enter on the keyboard
- In the services window, look for ATI Hotkey Poller service on the right side
- right-click on it and open Properties
- Go to General tab and look for Startup Type option
- Click the down arrow to open the drop-down list
- From the list, select Disabled
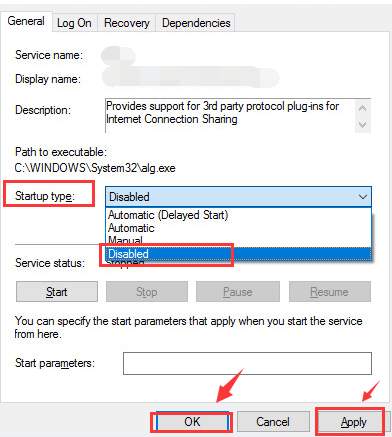
- Click Apply and then Click OK
- Close all windows and restart the computer
Check whether the mouse lag, stutter, and the freezing problem is resolved. In most cases, the mouse lag problem would be resolved by one of the solutions in the list.

Kerry-Ann says
This is really handy to know, after searching Microsoft and Acer websites to find help for my touchpad issue, which I still haven’t managed to fix or find relevant information about!! You have gave more options on how to fix this one issue than what I have found on these two infamous company websites….. go you
My issue is that upgraded to windows 10 home and my Elantech precision touchpad vanished altogether, there is no trace anywhere that it even existed on my Acer Aspire apart from the physical touchpad itself!! That was about 6 months ago, still not fixed so using a usb mouse.