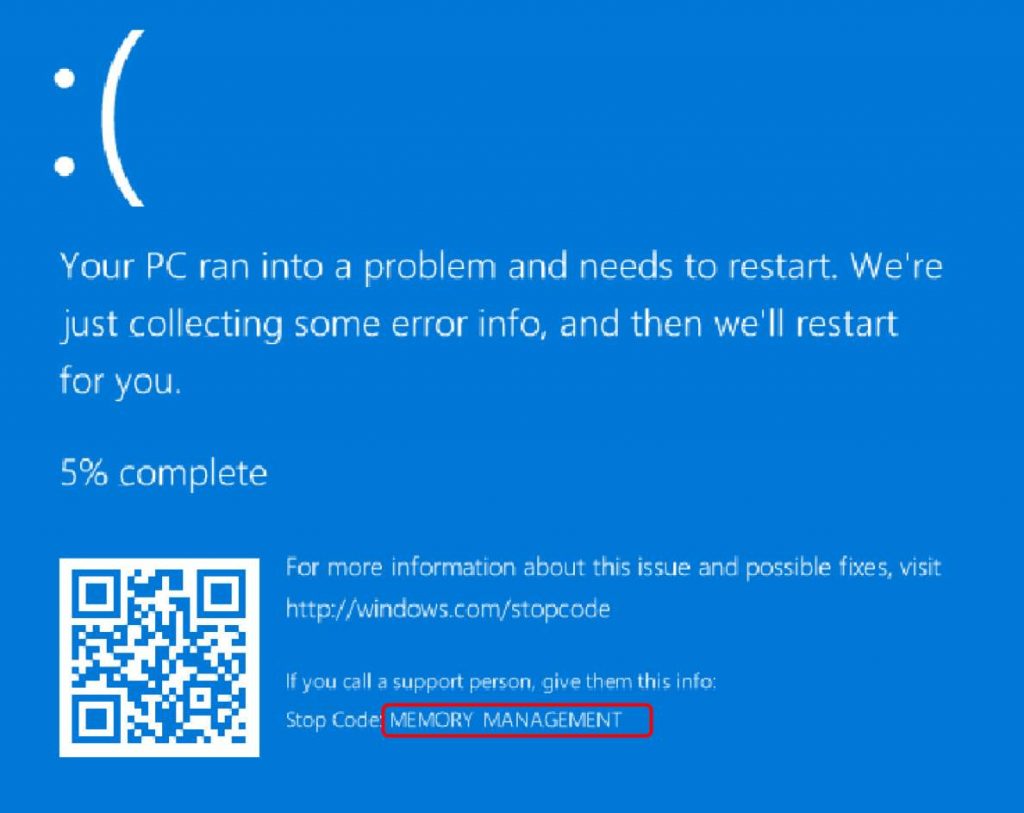
Blue Screen of Death (BSOD) is a common occurrence for Windows users. Almost every regular Windows user sees one or two BSODs in their lifetime. T
The BSOD can be a one-time error which means you may not see it repeatedly while sometimes a particular BSOD appears more frequently. You can find more about particular BSOD by looking at the Stop error code that is displayed on the screen.
There is no harm in ignoring single BSOD occurrences as the computer recovers after a system restart followed by BSOD.
However, if you are seeing a particular BSOD frequently, something is wrong with your system that needs your attention. Many Windows users have complained about BSOD related to Memory Management. the stop error code of the BSOD is 0x0000001A.
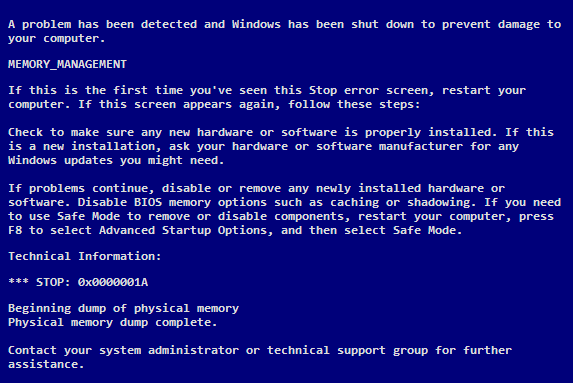
If you are getting this BSOD error and looking for a solution, this post is for you.
What is Windows Memory Management?
Memory management is an important aspect of Windows that keeps the operating system running smoothly. Windows keeps tracks of memory allocated to different system processes and app. Whenever any app is closed, the memory is freed and then Windows can allocate it to any app or process needing it.
When memory management goes wrong, system hangs or in worst cases, a BSOD appears on the screen and the system reboots. Though Memory Management BSOD error can happen when you are multi-tasking, its frequent occurrence indicates some problem which needs to be resolved
Causes behind Memory Management BSOD error
Though the name of the BSOD error refers to memory management, a problem with memory is not always the cause. Some of the causes behind this error can be
- Disk Errors
- Faulty RAM
- Software issues like corrupt system files
- Faulty Drivers
- Issues with hardware like Graphics card
The right solution for the Memory Management BSOD error depends on the root cause. If you know the root cause, you can straightway perform the troubleshooting steps in related solution and get rid of the error.
If you are unaware of the root cause for the BSOS error like many users, you need to try all solutions given below until the issue is resolved. The best approach is to start with the first solution. If that does not work for you, move to the next solution and so on.
Solution One- Check and clean RAM modules
Note- Only desktop users who are comfortable opening their computer and performing the steps need to go ahead. If you are not comfortable with the steps, skip the Solution One and go to the next one.
Before you perform any troubleshooting, clean the RAM modules in your computer. Here are the steps you need to follow.
- Disconnect the computer from the power supply
- Remove all cables attached to the CPU unit
- Open the computer casing
- Clean the motherboard especially areas near the RAM slots
- Remove the RAM stick and clean it
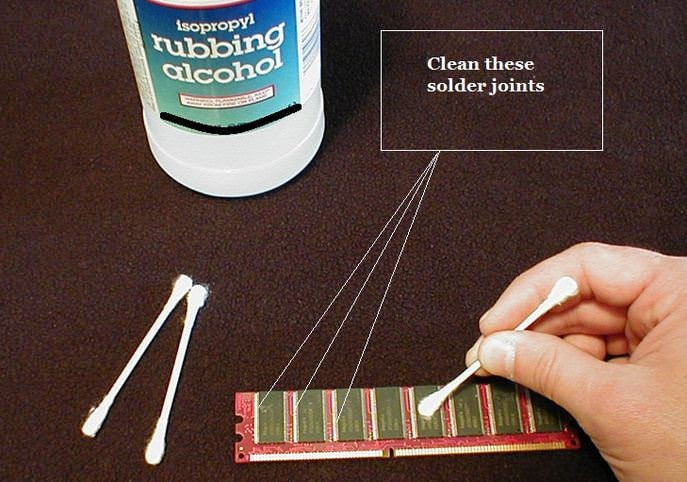
- Put back the RAM stick in the slot
- Do this to all RAM sticks on the motherboard
- Connect all cables to the CPU unit
- Plug the computer to the power supply and start the computer
Run the computer and see whether you get the Memory Management BSOD error. If the error persists, move to next solution.
Solution Two – Run Memory Diagnostic Tool
Windows has a built-in memory diagnostic tool that can check for memory related problems. The memory test is performed at the system startup. Before you run the memory diagnostic tool, make sure you save all work. Here are the steps to follow.
- Click Start and type memory in the search bar
- Select Windows memory diagnostic from the list of results
- In the Windows memory diagnostic pop-up, you can see two options – 1) Restart now and check for problems(recommended) and 2) Check for problems next time I start my computer
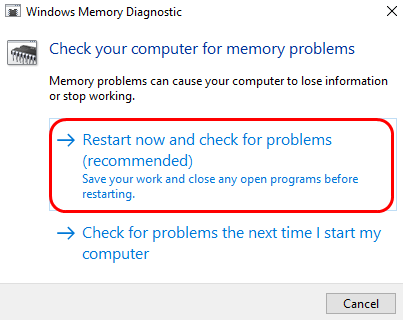
- If you select the 1st option, the computer would restart immediately and scan the memory before booting. If you select the 2nd option, the computer will run the memory diagnostic tool at next boot.
- You can choose any option. Here we have selected the 1st option that allows fixing the BSOD memory management error at earliest. Make sure you save all work before the computer shuts down.
- Wait for Windows to shut down normally and reboot. The memory diagnostic tool is automatically launched when the computer restarts
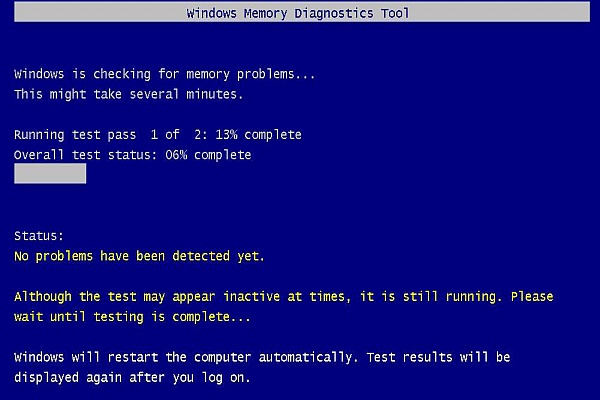
- Wait for the memory diagnostic tool to complete its operation. The diagnostic tool may take several minutes to check the memory completely
- After the memory scan is completed, the computer will reboot automatically. If the memory diagnostic tool reports any errors, you should replace the RAM module.
If the memory diagnostic does not find any problems with memory, you can conclude the RAM is not the cause of the Memory Management BSOD error. You need to proceed to the next solution to check the hard disk for errors.
Solution Three- Run Check disk
You cannot ignore the possibility of the corruption of the NTFS volume which prevents Windows from accessing files needed to run the operating system normally. Windows has an in-built tool for disk check and repair which is known as Chkdsk. The tool checks the file system and file system metadata of a volume for physical and logical errors.
Chkdsk is a command-line tool which means you need to open a command prompt window (with admin rights) to run Chkdsk. Here are the steps to follow.
- Click Start and type cmd prompt in the Cortana search box
- Right-click on Command prompt from the list of results and select Run as administrator
- In the command prompt window, type chkdsk /f /r.

- Press Enter on the keyboard
- When Windows prompt you question about scheduling chkdsk at next restart. Type Y for an answer
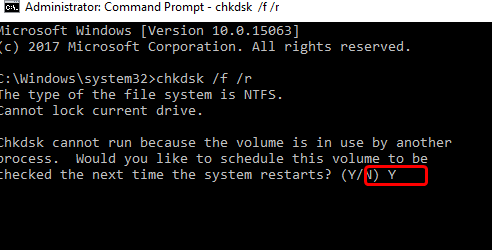
- Press Enter on the keyboard
- Windows will run the Chkdsk tool at the next The tool will report any errors it comes across and fixes them
Note – Chkdsk can take a longer time to complete and you need to be patient
- After the Chkdsk complete its operation, the system will reboot
Boot into Windows and use your computer and see if you encounter Memory Management BSOD error again. If the issue is not resolved, move to next solution.
Solution Four – Update Graphics Driver
As mentioned earlier, memory management BSOD could be a graphic card related issue. To rule out the possibility of a problem with graphic cards driver, install the latest graphic card drivers. there are two ways to update graphic card drivers- Manually through Device Manager and Automatically using Driver Updater software. Here we have shown both methods, you can use any method that suits you.
Method One- Manual Driver Update
- On your keyboard, press Windows logo key and R together to launch Run command
- In Run command window, type devmgmt.msc and click OK
- In the Device Manager window, go to the Display Adapters category and expand it
- Right-click on Graphic Card in the list and note down its name
- Now open an Internet browser and go to the graphic card manufacturer website and find driver updated for graphic cards installed in your PC
While downloading a driver update, make sure you download the right driver file. For example, if your computer is running Windows 32-bit OS, you need to download a graphic driver file intended for 32-bit Windows. Similarly, you need to download the right graphic driver file for 62-bit Windows OS.
- Download the right graphic driver to your computer
- Open Device Manager window again and go to the Display Adapters category
- Expand the category and right-click the graphic card and click Uninstall
- Wait for the uninstallation process to complete
- Close Device Manager
- Now navigate to the drive/folder where you have downloaded the driver file
- If the file is in zip format, you need to unzip the contents. After unzipping the contents, double-click on Driver setup file to start the installation
- If the file is in exe format, double-click on the file to start the installation
- follow on-screen instructions to install the latest graphics drivers.
- Wait for the process to complete and then restart your computer
If this method does not work for you, try updating the driver automatically
Method Two- Use Driver Update Tool to update Graphic Drivers automatically
Automatic driver update tools offer many benefits, the most important ones being:
- You can update device drivers automatically
- The software scans and updates all outdated or missing drivers at one go
- The tool picks the right drivers for your device and operating system, so you won’t have to worry about installing an incorrect driver by mistake
- Automatic driver updates are 100% safe
Driver Updater is one of the best driver update tools out there. Outbyte Driver Updater will give you access to a database of over 1 million drivers. It will regularly scan your PC, suggesting new driver versions to install. Driver Updater contains drivers for a variety of Windows devices. With just one click, you can update drivers in your system.
Step 1
Click here to Install and launch the app
Step 2
Scan all devices
Step 3
Install or update drivers automatically
Solution Five – Run SFC
Windows has a System File Checker tool (SFC) that can fix the problem with system files. The SFC tool replaces corrupt and missing files with good cached versions that could resolve the memory management BSOD issue. You need to run SFC commands from the command prompt with admin rights. Here are the steps to run the SFC tool.
- Click Start menu and type cmd in Cortana search box
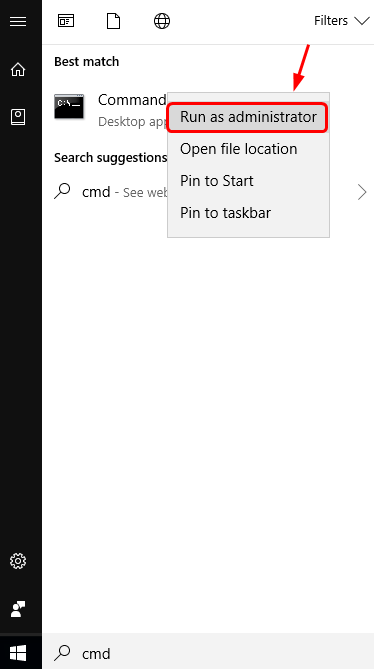
- Right-click command prompt from the list of results and select Run as administrator
- In the command prompt window, type sfc /scannow and hit Enter on the keyboard
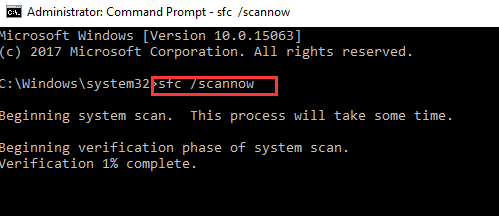
- Wait for the process to complete
Check whether memory management BSOD is generated. If the issue persists, go to the next solution.
Solution Six- Update Windows
there is a possibility the memory management BSOD is caused due to some big in Windows OS. Microsoft offers regular updates to Windows users to fix different bugs in Windows. You should always install all recommended Windows update to ensure the operating system keeps running smoothly. Here are the steps to install windows updates.
- On your keyboard, press Windows logo key and I simultaneously to open Settings Window
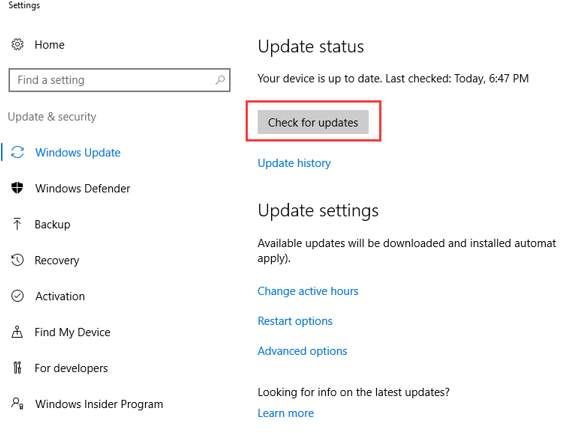
- In the Setting Window, click Update & Security
- Click Windows updates and look for any pending updates in the right-hand column
- Click Check for updates. Windows will look for any pending updates, download them and install updates automatically
- After the Windows Update process is completed, restart your computer.
Check whether the memory management BSOD error is generated. If the problem remains unresolved, go to the next solution.
Solution Seven – Check newly installed hardware and software
You cannot rule out the possibility of incompatible hardware or software causing memory management BSOD. Try to recall when the memory management BSOD started appearing. Did you start getting the error after installing any new hardware or software? If that is the case, you need to remove any new hardware like a graphic card or any software that you have installed recently
To remove software, follow the given steps
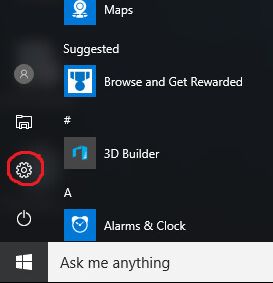
- Open Start Menu
- Click Settings(gear icon)
- In the Settings menu, click System
- Select App & features from the left pane
- Select an app which you want to uninstall
- Click Uninstall button that appears besides the app
To remove hardware, follow the given steps.
As mentioned earlier, the hardware related troubleshooting steps are only applicable to desktop users. Try the solution only if you are confident about performing the steps given below
- Unplug the computer from the power source
- Remove all cables connecting the CPU unit
- Remove the computer casing
- Remove the hardware component you wish
- Close the computer casing
- Connect all cables back
- Plug the computer to a power source and start your computer
Are you still getting the memory management BSOD? if the answer is Yes, move to next solution.
Solution Eight- Run Virus scan
In rare cases, memory management BSOD could be due to virus infection. Make sure the virus antivirus software has the latest virus definitions. Update anti-virus and then run a virus scan to get rid of possible infections
the steps to run virus scan differ with each anti-virus software. the steps given here are for reference purpose only. To know about detailed steps to run a deep virus scan, read your anti-virus software documentation. Here we have demonstrated steps for Windows Defender which is an in-built security software in Windows. Now let look at the steps
- Open Start Menu
- Click Settings(gear icon)
- In the Settings menu, click Update & Security
- Click Windows Defender option on the left side
- In the next dialog box that appears, click Open Windows Defender Security Center.
- Now look on the left side and click the Virus and Threat Protection button
- Click Advanced scan
- Click Full scan
In most cases, the memory management BSOD error will get resolved by one of the solutions. however, if none of the solutions work for you, reset your PC or show your computer to a repair professional.

Leave a Reply