Is your USB port not working?
If yes, don’t worry – this post will help you with a solution.
In this post, I’ve have provided 7 easy to follow solutions to fix the “USB ports not working issue”. I’m sure at least one of them, if not more, will work for you.
Of course, there’s no need for you to try all of the listed solutions. Start with the first one, and if it doesn’t work, move to the next solution and so on.
Solution One- Restart your computer
The USB ports not working might be a temporary issue. Restart your system and see if the problem is resolved.
Solution Two- Check if the USB port is defective
You need to rule out the possibility of your USB port becoming defective before you proceed further.
You can check this out by plugging the USB device in another USB port on your computer. You can also try connecting to a USB device to another computer.
If the USB device is detected at another USB port on your computer or on another computer, it means the said USB port is defective.
In that case, you can stop using the defective USB port and connect USB devices to other USB ports on your computer.
Solution Three – Hold down the power button
Hold down the power button for 30 seconds or a little more. This will discharge capacitors. Now restart the computer and see if the issue is resolved.
Solution Four – Check your laptop’s power supply
USB ports need adequate power for functioning. If the power supply is not providing adequate power to the motherboard, such problem can arise.
This can be fixed by following steps given below.
- Remove the power supply/charger cord from your laptop
- Restart your laptop
- Now connect the USB device to one of the USB port
- Reconnect the power supply/charger cord back to the laptop
Check whether USB ports are working now. If the issue remains unresolved, move to next solution.
Solution Five- Check Power Management settings
Windows have a power management feature where it stops supplying power to USB ports that are not in use.
Sometimes these settings could cause issues like “USB ports not working”. You need to check power management settings and makes changes if needed.
Here are the steps to follow.
- Press Windows logo key and R simultaneously to invoke Run command
- In Run command, type devmgmt.msc and click OK
- In the Device Manager window, go to the Universal Bus Controllers category and expand it
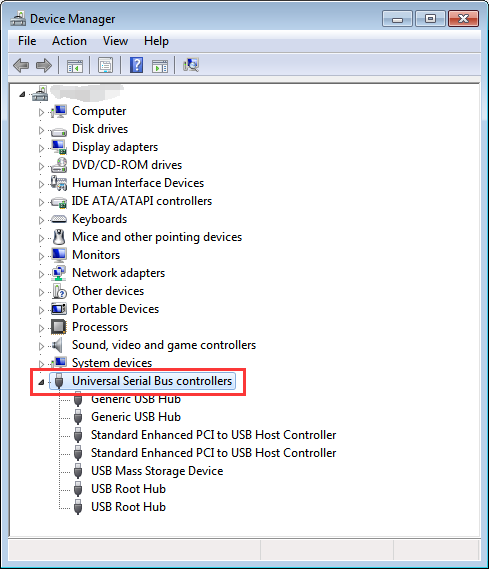
- Double-click on the first USB hub entry in the list to open the Properties window
- In the Properties window, go to Power Management tab
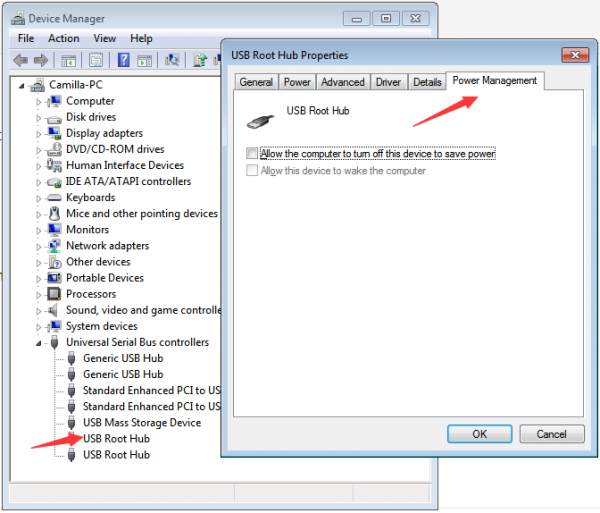
- Uncheck the option as shown below
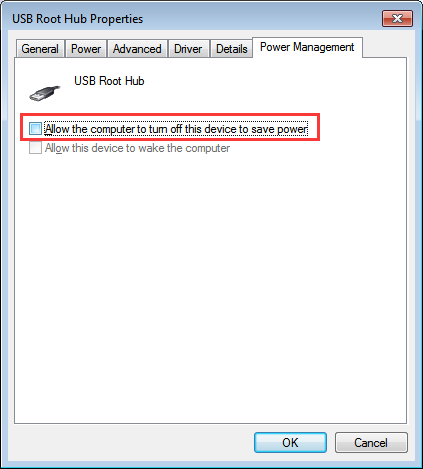
- Click OK
- Repeat the above 4 steps for other USB hubs in the list
- Close Device Manager
- Restart your computer
Now check whether USB ports are working. If the issue persists, move to next solution.
Solution Six- Disable USB Selective Suspend feature
Sometimes power management features like USB Selective Suspend can override USB detection and cause issues like USB ports not working.
In such cases, disabling USB Selective suspend features can resolve the issue.
Here are the steps to follow.
- Open Control Panel
- Click Hardware and Sound.
- Click Power Options.
- Under “Preferred plan,” click the Change plan settings link for the plan you’re currently using. For example Balanced or Power Saver
- Click Change advanced power settings link.
- In the Power Options window, expand USB settings.
- Expand USB selective suspend setting
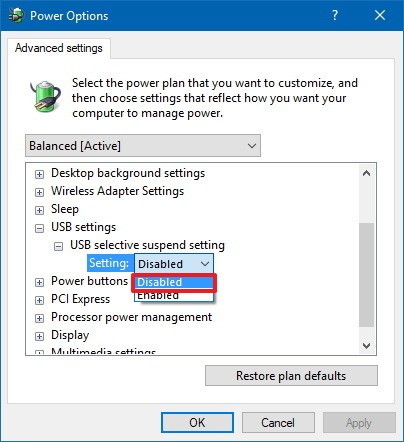
- Select Disabled from the drop-down list
- Click Apply and then click OK
- Close all windows
Solution Seven – Update Drivers software for Universal Serial BUS controller
There is a possibility the driver of Universal Serial BUS controller is corrupt and hence you are facing the USB ports not working issue.
You need to update drivers, which can be done manually or automatically.
Here we have provided steps for both methods.
Steps to manually update drivers for Universal Serial BUS controller
- Open Device Manager
- Go to Universal Serial BUS controller category and expand it
- Look for USB devices with a yellow exclamation mark
- Right-click in USB device entry with a yellow exclamation mark and click Update Driver software.
- In the next window, select “Search automatically for updated driver software”
- Wait for the windows to search for driver updates
- If Windows cannot find any driver update, go to the USB device with a yellow exclamation mark
- Right-click on the problematic USB device in the list and click Uninstall
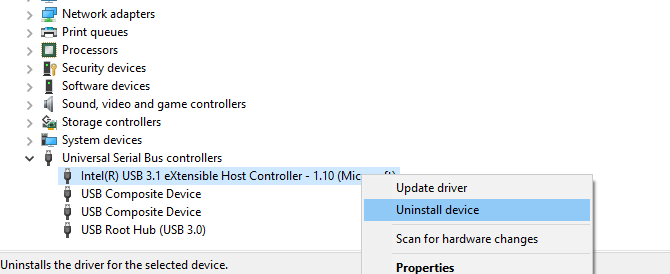
- Wait for the uninstallation process to complete
- Now go to the Action menu in the Device Manager window
- Click Scan for hardware changes
Note – Windows will install a new driver for USB device which might resolve the problem
- Close Device Manager
Steps to update the driver automatically
A much simpler approach is to use an automatic driver update tool to update your USB driver.
Automatic driver update tools offer many benefits, the most important ones being:
- You can update device drivers automatically
- The software scans and updates all outdated or missing drivers at one go
- The tool picks the right drivers for your device and operating system, so you won’t have to worry about installing an incorrect driver by mistake
- Automatic driver updates are 100% safe
Driver Updater is one of the best driver update tools out there. Outbyte Driver Updater will give you access to a database of over 1 million drivers. It will regularly scan your PC, suggesting new driver versions to install. Driver Updater contains drivers for a variety of Windows devices. With just one click, you can update drivers in your system.
Step 1
Click here to Install and launch the app
Step 2
Scan all devices
Step 3
Install or update drivers automatically

Leave a Reply