Windows has several system processes that are introduced by Microsoft with good intentions. However, many times these system processes make the system slow and cause errors. Many users have complained about a system process – SuperFetch that causes high disk usage and makes the system unresponsive.
If your system has become non-responsive, just check the Task Manager. Many users have found Service Host: SuperFetch taking a large amount of memory. If you are experiencing a similar issue with your computer, you have arrived at the right page. Here we have discussed few solutions to resolve high disk usage caused by the service host SuperFetch process.
Solution One- Disable SuperFetch Window service
Every window process is related to a window service. Disabling the SuperFetch windows service is a good idea to resolve this issue. Here are the steps to follow.
- Press the Windows button on the keyboard and type Run in the search box. Alternatively, you can press Windows + R key combination to bring up the Run command box.
- In the run command box, type services.msc and click OK
- In the services window, locate SuperFetch windows service and right-click on it
- Select Properties and then click Stop
To ensure this issue does not arise again, you need to disable this service which will prevent Windows OS to launch this service at startup. Here are the steps to disable SuperFetch windows service
- In the Services windows, right-click SuperFetch windows service and select Properties
- In the properties window, go to Startup Type
- From the drop-down list, select Disabled
- Click OK-> Apply
- Close all windows and restart the system
If the above troubleshooting does not help, move to the next solution.
Solution Two – Fix problem with Windows Update
According to experts, Windows update could be the cause behind high disk usage. Windows OS is designed to continuously check for updates to ensure optimal performance and security of the system. The solution to this problem is fixing problems with Windows update. Here are the steps to follow
- Press the Windows button on the keyboard and type control panel in the search bar
- Select Control Panel from the list of results.
- In the control panel window, locate System and security and click on it
- In the next window, click Security and Maintenance
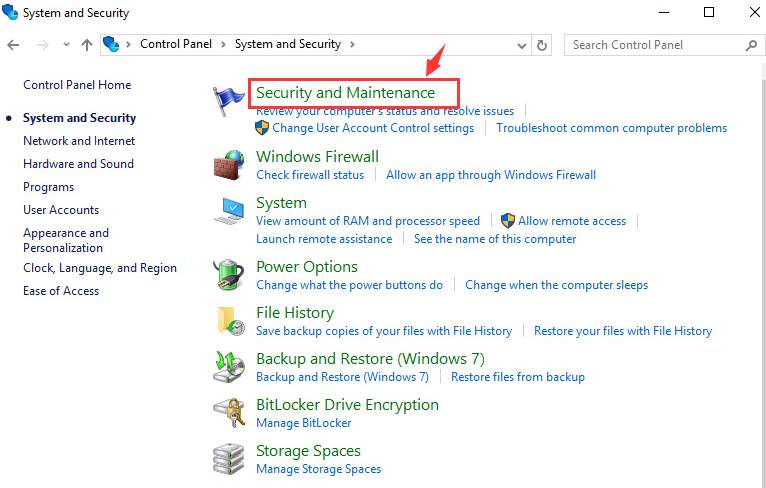
- In the next window, locate Troubleshooting and click on it
- In the Troubleshooting window, locate System and Security.
- Click Fix Problems with Windows update
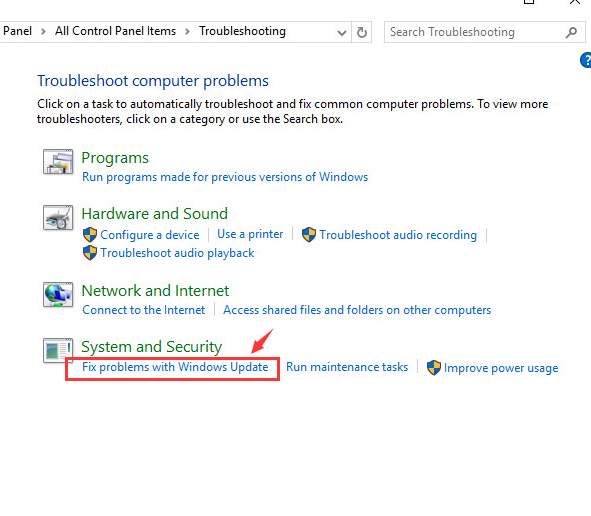
- Click on Next
- Click the option Try troubleshooting as an administrator
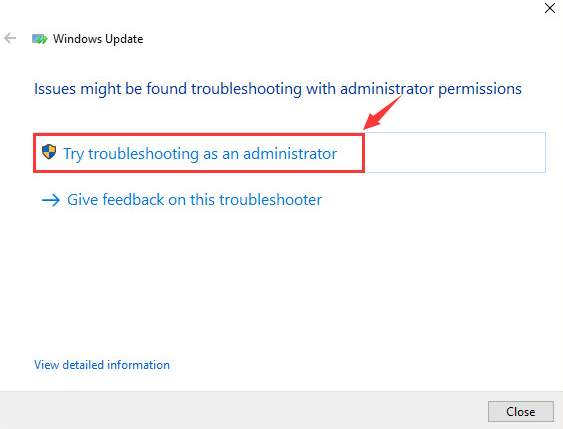
- Follow on-screen instructions if any to apply fixes
- Restart your system
Now check Task Manager. If you still see high disk usage by service host SuperFetch, move to the next solution in the list.
Solution Three – Run DISM
DISM is short stands for Deployment Image Servicing and Management. It has been part of in-built windows maintenance tools for several decades. The DISM tool utilizes the Windows update feature to fix any issues with system files. Here are the steps to follow.
- Click Start
- In the search box, type Command prompt
- Right-click on the command prompt in the list of results
- Select Run as administrator
- In the command prompt window, type DISM /Online /Cleanup-Image /Check Health
- Hit enter on the keyboard
The tool will check for any issues with Windows system files. You should also run the advanced scan and repair option in the DISM tool. Here are the steps to follow.
- Go to command prompt window, type DISM /Online /Cleanup-Image /Restore Health

- Press Enter
Before you execute these steps make sure the computer is connected to the Internet. Windows OS will establish a connection with the Windows Update server to download files needed to fix the corruption. If the above solution does not service host SuperFetch high disk usage issue, you need to run another in-built windows maintenance tool.
Solution Four – System File Checker
System File Checker (SFC) is an inbuilt tool in Windows. Like DISM, SFC also helps in troubleshooting issues in Windows. The SFC scanning tool verifies the integrity of the system files. It finds and replaces any corrupted files with a cached copy of the files. The cached copies of system files are located in the compressed folder:

The SFC scan also replaces any missing files. Here are the steps to run an SFC tool on your computer.

Solution Five- Stop certain services
There is a possibility some Windows services are the cause of high disk usage in Windows. Here we disable few Windows services that could be the culprit. Here are the steps to follow.
- Click empty space on the taskbar and select Task Manager from the menu
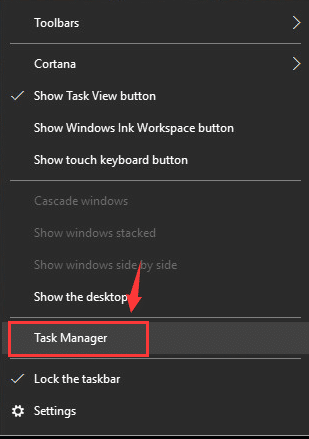
- In the Task Manager, go to the Processes tab
- Locate Services Host: Local System and select it
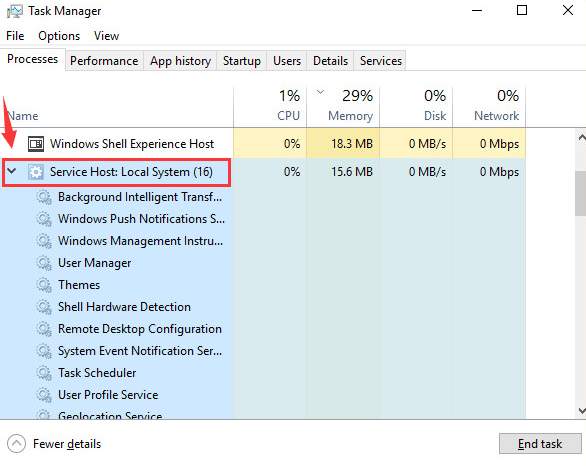
- Click End task
- Now locate Background intelligent transfer and select it
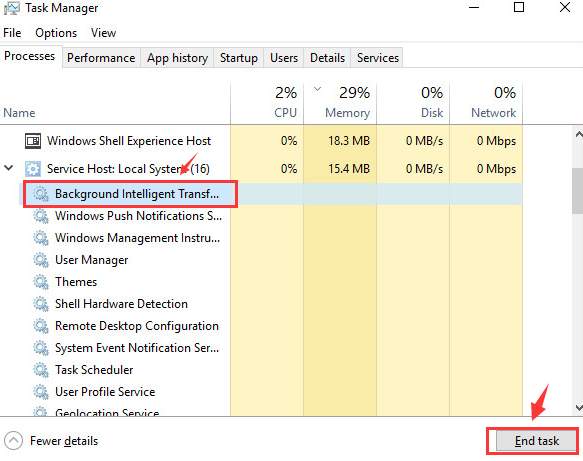
- Click End Task
Keep an eye on the CPU usage when you disable these services. If you see the CPU usage drops when you disable a specific service, you have located the culprit.
- Now open the services window, refer to steps in Solution One
- Locate Windows Push Notification system service and right-click on it
- Select Stop from the menu
If you see the CPU usage has dropped after stopping the service, you can conclude the Windows notification service is the cause of the high disk usage. In that case, it is better to disable this service so that you don’t face the problem again. Here are the steps to follow.
- Right-click on Windows Push Notification system service and click Properties
- Go to Startup type and select Disabled from the drop-down list
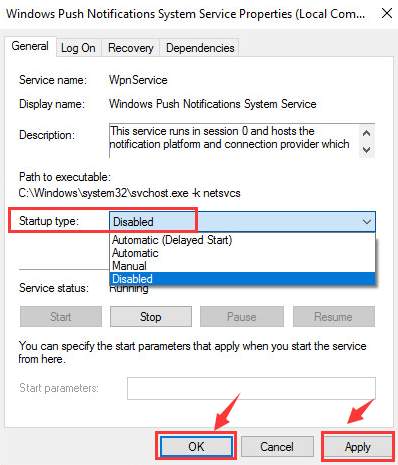
- Restart your computer
If the solution does not resolve the issue, you need to update drivers.
Solution Six- Update Drivers
You need to go to the OEM website to download the latest drivers for your device. Download drivers and install them and see if it helps resolve the issue
The easiest and the best way to download drivers is by using a reliable and fast driver update software tool.
Automatic driver update tools offer many benefits, the most important ones being:
- You can update device drivers automatically
- The software scans and updates all outdated or missing drivers at one go
- The tool picks the right drivers for your device and operating system, so you won’t have to worry about installing an incorrect driver by mistake
- Automatic driver updates are 100% safe
Driver Updater is one of the best driver update tools out there. Outbyte Driver Updater will give you access to a database of over 1 million drivers. It will regularly scan your PC, suggesting new driver versions to install. Driver Updater contains drivers for a variety of Windows devices. With just one click, you can update drivers in your system.
Step 1
Click here to Install and launch the app
Step 2
Scan all devices
Step 3
Install or update drivers automatically

Leave a Reply