Immersive gaming is critical for enjoying computer games. For this reason only, most avid gamers don’t shy away from investing in the best hardware and software to enjoy their favorite games. However, one issue that can spoil the fun is screen tearing.
Screen tearing refers to horizontal splits on the screen at one or more places. It occurs when the monitor’s refresh rate and GPU’s rate are unsynchronized. This issue is not only limited to gaming; you can also experience it while watching movies or videos.
Why does your screen tear?
Screen tearing occurs when your computer’s display outputs more video frames than your monitor can handle. The general refresh rate of a monitor is set at 60Hz. This means the screen refreshes visuals 60 times in a second.
If the video port gives out more number of frames per second than 60, it causes an out-of-sync situation. As a result, the monitor tries to adjust by displaying multiple frames at once on your screen, which is known as screen tear.
Another cause of screen gear could be corrupt or out-of-date display drivers. In that case, the easiest solution available is updating your display drivers.
Solution One – Update Display Drivers
You can update display drivers manually or automatically. The latter is a much easier, simpler, and faster method. Nevertheless, we have discussed both methods here. You can pick the one that works for you better.
Update Display Drivers Manually
- Simultaneously press Win + R
- In the run dialog box, type devmgmt.msc and then press the OK button
- In the Driver Manager window, expand Display adapters, right-click your graphics card and then click Properties
- Click the Driver tab
- Next, click the Update Driver option
- In the Update Driver Software window, click the first option (Search automatically…)
- Follow the onscreen instructions
Alternately, you can download the latest drivers from your graphics card manufacturer’s website and install it.
Updating Display Driver Automatically
As you can see, the manual updating process is tedious. It also requires a fair bit of technical knowledge. If you don’t have the time or technical know-how to update the display driver manually, we recommend you use a reliable driver update software tool.
Automatic driver update tools offer many benefits, the most important ones being:
- You can update device drivers automatically
- The software scans and updates all outdated or missing drivers at one go
- The tool picks the right drivers for your device and operating system, so you won’t have to worry about installing an incorrect driver by mistake
- Automatic driver updates are 100% safe
Driver Updater is one of the best driver update tools out there. Outbyte Driver Updater will give you access to a database of over 1 million drivers. It will regularly scan your PC, suggesting new driver versions to install. Driver Updater contains drivers for a variety of Windows devices. With just one click, you can update drivers in your system.
Step 1
Click here to Install and launch the app
Step 2
Scan all devices
Step 3
Install or update drivers automatically
If the issue is not resolved by updating display drivers, you should enable VSync. And see if it helps.
Solution Two- Enable VSync
VSync is a graphics technology that allows you to synchronize the frame rate of the game to the refresh rate of the monitor. The synchronization delivers uninterrupted and smooth gameplay for graphics-heavy 3D games.
Here are the steps to enable VSync.
For NVIDIA cards
If you have NVIDIA graphics cards installed on your PC, you need to follow the steps given below to enable VSync.
- Click the Start button
- In the search bar, type NVIDIA control panel and hit enter on your keyboard.
- Click Manage 3D settings
- Under the Global Setting tab, you should find a list of features.
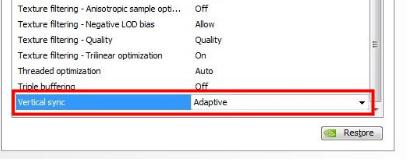
- Scroll down and find Vertical Sync
- Using the dropdown menu to the right, select Adaptive or On

For AMD Radeon graphics card
- Click the Start button
- In the search bar, type AMD Radeon Software and press Enter on your keyboard
- Click the cogwheel in the top right
- Click Graphics tab
- Under Wait for vertical refresh rate, choose Always on

For Intel graphics Users
- Click Start
- In the search bar, type Intel HD Graphics Control Panel and press Enter on your keyboard
- In the control panel window, click 3D
- Click Custom Settings.
- Under Vertical Sync, click Driver Settings

- Click Apply
In-game Settings
Popular 3D games have an in-built setting for VSync. Here are the steps to activate VSync in the in-game settings
- In your game, go to Settings
- Click Video -> Graphics -> Quality
- Set VSync ON

Leave a Reply