The NVIDIA control panel provides you easy access to the graphics settings of the NVIDIA graphics card. Many users have complained about the NVIDIA control panel not opening on Windows that prevents them from accessing important graphics settings for the graphics card.
If you are facing a similar problem, you have come to the right place. Here we have discussed few solutions to resolve the NVIDIA control panel won’t open issue.
Solution One- Restart the NVIDIA Control Panel Service
Every application running on your Windows has a background process. When you click any application icon in the Start Menu or anywhere on the desktop, the associated process is initiated. The processes related to graphics are scheduled to start with Windows every time as they are essential for graphics card functioning.
Much time due to some computer glitches the app does not function properly even though the background service is running. In that case, you need to restart the service and see if it helps. Here are the steps to follow.
- Press the key combination – Ctrl+Shift+Esc to launch Task Manager
- In the Task Manager window, go to the Applications tab
- Find the NVIDIA Control Panel Application in the list and right-click on it
- Choose End Task
- Close the Task Manager
- Try launching the NVIDIA control panel
If the above solution does not yield success, proceed to Solution 2.
Solution Two- Check important services are running
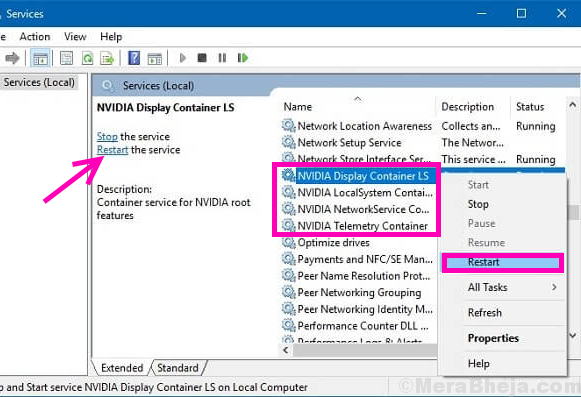
The first thing you need to check whether important services related to the NVIDIA control panel are running. Here are the steps to follow.
- Press Windows and R keys to bring Run command window
- Type services. msc in the Run command window and press Enter
- Find NVIDIA Display Container LS in the list and double-click on it to access Properties

- In the Properties window, go to General Tab
- Check the Service Status. If the Service Status is started, the service is running. If the Service Status is stopped, the service is not running.
- If the service is not running, click Start
- No go to Start-up Type and select Automatic from the drop-down list
- Click Apply and then click OK
- Now try launching the NVIDIA Control Panel
If the above solution does not work for you, try the steps in Solution 2.
Solution Three- Update NVIDIA Drivers
One reason for the NVIDIA Control Panel, not opening is drivers are obsolete. In that case, you need to update NVIDIA drivers and see if the issue gets fixed. Here are the steps to follow.
- Click Windows icon
- Type Device Manager in the search box
- Click Device Manager from the list of search results
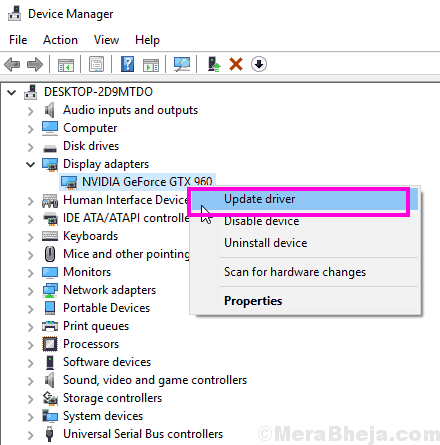
- In the Device Manager, go to the Display Adapters section and expand it

- Click Update Drivers
- Follow on-screen instructions to update the driver.
If the above process does not work, you can uninstall the display adapter and install the latest drivers which will install the NVIDIA Display Adapter again. Here are the steps to follow.
- Repeat steps 1 to 4
- Select Uninstall device from the list
- Follow on-screen instructions to remove the device
- Close Device Manager
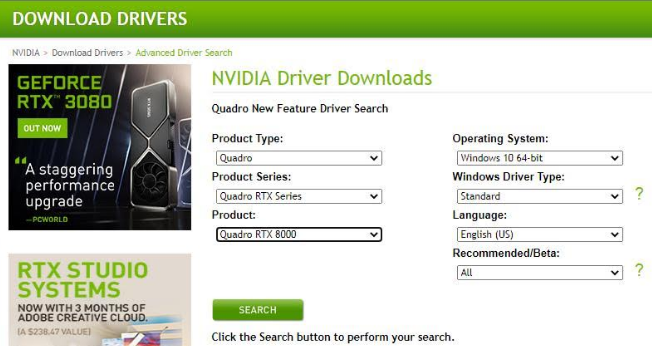
- Open browser and type NVIDIA latest drivers
- Go to the NVIDIA website
- Select the Product Type, Operating System, Product Series, Product
- Click Search

- Download the latest drivers from the website
- Install the latest graphics drivers and restart your system
Solution Four- Update Drivers Automatically
Automatic driver update tools offer many benefits, the most important ones being:
- You can update device drivers automatically
- The software scans and updates all outdated or missing drivers at one go
- The tool picks the right drivers for your device and operating system, so you won’t have to worry about installing an incorrect driver by mistake
- Automatic driver updates are 100% safe
Driver Updater is one of the best driver update tools out there. Outbyte Driver Updater will give you access to a database of over 1 million drivers. It will regularly scan your PC, suggesting new driver versions to install. Driver Updater contains drivers for a variety of Windows devices. With just one click, you can update drivers in your system.
Step 1
Click here to Install and launch the app
Step 2
Scan all devices
Step 3
Install or update drivers automatically

Leave a Reply