Whether you are a novice or an experienced Windows user, you are likely experience frustration upon receiving Blue Screen of Death errors as they prevent you from using your computer normally. What’s worse is that whenever you get a BSOD, the PC crashes in dramatic fashion without giving you an opportunity to save anything you are doing.
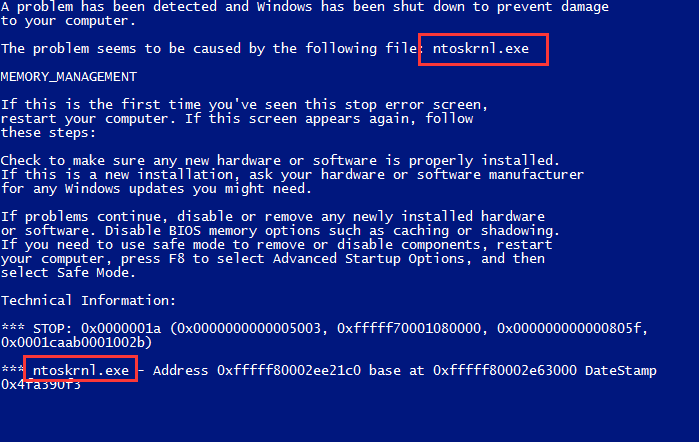
If you are troubled by dreaded ntoskrnl.exe BSOD error and looking for a solution to fix it, this post is for you.
We have provided three simple solutions to fix the ntoskrnl.exe BSOD error and we are sure one of them might just work for you.
What is Ntoskrnl.exe BSOD error?
The ntoskrnl.exe (Short for Windows NT operating system kernel) refers to a system application file that plays important role in various system services like the process and memory management and hardware virtualization.
It is an important part of the system that contains cache manager, the scheduler, the security reference monitor, the kernel, and the memory manager. If there is any problem with ntoskrnl.exe, your system will restart frequently after BSOD error.
There can be many reasons behind ntoskrnl.exe BSOD error like a problem with physical RAM, faulty drivers or over-clocking.
Whatever the reason, you can fix the error by following solutions given below. You need not try all solutions. Start with the first solution and work your way downwards until the ntoskrnl.exe BSOD error is fixed.
You need to be logged into Windows to perform troubleshooting steps given below. If you are unable to boot into Windows normally, boot Windows in Safe mode by following steps given below.
- Power on and off PC three times to force Windows operating system into hard reboot.
- Select the option to Enter in Safe Mode and perform the troubleshooting steps given below.
Solution One – Update Drivers
One of the most common reasons behind this BSOD error is outdated or corrupt device drivers. It is important to keep your drivers up-to-date. If your drivers are outdated or corrupt, you might fail to get the best performance from your hardware. Worse, you might random errors such as ntoskmle.exe BSOD and face PC performance issues.
You can update drivers manually or through an automatic driver update tool. We recommend the second method because it is not only quick but also accurate. Plus you don’t require any computer knowledge.
To update your device drivers, we recommend you use a Driver Update Tool.
Download the software
Automatic driver update tools offer many benefits, the most important ones being:
- You can update device drivers automatically
- The software scans and updates all outdated or missing drivers at one go
- The tool picks the right drivers for your device and operating system, so you won’t have to worry about installing an incorrect driver by mistake
- Automatic driver updates are 100% safe
Driver Updater is one of the best driver update tools out there. Outbyte Driver Updater will give you access to a database of over 1 million drivers. It will regularly scan your PC, suggesting new driver versions to install. Driver Updater contains drivers for a variety of Windows devices. With just one click, you can update drivers in your system.
Step 1
Click here to Install and launch the app
Step 2
Scan all devices
Step 3
Install or update drivers automatically
Solution Two – Reset overclocking settings
Overclocking your system pushes the hardware to its limit and sometimes it does not go well with Windows operating system and the result is random BSOD errors including ntoskrnl.exe error.
To resolve this, you need to reset overclocking settings by following steps given below.
- Power on your PC and when you see the first logo screen, press the correct key to enter BIOS. If you look at the bottom of the screen, you can see the key you need to press to access BIOS settings. The key to access BIOS settings differs with BIOS manufacturers. In general, F1, F2, Del, F10 or Esc are one of the keys to access the BIOS settings.
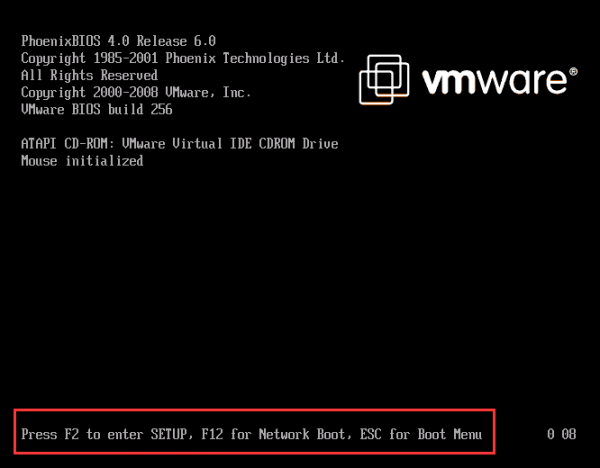
Note- the keys to move around and select BIOS settings differ with each BIOS manufacturer. You will see the keys mentioned to select, change BIOS settings at the bottom of the screen in BIOS Settings page.
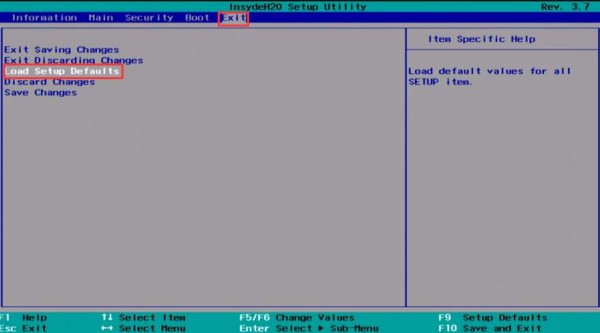
- Use the arrow key to go to Exit tab in BIOS settings. Look for option – Load Setup Defaults
Note- the name of the setting to load BIOS defaults can be different in BIOS menu. In general, you need to look for a setting that mentions loading of BIOS defaults or anything with similar meaning.
- After you have selected the Load Setup Defaults, press Enter key and you should see two options- Yes and No.
- Use the arrow key to select Yes and hit Enter on the keyboard
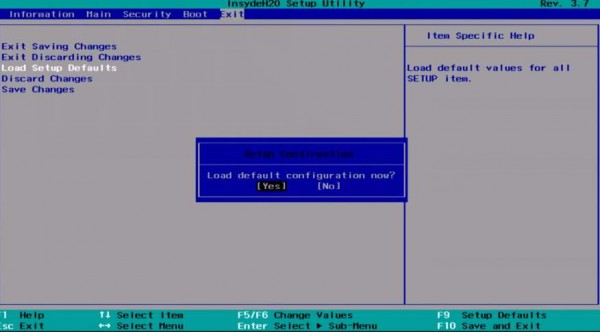
- You should see the Exit Saving Changes highlighted now. If it is not highlighted, use arrow keys to highlight and press Enter twice to save the BIOS configuration settings and exit the BIOS menu.
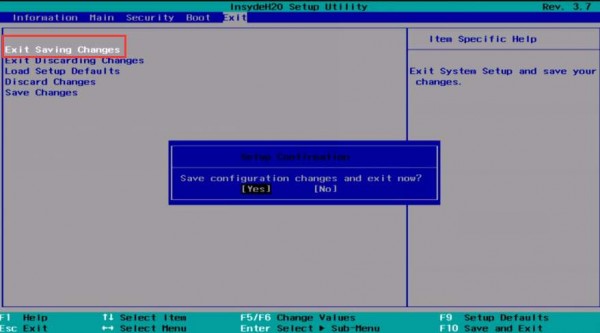
- Your computer will restart. See if the issue persists. If the error is not resolved, try next solution.
Note- The BIOS menu may appear different than screenshots shown above. The purpose behind these troubleshooting steps is loading the BIOS defaults that will override any overclocking settings that you have done. Use the images and steps as a reference to navigate and select right option to load BIOS defaults.
Solution Three-Run Windows Memory Diagnostic Tool
Windows has inbuilt Windows Memory Diagnostic Tool that can detect any problems in physical RAM module. If the memtest (short for memory test) returns any errors, you need to replace the RAM module with a new one. Here are the steps to run memtest.
- On your keyboard, press the Windows logo key and type Windows memory diagnostic in the box
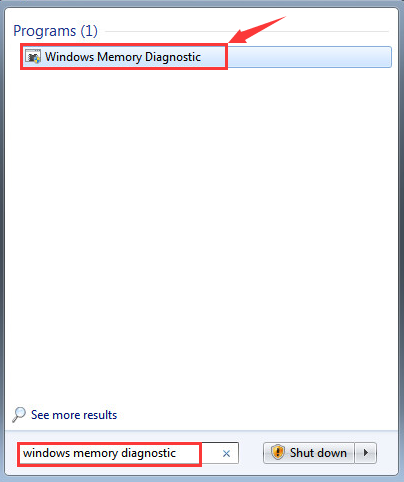
- Select Windows Memory Diagnostic from the list of results
- In the WindowsMemory Diagnostic pop up box, you get two options -1) Restart now and check for problems (recommended). If you choose this option, the computer would reboot immediately and the Windows Memory Diagnostic tool runs at startup
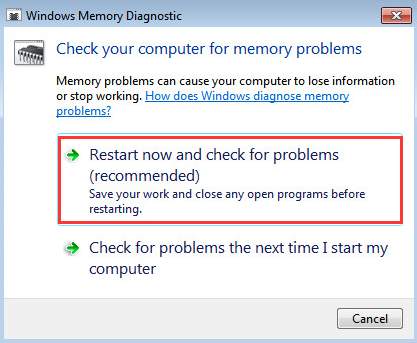
- The 2nd option reads Check for problems the next time I start my computer. if you select this option, Windows will run the WindowsMemory Diagnostic tool during next system restart.
- We have selected 1st option – Restart now and check for problems (recommended) which leads to computer restarting immediately and running the memory test
- You should see a similar screen like the one below which is WindowsMemory Diagnostic tool in action. It may take some time for the test to complete. You can see the progress of the memtest and also see if any errors are detected by the Windows Memory Diagnostic tool.
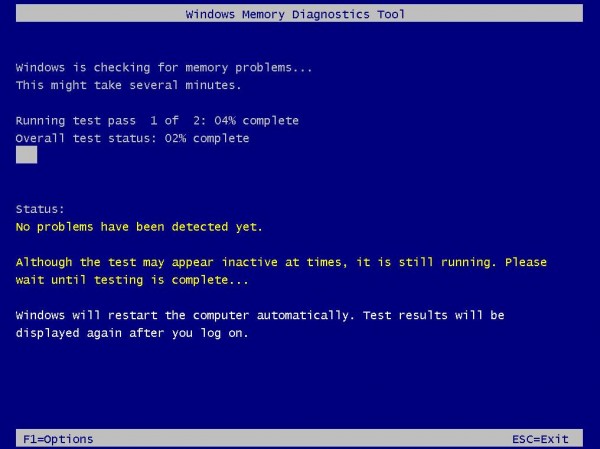
After the memtest process is completed, Windows will boot normally. In most cases, the ntoskrnl.exe BSOD error should be resolved by now.

Leave a Reply