Many Windows users have reported issues like “my mouse disappears” after installing software or installing updates. Sometimes it may happen randomly and it is hard to recall what actions caused the mouse to disappear. If your mouse pointer has disappeared from the screen, leave your worries aside as we have prepared a list of a few easy-to-use solutions that could fix the issue.
Solution One – Reboot your PC
Whenever you see the mouse cursor has disappeared from the screen and moving the mouse on the surface does not lead to anything (does not move the pointer), the first thing to do is check your mouse.
In an optical mouse, a red light glows at the bottom which is an indication that the mouse is working fine. If you see the red light under the mouse glowing but the mouse does not work, just restart your PC. Sometimes such issues are temporary and a simple restart will resolve the issue. Restart your PC and see if the mouse has appeared on the screen. If the solution did not work for you, move to the next solution.
Solution Two – Plug it into a different port
The mouse is generally connected to a USB port on your computer. You cannot eliminate the possibility of the USB port going bad. Before following any complex resolution steps, it is always a good idea to perform some basic checks. Here are the steps to follow.
Unplug the mouse from the current USB port and plug it in a different USB port. Check whether the mouse has reappeared. If changing the USB port does not help, you can conclude the problem is deep. In that case, you need to move to the next solution.
Solution Three – Use function keys to get the mouse pointer back
This solution specifically applies to Windows 10. The installation of Windows 10 sometimes disables the function of your mouse cursor. If that is true in your case, you can get the mouse cursor back by pressing a combination of function keys. Depending on the keyboard and mouse model, the combination of function keys may vary. Here are some function keys combinations you can try to get back the mouse cursor.
- Fn + F3
- Fn + F5
- Fn + F9
- Fn+ F11
If pressing the function keys combination does not get back the mouse cursor, there is a possibility the problem lies with mouse drivers. In that case, you need to proceed to the next solution.
Solution Four – Change Mouse settings
Windows has separate mouse settings that allow you to control mouse functionality. Sometimes default mouse settings get changed due to the installation of updates or software. Here we will try to change few mouse settings and see if it helps. Many users have reported they were able to resolve the “my mouse disappears” issue by changing mouse settings.
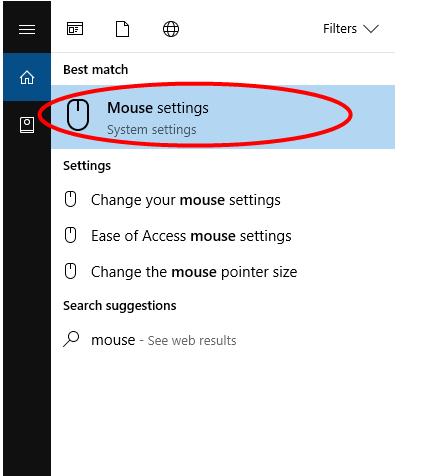
- Press the Windows key on your keyboard
- Type mouse in the search box
- You will see mouse settings options in the search results. Click that option

- In mouse settings, press the Tab on your keyboard until the Buttons tab is highlighted
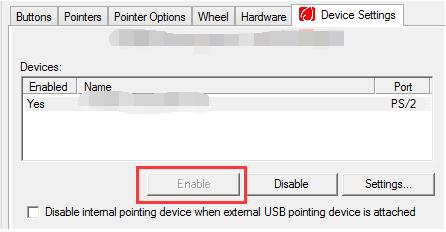
- Press the right arrow key until the Device Settings option is revealed

- If you find the device is disabled, press the Tab button on your keyboard until the Enable button is highlighted

- Press Enter on the keyboard to enable the device
Close all windows and see if the mouse cursor has started working. If changing mouse settings did not resolve the issue, move to the next solution.
Solution Five– Reinstall mouse drivers
Windows installs drivers for every hardware connected to your system. Sometimes the drivers become corrupt which affects the functioning of the related hardware. Here we will uninstall and reinstall mouse drivers and see if it helps
(Note –since your mouse is not working you have to use up and down arrow keys to navigate in Device Manager. You might also have to use left and right arrow keys to expand the sections)
- Press Windows keys and R simultaneously to launch the Run command
- In the Run command window, type devmgmt.msc and press Enter
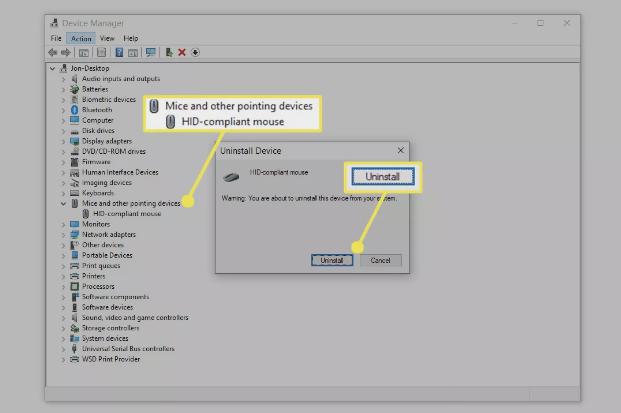
- In the Device Manager window, go to the Mice and pointing devices section and expand it
- You will find an HD compliant mouse or similar entry. Use the up and down arrow key to highlight the option
- Press Shift+F10 to bring up right-click menu and use arrow keys to select the Uninstall option.
- Press Enter on the keyboard to confirm your selection.
- Alternatively, you can press Alt->a->u to trigger the uninstall option.

- A dialog box with a warning will pop up on the screen. Use arrow keys to highlight Uninstall option and press Enter to confirm your action.
- Once the mouse driver is uninstalled. Unplug the Mouse from the current USB port and plug it again
Windows will detect the mouse as new hardware and install new drivers. Check whether the mouse cursor is moving when you move the mouse on the surface. If you find the issue is not resolved, you can consider updating all system drivers.
Updating outdated device drivers is easy with a Driver Update Tool.
Automatic driver update tools offer many benefits, the most important ones being:
- You can update device drivers automatically
- The software scans and updates all outdated or missing drivers at one go
- The tool picks the right drivers for your device and operating system, so you won’t have to worry about installing an incorrect driver by mistake
- Automatic driver updates are 100% safe
Driver Updater is one of the best driver update tools out there. Outbyte Driver Updater will give you access to a database of over 1 million drivers. It will regularly scan your PC, suggesting new driver versions to install. Driver Updater contains drivers for a variety of Windows devices. With just one click, you can update drivers in your system.
Step 1
Click here to Install and launch the app
Step 2
Scan all devices
Step 3
Install or update drivers automatically

Leave a Reply