You may have come across this error while launching programs or loading games: msvcr120.dll is missing.
This is not a very complicated error, and you can easily fix it quickly. In this post, we’ll discuss several methods to resolve the issue. You don’t have to try all of these solutions. Start with the first one in the list and work your way down until you are able to get rid of this error.
However, before we look at the solution, let’s check what the msvcr120.dll file is all about.
MSVCR120.dll – What is it?
The MSVCR120.dll is an important file for Windows. It is required for extracting the key application resources needed at runtime by 3rd party installation programs. In case this file has gone missing, you can’t launch programs in C++ programming languages. That’s because this file is the corresponding C++ library.
Solution 1 – Reinstall the Visual C++ Redistributable Packages
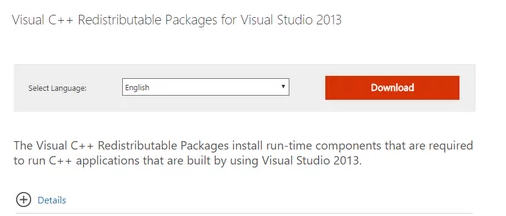
The easiest way to replace the missing MSVCR120.dll file is to download the redistributable package. Once you’ve downloaded it, install it to get this file back.
Note: You should not download .dll files from any non-official website. That’s because some websites may push malware disguised as genuine files. Downloading and installing corrupt files can make your PC unstable or worse put your sensitive information at risk.
Here are the steps to install the redistributable package:
- Go to Microsoft Download Center
- Choose your language, and then click at the Download button

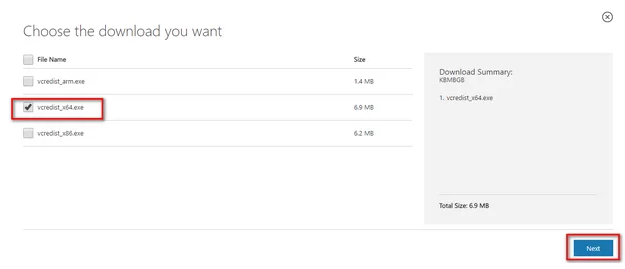
- Now select the file that corresponds to your operating system. That is, if you use 32 bit Windows, select vredist_x86.exe. On the other hand, those using 64 bit can choose either vredist_x64.exe or vredist_86.exe.
- Once you have selected the right file, click the Next button to download it. You should save the downloaded file in a readily accessible location, like your desktop

- Run this file to install it. Once the installation is complete, reboot Windows
- Now check whether the issue is fixed
If the problem persists, go to the next step.
Solution 2 – Run System File Checker
Windows have a built-in utility — system file checker (SFC) — that allows users to check for corrupt files on their computers. This is an immensely useful tool to diagnose the issue and check whether a problem is occurring because of corrupt files.
You should give SFC a shot and see if that solves the problem. When you run SFC, you’ll get any of the following three responses:
- Windows was not able to locate any integrity violations on the computer
- Windows Resource Protection was able to find corrupt files and repair them
- Windows Resource Protection located corrupt files but it was not able to fix some or all of these files
Here are the steps to follow to run SFC:
- Press the Windows key and R key simultaneously
- In the run dialog box, type taskmgr and then press Enter
- In the Task Manager menu, click File and then click Run new task
- In the Create new task dialog box, type powershell, select the option below it (Create this task with administrative privileges)
- Now type sfc /scannow in the Windows Powershell window and press the Enter key. Kindly not that this process might take a bit of time as the tool will scan all your Windows files for corrupt phases.
- In case you come across an error that states Windows found errors but couldn’t resolve them, type the following command – sfc /verifyonly
- The process may take some time. Wait until it completes.
- In case you still couldn’t repair corrupt files, run this command – DISM/Online/Cleanup-Image/RestoreHealth
- This command works by downloading the correct version of corrupt files from Windows update servers and then it will replace the latter with correct files. The whole process may take some time, depending on how fast the internet connection is. You shouldn’t cancel the command once you’ve run it.
If Windows was able to detect an error and fix it using the methods listed in this section, reboot the computer. Upon restart, reinstall the program or application with which you were getting the error. Now check if the problem is fixed.
Solution 3 – Download MySQL Installer Community
In case you are facing problems when you run a MySQL application like MySQL Workbench, we recommend that you download and install this tool – MySQL Installer Community. If your Windows computer is lacking in one or more Visual Studio component, this tool will detect that. After that it may launch an installer to make up for the gaps. Like always, you should always download application from trusted sources only. You can download this tool from Mysql website.
Solution 4 – Install both VC Redist Packages
Some users were able to fix the issue by:
- Reinstalling VC Redist packages
- Installing the 32-bit as well as the 64-bit version
We recommend that you also give this method a try. First, you’ll need to uninstall previous VC Redist installations. After that, you’ll have to reinstall VC Redist packages.
Here are the steps to follow:
- Press the Windows key and R key simultaneously
- In the Run dialog box, type cpl and then press the OK button or hit Enter
- Locate and right-click Visual C++ Redistributable application in app management window
- Select Uninstall. Follow on-screen instructions in order to uninstall the application
- You will need to perform the uninstallation steps for each installation of this software
- Now go to Microsoft website. Next, download these installations
- Microsoft Visual C++ Redistributable 2005 64-bit + 32-bit
- Microsoft Visual C++ 2008 Redistributable Package (x86)
- Microsoft Visual C++ 2008 Redistributable Package (x64)
- Microsoft Visual C++ 2010 Redistributable Package (x86)
- Microsoft Visual C++ 2010 Redistributable Package (x64)
- Visual C++ Redistributable Packages for Visual Studio 2013 32+64 bit
- Visual C++ Redistributable for Visual Studio 2015
- After you have downloaded these, install the applications one at a time by launching their setup files
- Now check if the issue is resolved
Solution 5 – Scan for Virus
You may also get this error if your computer is infected with malware or virus. Scan the computer for infection using your antivirus. Below we have given steps for Windows Defender, which is included in Windows 10 by default.
- Press the Windows key and S key simultaneously
- In the start search bar, type Windows Defender. Select the result that appear
- A scan option will appear on your screen. Choose Full Scan and then click Scan Now. The scan will scan all the files, so the process will take some time.
- In case the software identifies any rogue file, it will remove or quarantine it. Restart Windows and check if the problem is fixed
Solution 6 – Update your drivers
Automatic driver update tools offer many benefits, the most important ones being:
- You can update device drivers automatically
- The software scans and updates all outdated or missing drivers at one go
- The tool picks the right drivers for your device and operating system, so you won’t have to worry about installing an incorrect driver by mistake
- Automatic driver updates are 100% safe
Driver Updater is one of the best driver update tools out there. Outbyte Driver Updater will give you access to a database of over 1 million drivers. It will regularly scan your PC, suggesting new driver versions to install. Driver Updater contains drivers for a variety of Windows devices. With just one click, you can update drivers in your system.
Step 1
Click here to Install and launch the app
Step 2
Scan all devices
Step 3
Install or update drivers automatically
Solution 7 – Install Windows Updates
You may also receive this error if some important Windows update has not been installed on your system. Therefore, check if any updates are available and install them.
Here are the steps to follow:
- Press Windows key and I key simultaneously
- Click Updates and Security
- Click Windows Update in the left pane. Next, click Check for Updates
- Windows will now check for updates. If any updates are available, it will automatically install them
- Now check if you are still getting the error
Solution 8 – Reinstall Application
In case you are getting the error with just one game or application, as a last resort first uninstall it and then reinstall. After you have uninstalled the application or game in question, download it again from its original source and run the setup file to complete the installation process.

Leave a Reply