If your computer is throwing BSOD with memory management error, this post is exactly for you.
The BSOD Windows Management error affects a Windows system badly and can cause abrupt shutdown and reboots. With that said, there’s no need to let frustration spoil your mood when you encounter the dreaded BSOD error.
Dreaded though BSOD errors are, they are usually not difficult to resolve. This is the case with memory management BSOD too.
We have provided 5 do-it-yourself solutions to memory management BSOD. Of course, you don’t need to try all of them; start with the first one and move on to the next one and so on until the error goes away.
However, first you might want to understand what memory management error is all about.
What is memory management error?
As the name suggests, the memory management is related to allocation of memory. Every Windows processes and programs that you run have memory requirements.
Windows allocates memory to processes and programs. When you close any program, it frees up memory space, which is then made available to other program or process.
Like any other process, memory management can crash. When that happens, the system cannot function normally. The result is the system throws up BSOD memory management error and reboots to recover from the error.
What causes Memory management error?
There can be several reasons behind the BSOD Memory management error. Some of the reasons are
- Hardware or software conflicts
- Disk errors
- Virus infection
- Faulty video driver
- Faulty RAM
Now that you have adequate knowledge about BSOD Memory management error, let’s look at the solutions available to fix the issue.
Solution One – Update video drivers
One of the causes of memory management error is outdated or corrupt video card driver. To fix this issue, you need to update video card driver. You can either update driver manually or use driver update software which would update video driver automatically.
Manual Driver Update
To update drivers manually, you need to be familiar with Device Manager, an inbuilt utility in Windows that allows you to install or uninstall device drivers, among other things.
Here are the steps to update video drivers manually using Device Manager.
- Go to device manufacturer website or video card manufacturer website
- The driver file is available in different formats- ZIP, EXE, SYS, and other formats. Download the driver file in zip format
- Unzip the file to a designated folder
- Click Start and type Device Manager in Cortana search box
- Click Device Manager from the list of results
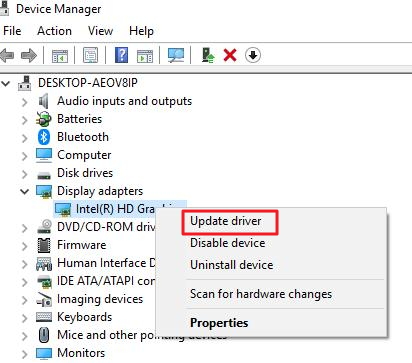
- In the Device Manager window, go to Display adapters and expand it
- Right-click video card and click Update Driver
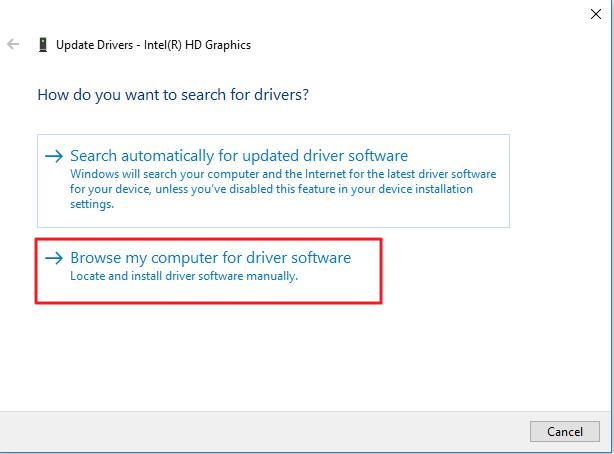
- Click Browse my computer for driver software.
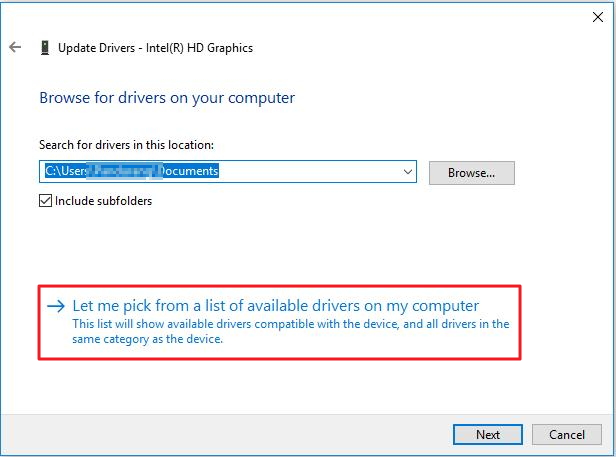
- Click Let me pick from a list of device drivers on my computer
- Click Have Disk
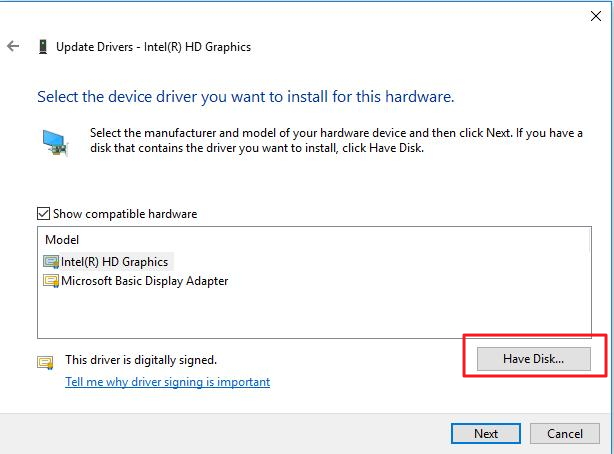
- Click Browse
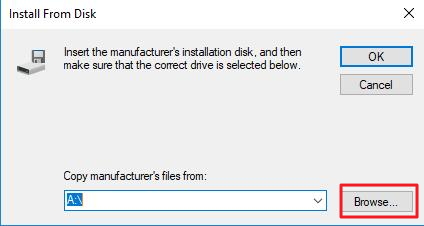
- Access the designated folder where the video card driver is stored
- Select the driver file
- Click Open and then Click OK
- Click Next
- Windows will install the video card driver. After the video card driver is installed successfully, restart the computer
Automatic Driver Update
Updating driver using a driver software tool is a good option.
Automatic driver update tools offer many benefits, the most important ones being:
- You can update device drivers automatically
- The software scans and updates all outdated or missing drivers at one go
- The tool picks the right drivers for your device and operating system, so you won’t have to worry about installing an incorrect driver by mistake
- Automatic driver updates are 100% safe
Driver Updater is one of the best driver update tools out there. Outbyte Driver Updater will give you access to a database of over 1 million drivers. It will regularly scan your PC, suggesting new driver versions to install. Driver Updater contains drivers for a variety of Windows devices. With just one click, you can update drivers in your system.
Step 1
Click here to Install and launch the app
Step 2
Scan all devices
Step 3
Install or update drivers automatically
Solution Two- Run Check Disk
The Windows system might also throw up BSOD memory management error on the screen if the NTFS volume is corrupt. To resolve this problem, you need to fix NTFS file system errors by running Check Disk. Here are the steps to follow.
- Press Windows key + S simultaneously on the keyboard to bring up Cortana search
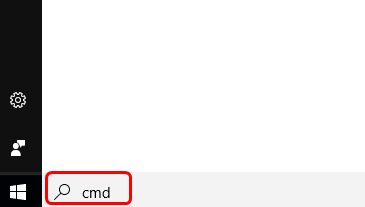
- In the search box, type cmd and click OK
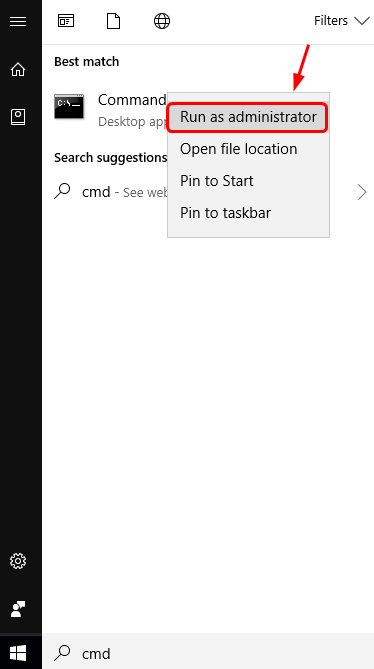
- Right-click Command Prompt from the list of results and select Run as administrator
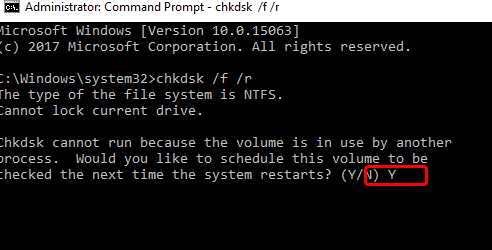
- In the command prompt window, type chkdsk /f /r, and press Enter on your keyboard.
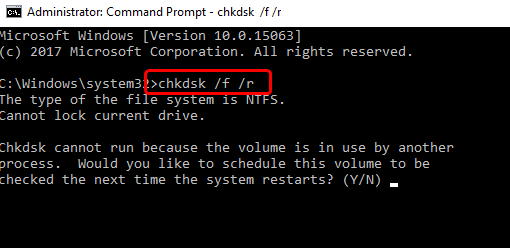
- When the system asks “Would you like to schedule this volume to be checked next time the system restarts?”, press Y on the keyboard
- Close the command prompt window and restart your computer.
- When the computer reboots, Windows will run the check disk program to fix any errors with NTFS volume.
- Use your computer for some time and see if the error is generated. If the issue persists, try next solution.
Solution Three-Run Windows memory diagnostic test
When your computer shows memory management errors, there is a possibility there is some problem with physical RAM installed in your computer. To rule out this possibility, you can run Windows memory diagnostic tool to check physical RAM for any faults.
Here are the steps to follow.
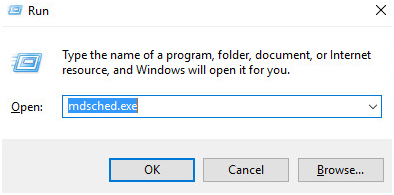
- Press Windows key + R simultaneously on the keyboard to bring up the Run command console
- In the Run command window, type mdsched.exe and click OK
- Windows will provide two options – Restart now and check for problems (recommended)or Check for problems the next time I start my computer
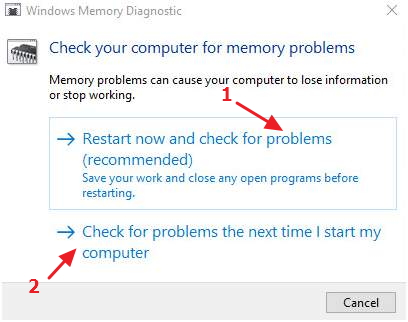
- If you want to run Windows memory diagnostic tool immediately, select Restart now and check for problems (recommended) else select Check for problems the next time I start my computer
- When the Windows runs Windows memory diagnostic tool, you will see the progress and also see errors that Windows memory diagnostic tool may encounter.
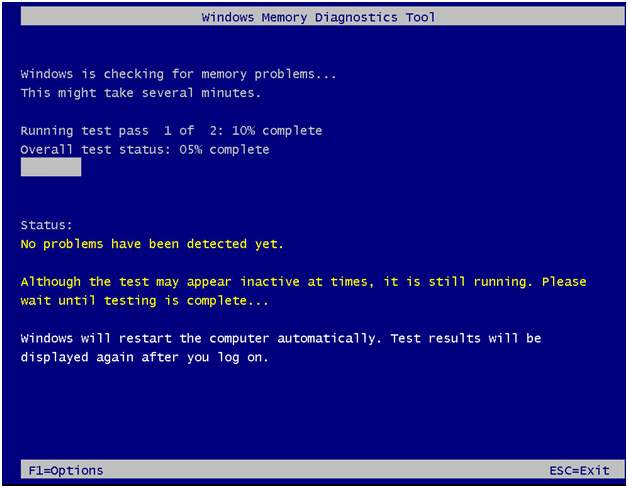
- When the Windows memory diagnostic test is completed, the computer reboots and you can see the test results when you log on
If the Windows memory diagnostic test results show no errors, you can conclude the physical RAM is in good condition. You need to move to next solution to resolve the issue.
Solution Four- Check newly installed hardware and software
Try to recall any changes you made to the system after which BSOD memory management error started appearing.
Have you recently installed any new hardware or software? There is a possibility the newly installed hardware or software is not compatible with your system, which in turn might be causing the memory management error.
You should remove any newly installed hardware and also uninstall any new software and see if the issue is resolved. If the issue still persists, you need to try next solution.
Solution Five- Scan your system for virus infection
Though very rare, a virus infection can be the reason behind BSOD memory management error. If you haven’t scanned your system for virus infection recently, do it now.
If you don’t have any 3rd party anti-virus installed, you can use the built-in Windows Defender to scan your system and get rid of virus infections if any.
We are sure you would be able to resolve the error using one of these methods. Do let us know which solution worked for you by leaving a comment. Thanks!

Leave a Reply