When it comes wireless mice, Logitech’s popularity is unparalleled – and for good reason. Each of Logitech’s wireless mice is not only easy to use and set up, but also very durable. All the same, like any peripheral device, you may encounter issues with your Logitech mouse from time to time. One of the most common issues is of the device failing to register with a PC. If you are facing this issue, this post is just for you. We will discuss various solutions for this error.
The Logitech mouse uses a 2.4 GHz receiver (wireless). You can encounter the “Logitech Mouse Not Working” issue if the wireless radio has lost connection with your mouse. You must reset the connection to reestablish connection with your mouse.
How to Reset Logitech Mouse’s Wireless Radio Connection
Some Logitech mice have a reset button; others don’t. If your mouse has it, simply pressing it will reset the device. However, if you have a model without a reset button, like the Logitech M185 mouse, you must perform these steps instead.
Solution 1 – Access the power switch of your mouse
If you do not use the mouse for a certain time, it automatically switches itself off. Nevertheless, if there is any movement, the optical sensors automatically detect them and switch the mouse on.
Having said that, Logitech strongly recommends users to switch off their mouse if they are not using for an extended period. Even though the sensor does not hog resources, the battery life can take a hit if the mouse is not manually switched off.
In case the Logitech mouse is not switching on, it is necessary to check whether the battery has still got life in it. If it is dead, you must replace it.
- Switch MI85 off. Now, switch it on after a few seconds have passed
- Place the MI85 mouse on your mouse pad and move it randomly to check whether it is being recognized by your computer or not. This particular model doesn’t use LED power indicator, which means the only way for testing the power is to move the mouse a bit and look for the mouse cursor on your computer’s screen
In case the computer fails to detect any sort of movement, replacing the mouse battery might be a good idea.
- Open battery compartment
- Take out the battery and insert a new one. Now close the battery compartment and then turn the mouse on. Now check whether the mouse is being recognized by your computer. Replacing the battery should work in case the problem was being caused by wireless receiver
Solution 2 – Check your wireless dongle
Wireless mice, such as the M185, have a wireless dongle which is inserted in a USB slot. It is possible that your computer is no longer recognizing the wireless dongle.
- Take the wireless dongle from USB port
- Replace the current battery of your mouse with a new one. Switch the M185 on and then reinsert its dongle into a USB port. Now place the M185 on your mouse pad and move it randomly to check if the PC is recognizing it or not
- If the computer is still refusing to recognize the M185, try another USB slot. Take care to insert the wireless dongle into a USB slot properly. You should gently push the dongle into a USB slot as far as it would go, but do not apply undue force. When inserted properly, the whole of the metal part is inside the slot.
- In case the M185 is still not getting registered with your computer, it’s time to thoroughly check its software settings
Solution 3 – Check Software Settings and Device Driver
Typically, when the wireless dongle is inserted and the mouse is turned on, the computer automatically installs the required drivers, as well as software. That said, sometimes things may not go as planned, requiring your intervention.
Check Driver Updates Through Device Manager
Windows comes with a built-in utility called the device manager that allows you to check the status of all your devices and troubleshoot errors.
- In the start search box, type run and press enter
- In the run dialog box, type devmgmt.msc and press enter
- Expand Mice and other pointing devices. You will see Logitech mouse under this entry
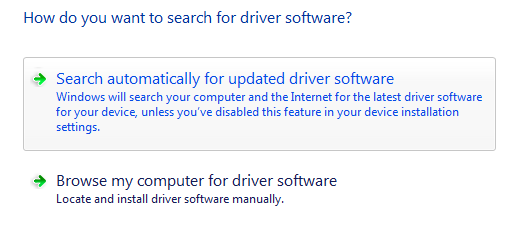
- Right click Logitech mouse and click “Update driver”. You will be presented with two options. Click the first option.

- Windows will automatically search from the latest driver on the Internet. It will either issue a prompt stating that the latest driver has been installed or that your current driver is up-to-date. Click the Close button
Update Device’s Firmware Using Logitech Firmware Update Tool
In case the problem persists, you might have to update the firmware of your device using a special application.
Since device software and drivers receive updates on a regular basis from its manufacturer, ensuring the software is up-to-date is extremely important. You can download the latest Logitech Firmware Update Tool from the manufacturer’s website.
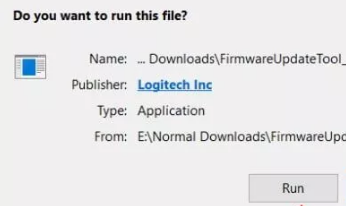
After you have downloaded the software, open the folder and double-click to launch the software. In the Open File – Security Warning window, click the Run button.

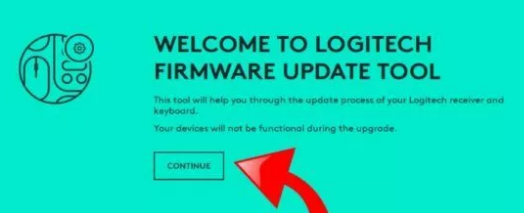
In the next window click Continue.

Your computer will be scanned for connected receivers and the software will automatically update the device.

In case the software is unable to detect a device, there is a strong possibility that there is something wrong with the hardware. If your mouse is still in the warranty period, you should contact Logitech Support or the retailer from where you bought the device.
Use Driver Update Tool to Manage All Drivers
Automatic driver update tools offer many benefits, the most important ones being:
- You can update device drivers automatically
- The software scans and updates all outdated or missing drivers at one go
- The tool picks the right drivers for your device and operating system, so you won’t have to worry about installing an incorrect driver by mistake
- Automatic driver updates are 100% safe
Driver Updater is one of the best driver update tools out there. Outbyte Driver Updater will give you access to a database of over 1 million drivers. It will regularly scan your PC, suggesting new driver versions to install. Driver Updater contains drivers for a variety of Windows devices. With just one click, you can update drivers in your system.
Step 1
Click here to Install and launch the app
Step 2
Scan all devices
Step 3
Install or update drivers automatically

Leave a Reply