Are you experiencing “keyboard not typing issue in Windows 7 or 8 or 10″?
There are many reasons why this issue occurs. However, irrespective of the cause, it can be resolved fairly easily and quickly.
In this post we share 9 solutions to this post. But, hey, you don’t need to try them all. Start with the first one in the list and work your way down till you are able to get rid of this pestering error.
Solution One- Check the keyboard connection (PS/2, USB and wireless keyboard)
For Wired keyboards
The first thing you need to check is whether the keyboard is connected correctly to the port on the computer. Ensure the keyboard connection is not loose. Try unplugging the keyboard and plugging it again. Now see if the keyboard is typing. If the issue persists, move to next solution.
For Wireless keyboards
If you are using a wireless keyboard, switch off the keyboard and then switch it on again after some time. Wait for the keyboard and computer to establish a connection. Now see if the keyboard is typing. If you are still facing a problem with the keyboard, try the next solution. Click here for a post specifically dealing with wireless keyboard connection issues.
Solution Two- Try the keyboard with another computer
There is a possibility the fault lies in the keyboard. This can happen if the keyboard is broken or something inside is damaged. To rule out this possibility, try the keyboard on another computer.
If the keyboard is not typing even when it is attached to another computer, you can conclude the keyboard has gone bad and it’s time to get a new keyboard. However, if the keyboard works fine with the other computer, you need to try the next solution.
Solution Three – Connect the keyboard to other USB port (For USB keyboards)
You cannot rule out the possibility of a dead USB port or some problem with the USB port, which in turn might cause the keyboard not typing issue. Your Windows computer is more likely to have more than one USB port, so try connecting the keyboard to another port and see if it is working.
If you are still facing problem with the keyboard after connecting to another USB port, try next solution.
Solution Four – Check batteries (for wireless keyboards)
If you are using a wireless keyboard, ensure the batteries are not weak. If the wireless keyboard battery is weak, it will give you connectivity problems like frequent disconnection or simply not registering your keystrokes. To rule out weak batteries problem, try installing new batteries and see if the problem is resolved.
The next important thing you should remember is the distance between the wireless keyboard and the receiver. Make sure the keyboard is not far than 1 foot from the receiver and there is nothing between the wireless keyboard and the receiver. If you are still facing a problem with the keyboard, try the next solution.
Note –There are not many differences in Start Menu and other options in Windows 8 and Windows 10. Hence, Windows 8 users can use troubleshooting steps given for Windows 10 for references.
Solution Five – Run Troubleshooter
Windows operating system comes with a Troubleshooting tool that can fix the problem with hardware and devices and components of the Windows operating system. Here are the steps to run the Troubleshooter tool.
For Windows 7 users:
- Click Start and type troubleshoot in the search box
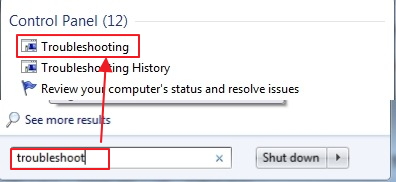
- Select Troubleshooting from the list of results
- In the Troubleshooting window, click Hardware and Sound
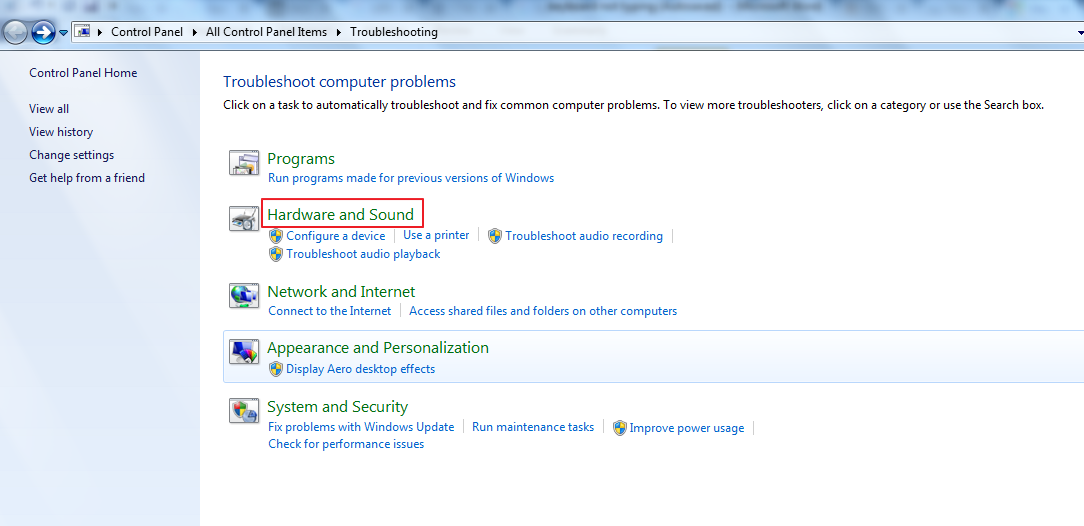
- In the Hardware and Sound window, click Hardware and Devices
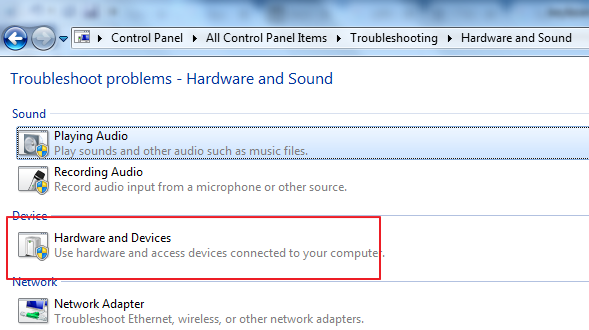
- You can see Hardware and Devices Troubleshooter dialog pop-up, click Next
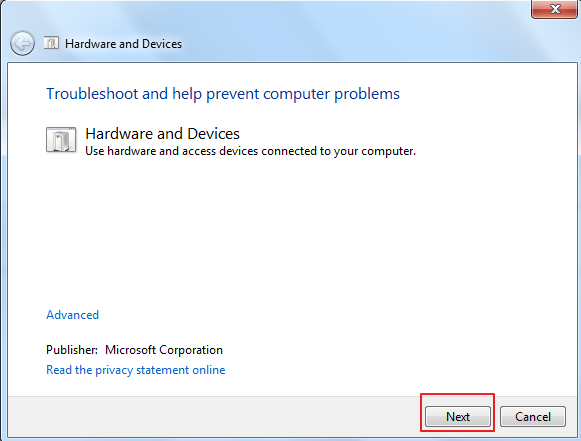
- Wait for the Troubleshooter to complete its operation and fix problems.
Check whether the keyboard is typing. If the issue persists, try next solution.
For Windows 10 users
- Click Start and type troubleshooting in Cortana search box
- In the Troubleshoot window, click Hardware and Devices
- Now you can see the Hardware and Devices option expand and you get Run the troubleshooter option, click on it

- You can see the troubleshooter running. Wait until the Troubleshooter operation completes
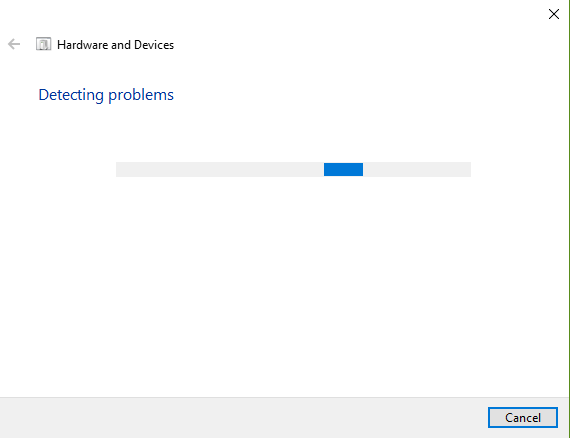
Now check whether the keyboard is working. If the issue persists, try next solution.
Solution Six – Turn off Filter keys
Filter Keys is an accessibility function in Windows that tells keyboard to ignore repetitive or brief keystrokes to make typing easier and accurate for users. The Filter Keys feature has a setting which defines the amount of time the key needs to be pressed for the operating system to recognize the keystroke.
You cannot ignore the possibility of the filter keys feature of being the reason behind the keyboard not typing issue. To ensure the Filter keys are not a problem, you can turn off the Filter keys feature and see if the change in the settings gets the keyboard working again. Here are the steps to follow.
- Click Start
- Click Control Panel
- In the Control Panel window, set the View by to Category
- Click Ease of Access
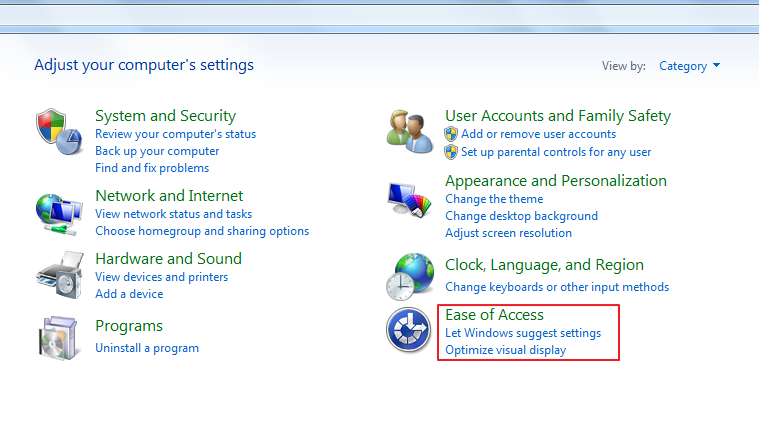
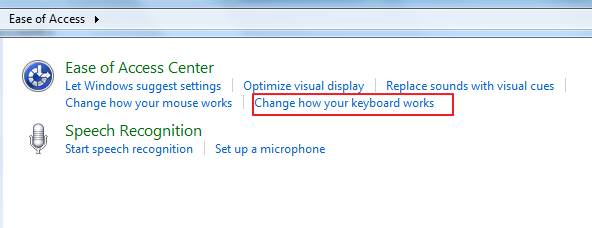
- In the Ease of Access window, click Change how your keyboard works
- Under “Make it Easier type” see whether the Turn On Filter Keys option is checked. If Yes, remove the check from the box to Turn On Filter keys
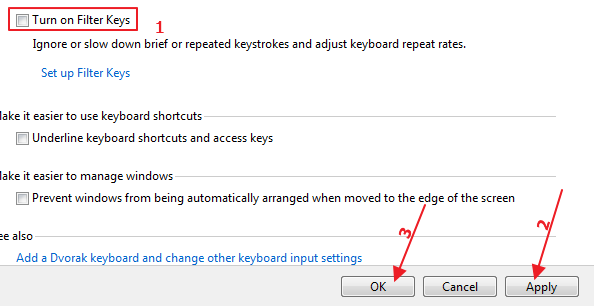
- Click Apply button and then click OK
- Close all windows
Try typing on the keyboard to see if the issue is resolved. If the issue still persists, try next solution.
Solution Seven – Create a new user account to login into Windows
Many users find that the keyboard not typing issue only occurs with a specific user account. Nobody knows the reasons behind this. In such case, creating a new user account with administrative privileges has helped many users to resolve the keyboard issue.
If the keyboard works fine after logging into Windows with a new user account, you can conclude the problem was with old user account. Here are the steps to create a new user account with administrative privileges.
(Note – Since the keyboard is not working, you can use on-screen keyboard wherever you need to type something in troubleshooting steps below)
Steps to access on-screen keyboard
Window 7 users – Click Start -> All Programs -> Accessories -> Ease of Access – > On-screen keyboard
Windows 10 users – > Click Start -> Settings -> Ease of Access – > On-screen keyboard
Steps to create a new user with administrative privileges in Windows 7:
- Click Start -> Control Panel
- In the Control Panel window, set the View by – Category
- Click User Accounts
- In the User Accounts window, click Manage another account
- In the Manage Account window, click create a new account
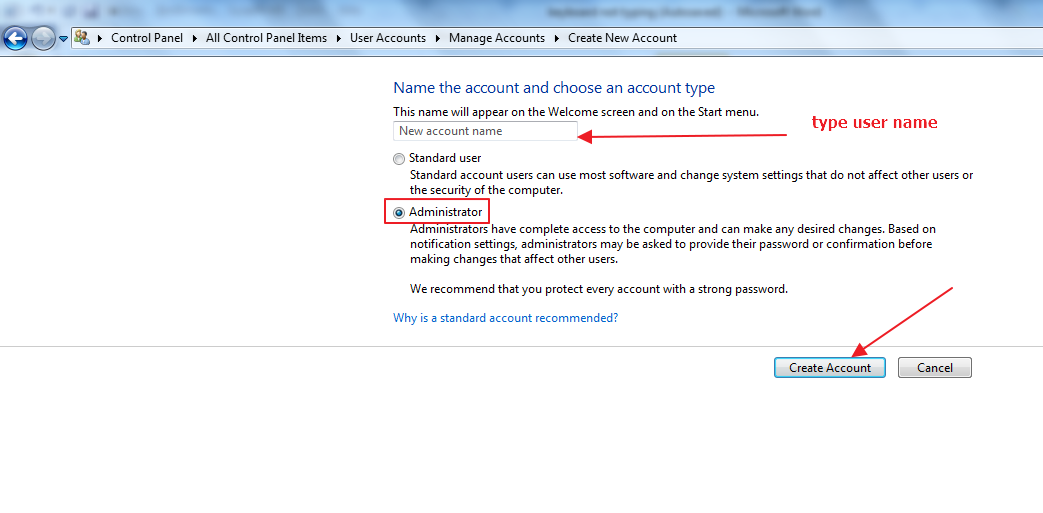
- Type in account name in the box, select Administrator as account type and then click Create Account
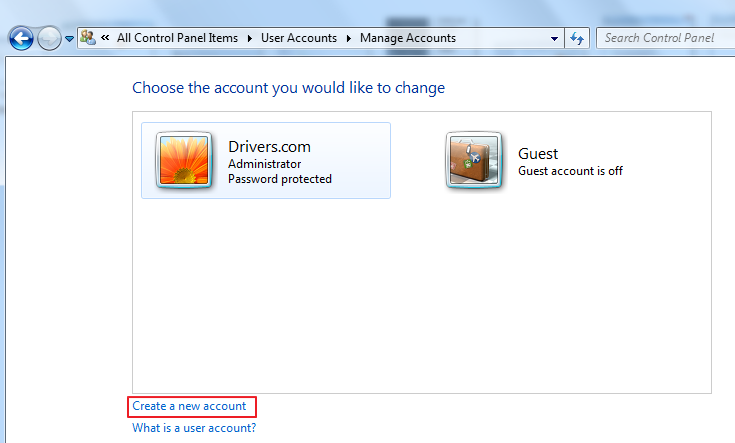
- You can see the new user account with Administrator account is created
- Click Start and then click the arrow beside Shutdown and then click Logoff
Log into Windows with a new user account and see if the “keyboard not typing issue” is resolved. if the keyboard issue still persists, try next solution.
Steps to create a new user with administrative privileges in Windows 10:
- Click Start and then click Settings(gear icon)
- In the Settings window, click Accounts
- In the left pane, click Family and other people
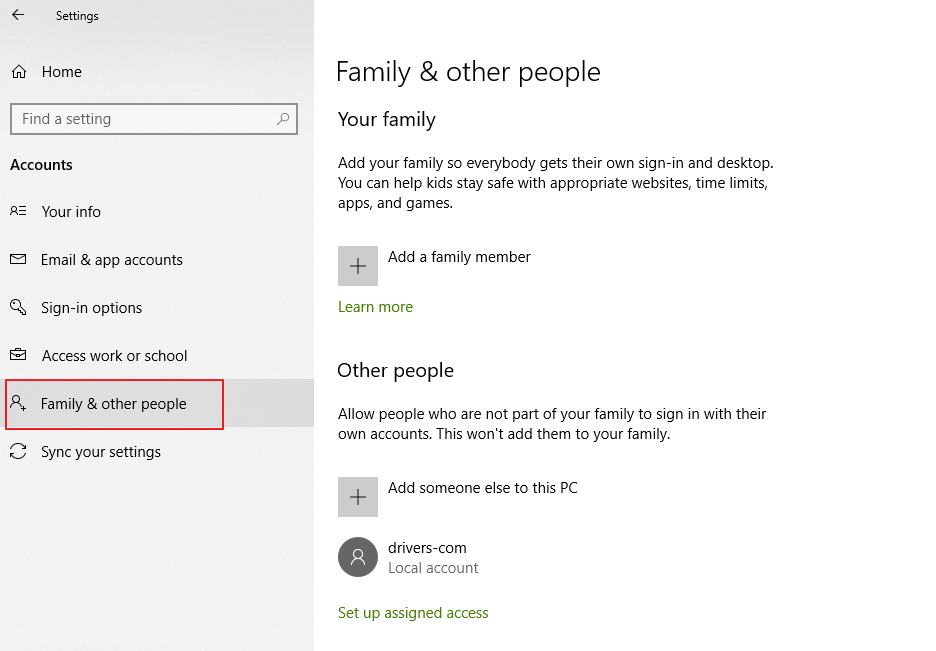
- In the right pane, click Add someone else to this PC
- In the Microsoft Account window, click I don’t have this person’s sign-in information
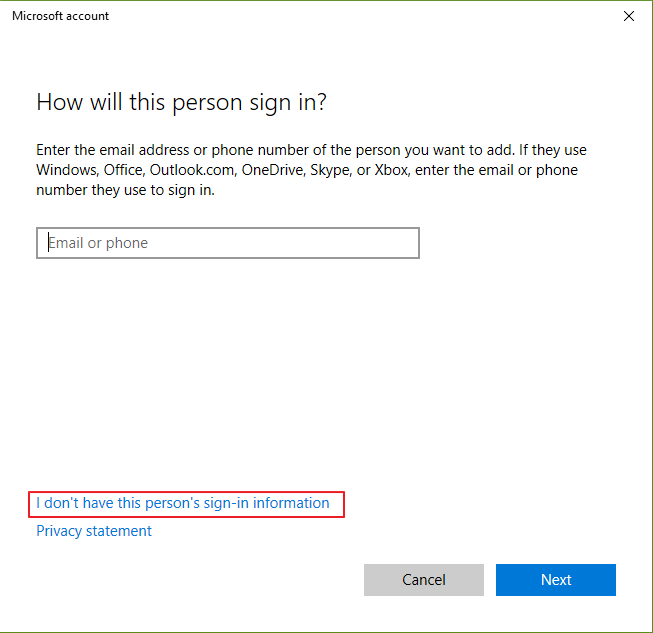
- In the next window, click Add a user without a Microsoft account
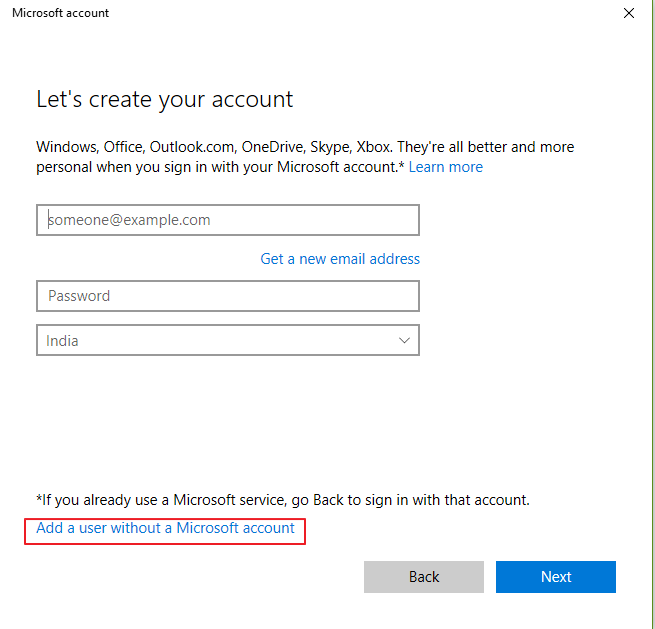
- In the Create an account for this PC window, type username, and then type the password twice
- Also, select Security Question 1 and Security Question 2 and type answers for these questions in their respective answer boxes
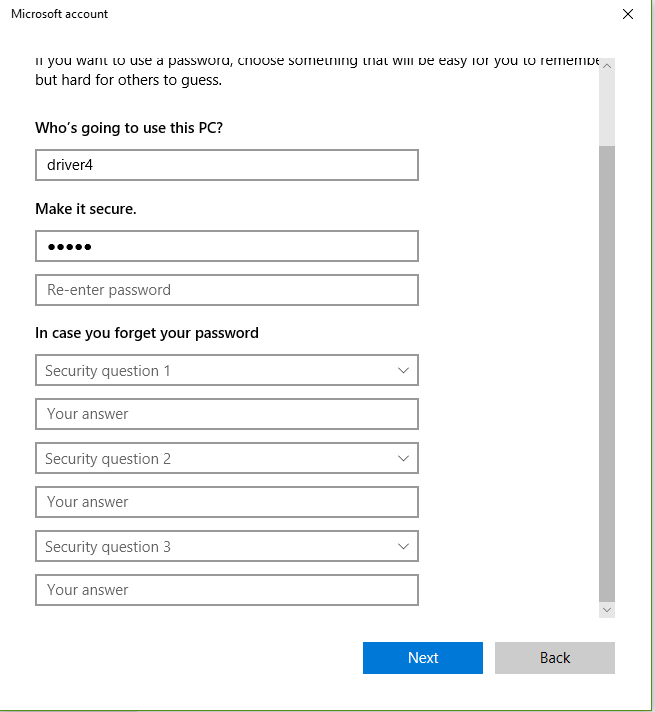
- Click Next
- Wait for the account creation and then go back to the Settings window
- Click the newly created account and then click Change account type
- In the Change account type pop-up, under Account type, select Administrator from the drop-down list
- Click OK
- Click Start again and click the arrow beside Shutdown and then click Logoff
- Now you can see newly created user account available for login. Click on it and enter a password to log in
Now, see if the keyboard is typing. If the issue still persists, try next solution.
Solution Eight – Check Device Manager for keyboard issues
There is a possibility the keyboard issue is related to the driver. You can check whether there is any problem with keyboard driver through Device Manager. Here are the steps to follow
- Press Windows logo key and R simultaneously on the keyboard to invoke Run command
- In the Run command prompt window, type devmgmt.msc and click OK
- In the Device Manager window, expand keyboard category and look for a yellow exclamation mark which is an indicator of a driver Skip next step and follow troubleshooting steps thereafter.
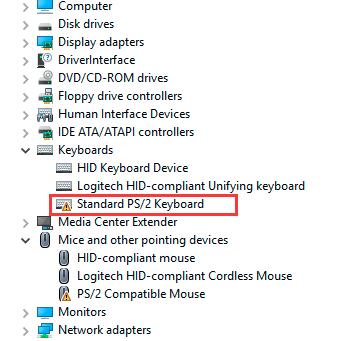
- If you don’t see any problem with keyboard driver, skip the steps below and proceed to Solution Nine
- Right-click on Keyboard device entry and select Update Driver software
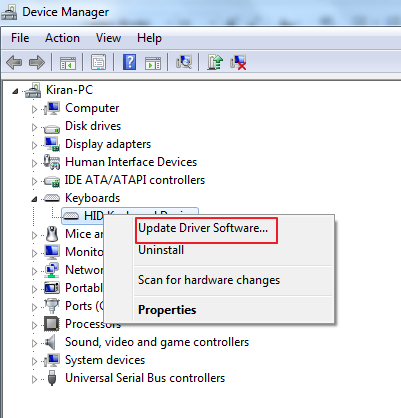
- In the next window, click Search automatically for updated driver software
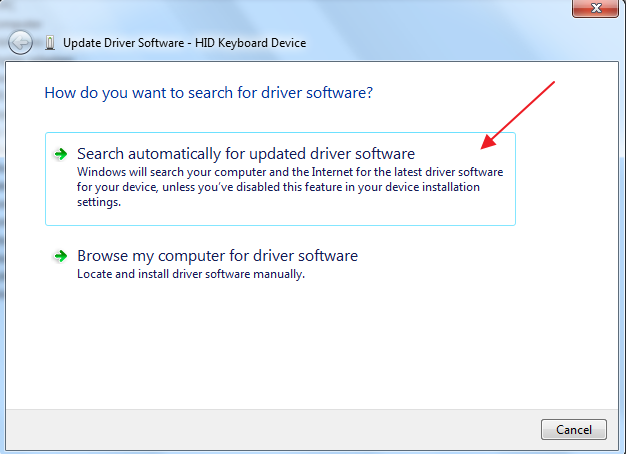
- Wait until Windows searches for best keyboard driver on the Internet.
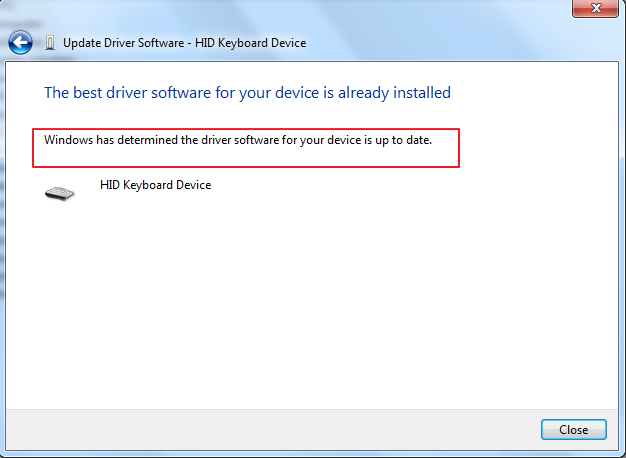
- If the Driver Search tool returns a message “best driver software for the device is already installed”, move to next solution.
Solution Nine – Update Drivers
You can get the “keyboard not typing” issue if your drivers are outdated or corrupt or missing. Thankfully, you can easily fix this issue. Use an advanced and fast driver update tool software to update your device drivers.
Automatic driver update tools offer many benefits, the most important ones being:
- You can update device drivers automatically
- The software scans and updates all outdated or missing drivers at one go
- The tool picks the right drivers for your device and operating system, so you won’t have to worry about installing an incorrect driver by mistake
- Automatic driver updates are 100% safe
Driver Updater is one of the best driver update tools out there. Outbyte Driver Updater will give you access to a database of over 1 million drivers. It will regularly scan your PC, suggesting new driver versions to install. Driver Updater contains drivers for a variety of Windows devices. With just one click, you can update drivers in your system.
Step 1
Click here to Install and launch the app
Step 2
Scan all devices
Step 3
Install or update drivers automatically

Leave a Reply