Few computer issues are as frustrating as “Reboot and select proper boot device” error. Thankfully, there are many ways to solve this error, all of which can be done by an average Windows user.
In this post, we will take you through a few solutions to fix this issue. However, you don’t need to try them all. Start with the first one and start moving down until you are able to resolve the error.
However, before you try any of these given solutions, check for any USB devices attached to the system. Unplug your portable drive, thumb drive or USB camera and try restarting the Windows system.
If it still throws up “Reboot and select proper boot device error”, it might mean there’s something seriously wrong with some hardware. It might also mean that the cables are not properly connected to your hard drive.
To resolve the issue, try these solutions in the order they appear.
Solution One – Check the cables connecting the hard drive
The hard drive has two slots – one for the power cable and other for data cable that connects to the motherboard.
The first thing you need to do is ensure the power cable is seated firmly in the hard drive slot. Now, check the data cable is seated firmly on both ends: motherboard slot and hard drive slot.
If both connections are good, the problem might be with the power cable. It might be damaged and, as a result of which, unable to supply the required voltage to the hard drive. This in turn can prevent the motherboard from detecting hard drive, causing the error message to appear on your screen.
Test the power cable/SMPS on another computer. If you get the same error, get the power cable/SMPS replaced.
Solution Two – Clean RAM
A dusty RAM could be the reason behind the booting error. Remove the RAM module and clean it with a soft lint-free cloth. Put the RAM module, restart the system and check whether you still get the error.
Solution Three – Check the Boot Settings in BIOS
The motherboard allows you to boot from different devices such as HDD, FDD, USB, CD/DVD, Zip drive, Legacy LAN, USB CD-ROM, and few other options.
Whenever you restart the Windows system, the BIOS checks the first boot device entry and tries to load information from that boot source.
A wrong boot device entry could be the reason behind the error. Selecting the right first boot device will help solve the issue.
Here are the steps you need to follow.
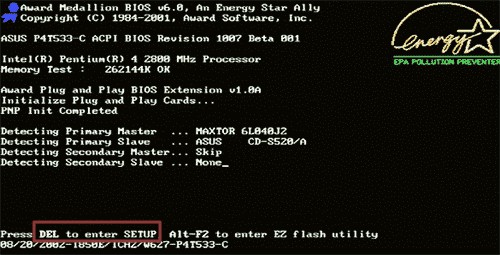
- Restart your system and press Del button on your keyboard to enter BIOS setup. Depending on the motherboard make and model or BIOS utility, you may have other option to enter BIOS setup. Check the bootup screen for more information about it

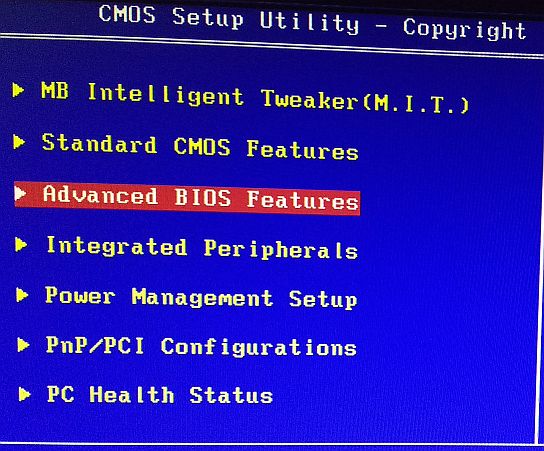
- Once you have entered the BIOS setup, look for options such as Advanced BIOS features or Startup to check the boot device priority

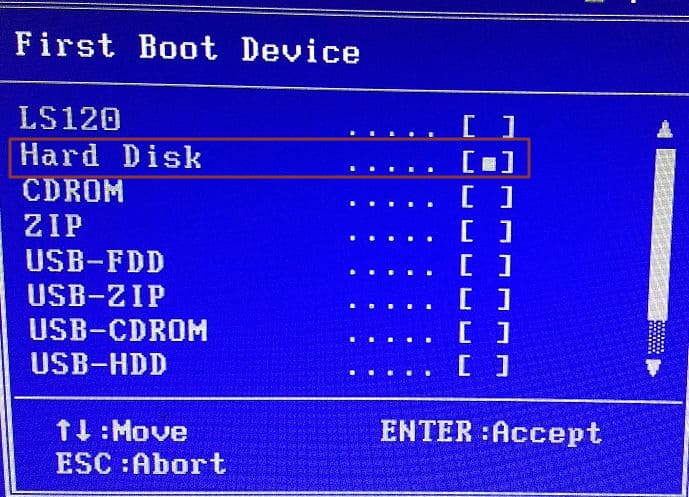
- Check the first boot device entry and modify if necessary

If you see a wrong device selected as First Boot Device, select the Hard Drive as the first boot device

- Press F10 to save the changes and exit BIOS. Depending on the BIOS make and version, you may have other option to save the changes. Look at the bottom of BIOS screen for the right way to save changes and exit BIOS
If the error still exists, the last option is to update your drivers. Here are the steps to follow.
Solution Four – Update Drivers in Safe Mode
Automatic driver update tools offer many benefits, the most important ones being:
- You can update device drivers automatically
- The software scans and updates all outdated or missing drivers at one go
- The tool picks the right drivers for your device and operating system, so you won’t have to worry about installing an incorrect driver by mistake
- Automatic driver updates are 100% safe
Driver Updater is one of the best driver update tools out there. Outbyte Driver Updater will give you access to a database of over 1 million drivers. It will regularly scan your PC, suggesting new driver versions to install. Driver Updater contains drivers for a variety of Windows devices. With just one click, you can update drivers in your system.
Step 1
Click here to Install and launch the app
Step 2
Scan all devices
Step 3
Install or update drivers automatically

Leave a Reply