A bad pool header error indicates Windows is having a problem allocating memory. The most common cause of the error is a problem with device drivers. With that said, the problem might occur because of other reasons, too, like disk write issues, bad sectors or even some problem with routers.
If you are getting this error, keep your worries aside as we are providing some easy solutions to fix the bad pool header issue.
Try the solutions one by one starting from the top and tell us which one worked for you.
Solution One- Disable third-party antivirus
Many users have said that they received the error because of 3rd party antivirus clients.
You need to check whether the 3rd party antivirus is not using too much of non-paged pool that is causing interference in memory allocation. Disabling the antivirus for some time is a good way to check whether the antivirus is the cause of the problem.
The exact steps to disable a 3rd party antivirus program might vary from product to product. Refer to the documentation of the anti-virus to know the exact steps to disable it.
If disabling the anti-virus resolves the issue, contact your anti-virus manufacturer and ask for their advice to resolve the bad pool header issue. Another option is installing another anti-virus.
Solution Two- Update All Drivers
As mentioned earlier, device drivers might be one of the causes behind the bad pool header error. Updating all drivers is an easy way to fix the issue.
You have two options to update all drivers, update all drivers manually or update all drivers automatically.
Manual driver update– If you are using an assembled PC, you will be required to visit hardware manufacturer’s website and find latest drivers update for your system. Laptop users need to go their device manufacturers website and look for driver updates available for your system.
Updating drivers manually is a time-consuming task that needs some expertise and lots of patience. If you are not confident about updating drivers manually, we suggest you use a Driver Update Tool to update all drivers automatically.
Updating Drivers Automatically
Automatic driver update tools offer many benefits, the most important ones being:
- You can update device drivers automatically
- The software scans and updates all outdated or missing drivers at one go
- The tool picks the right drivers for your device and operating system, so you won’t have to worry about installing an incorrect driver by mistake
- Automatic driver updates are 100% safe
Driver Updater is one of the best driver update tools out there. Outbyte Driver Updater will give you access to a database of over 1 million drivers. It will regularly scan your PC, suggesting new driver versions to install. Driver Updater contains drivers for a variety of Windows devices. With just one click, you can update drivers in your system.
Step 1
Click here to Install and launch the app
Step 2
Scan all devices
Step 3
Install or update drivers automatically
Solution three – Disable fast start-up
The Fast start-up option is different from the regular boot.
Unlike the regular boot, the fast start-up does not reload the kernel and drivers; it just reloads the system image from the hibernation file and refreshes RAM.
Disabling fast start-up will force the Windows operating system to reload kernel and device drivers individually that might resolve the issue. Here are the steps to follow.
- Go to Desktop
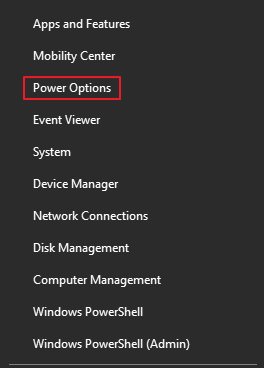
- Right-click on Start button and select Power options

- In the next screen, select Advanced Power Settings that appears in the right-hand side pane

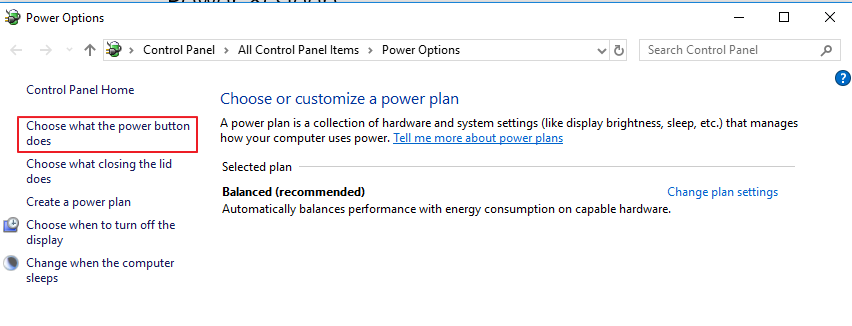
- In the Power Options window, select Choose what the power button does

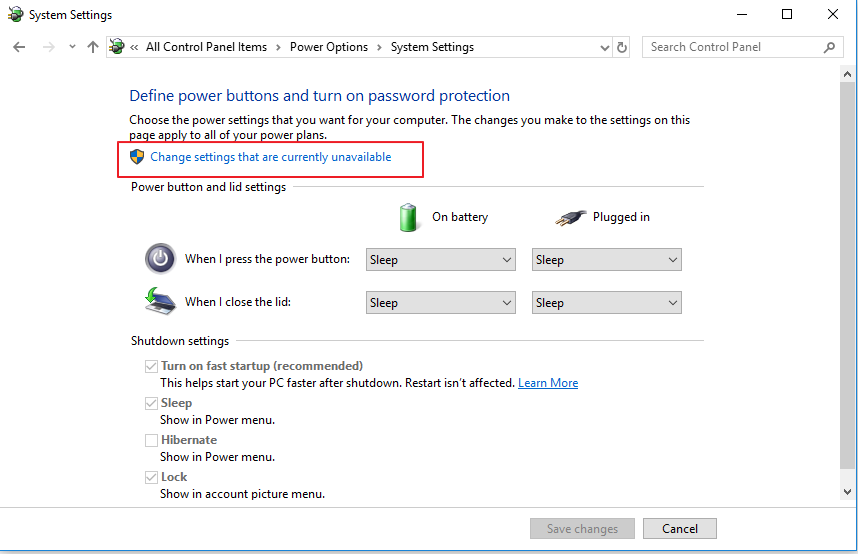
- In the System Settings window, select Change Settings that are currently unavailable

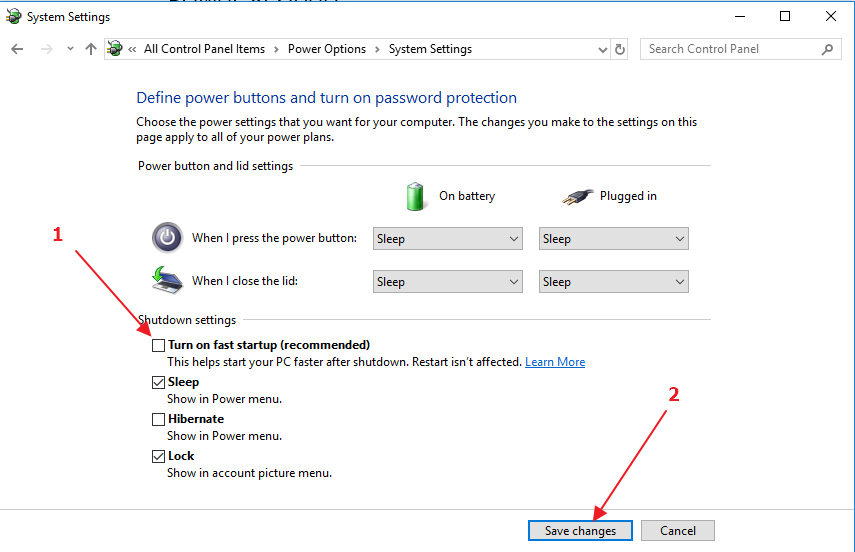
- In the next window, uncheck the option- Turn on fast start-up(recommended)

- Click Save Changes
- Close all windows and reboot PC and see if the issue exists
Solution Four- Unplug all external devices
As mentioned earlier, one of the devices drivers might be the reason behind the issue. To find out the problematic device, you need to unplug all external devices from your computer. You can keep the USB mouse and keyboard connected.
Restart the PC and see if the issue persists. If you don’t get the bad pool header error, shut down the PC. Now connect one USB device and restart your computer and see if you get the bad pool header error. Shut down the system again and check one USB device at a time to find
out the faulty device behind the bad pool header. Once you recognize the faulty device, update its drivers to resolve the issue.
Solution Five- Check if the RAM is faulty
A faulty RAM module can cause the bad pool header error. To check whether the RAM module is faulty, first switch off the PC and remove the RAM module from its slot. Clean the dust off the RAM, especially the golden colored connector strip. Use a lint-free clean cloth to clean it.
After cleaning the RAM, insert the RAM module in the slot and see if the error persists. If you still get the error, try inserting RAM module in a different slot. Alternatively, you can also use a different RAM module to check whether the first RAM module is faulty.

Leave a Reply