Is Counter-Strike Global Offence (CSGO) crashing on your Windows 10?
Don’t worry. You’re not alone. CSGO crashing frequently is not an uncommon issue, particularly on Windows 10.
More importantly, it can be fixed fairly easily, as this post shows.
How to fix CSGO crashes?
Try the solutions listed below in the order they are listed.
Fix #1 – Turn off the Compatibility Mode
While CSGO crashes can occur due to many reasons, the primary cause in most instances is the compatibility mode. Turning it off can prevent the issue from surfacing again.
Here are the steps to follow:
- Go the game’s installation directory
- Locate csgo.exe
- Right-click it and select properties
- Now find the compatibility tab
- Next, disable the ‘Run as Administrator’ feature and then disable compatibility mode
- Click Apply to save the changes
- Restart CSGO to see if the problem was fixed
Fix #2 – Check integrity of CSGO game files
If the fix 1 didn’t work for you, try this option.
- Launch Steam and then click LIBRARY
- You’ll see a list of your games. Locate CSGO and right-click it and then select Properties
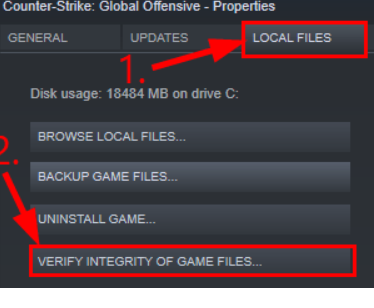
- Click LOCAL FILES and then click VERIFY INTEGRITY OF GAME FILES
- The CSGO game cache verification may take a few seconds. Wait until it is over
- Close the windows in Steam
- Exit Steam
- Open Steam, run CSGO and check if the issue has been resolved
If you’re still facing the CSGO crashing issue, move on to the next solution.
Fix #3 – Launch the game in -safe or -autoconfig mode
It’s possible the problem would disappear when you run the game in a different mode. We recommend you give the -safe mode and -autoconfig mode a try.
Important: You can try only one of these modes at a time. After the crashing issue has been fixed, remove these modes.
Launch CSGO in -safe mode
- Launch Steam and then go to LIBRARY
- You’ll see your list of games. Locate CSGO, right-click it, and select Properties
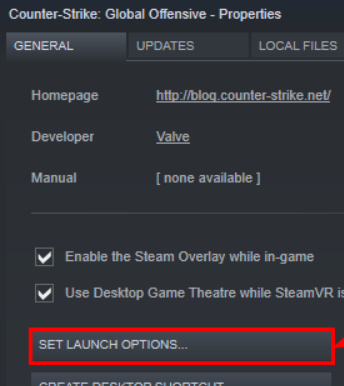
- Click SET LAUNCH OPTIONS
- If any launch options are listed, remove them
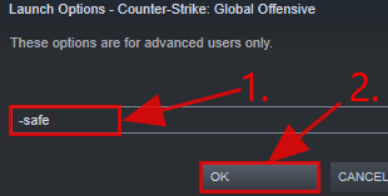
- Now, type -safe and click the OK button
- Exit Steam
- Launch CSGO again and see if the crashing issue has been fixed
- If not, try launching the game in -autoconfig mode
Launch CSGO in -autoconfig mode
- Launch Steam and navigate to LIBRARY
- You’ll see all your games listed here. Locate and right-click CSGO and then click Properties
- Now click SET LAUNCH OPTIONS
- If any launch options are currently listed, remove them
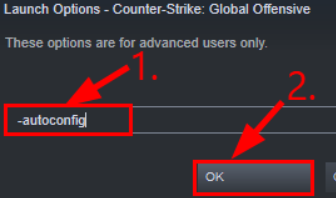
- Now, type -autocofig and then click the OK button
- Exit Steam
- Relaunch CSGO and see if the crashing issue has been fixed
Fix #4 – Reacquire all CSGO game files
If nothing has worked so far, try reacquiring all CSGO game files.
Here are the steps to follow:
- Exit Steam
- Press Win + E on your keyboard
- In the address bar, paste this address: C:\Program Files (x86)\Steam and then press Enter
- Locate the steamapps folder, right-click it, and rename it to old_steamapps
- Relaunch Steam and re-run CSGO
- After the installation process has completed, test whether CSGO crashing issue has been fixed
If the issue has been resolved, copy new files to the old_steamapps folder and then rename it to steamapps for restoring other games without having to download them again.
If the issue still persists, rename the folder so that you wouldn’t have to reinstall other games and then try the next solution in this list.
Fix #5 – Rename fastprox.dll to fastprox.dllold
Here are the steps to follow:
- Press Win + E on the keyboard
- Click View | Options | Change folder and search options
- In the Folder Options window, click View, uncheck the Hide extensions for known file types option
- Click Apply and then click OK
- Press Win + E and then paste this address in the address bar: C:\Windows\SysWOW64\wbem
- Press Enter
- Locate fastprox.dll, right-click it, and rename it to fastprox.dllold
Launch the game again and see if the issue has been fixed. If not, try the last solution in the post.
Fix #6 – Update the graphics card driver
The ‘CSGO is frequently crashing’ issue can occur due to an outdated graphics card driver. To resolve the problem, update the graphics driver.
You can update the graphics card driver either manually or automatically. We have shared the steps for both. All the same, we recommend the automatic method, since it doesn’t require any technical knowledge and can update device drivers in just a couple of minutes.
How to update graphics card Manually
- Follow these steps:
- Press Win + R keys
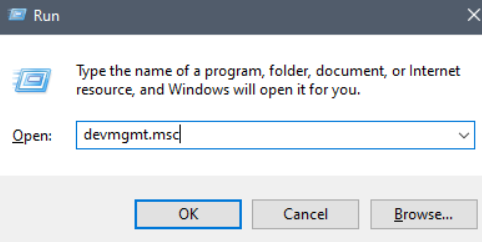
- In the Run dialog box, type devmgmt.msc and press the OK button to open the Device Manager window
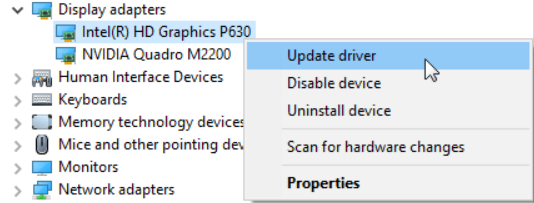
- Expand Display Adapters entry, right-click your graphics card, and click Update Driver
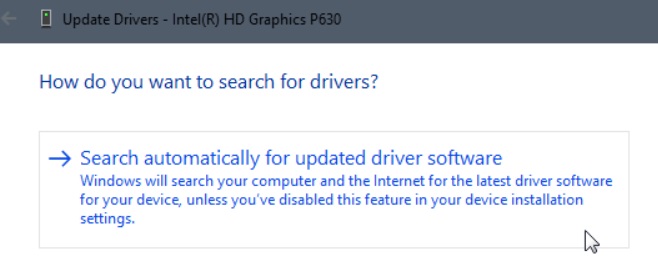
- Click Search automatically for updated driver software
- Windows will look for the latest driver and download and install it automatically
- Once the latest graphics driver has been installed, restart Windows
If Windows fail to locate the latest driver, you can do so manually by visiting the driver manufacturer’s website and downloading the latest driver for your graphics card. To do this, you will have first have to know your graphics card details. You can find them by following these steps:
- Click Windows Start button, type System Information in the Search box, and press Enter
- In the left pane of the System Information dialog box, expand Components and then click Display . In the right panel, you’ll find the details regarding the graphics display adapter in the Adapter Type or Adapter Description entries
- Not down the graphics card model number, go to the manufacturer’s website, download the latest driver for your Windows operating system and save the file in the desired location
- Once the download process is complete, double-click the downloaded folder, and launch the set up file (the one with the .exe file extension)
- Follow the on-screen prompts and wait for installation to complete
- Restart Windows
How to install graphics card automatically
If the steps listed above sounds like hard work, simply use an advanced driver update software to update your graphics card driver. We recommend you give DriverUpdater a try.
Automatic driver update tools offer many benefits, the most important ones being:
- You can update device drivers automatically
- The software scans and updates all outdated or missing drivers at one go
- The tool picks the right drivers for your device and operating system, so you won’t have to worry about installing an incorrect driver by mistake
- Automatic driver updates are 100% safe
Driver Updater is one of the best driver update tools out there. Outbyte Driver Updater will give you access to a database of over 1 million drivers. It will regularly scan your PC, suggesting new driver versions to install. Driver Updater contains drivers for a variety of Windows devices. With just one click, you can update drivers in your system.
Step 1
Click here to Install and launch the app
Step 2
Scan all devices
Step 3
Install or update drivers automatically


Leave a Reply