One of the biggest controversies around Windows 10 is forced updates – that is, no choice policy. Unlike earlier Windows versions, users do not have much control over Windows update. Though updates are for good, the way the Windows updates process works causes inconvenience to many.
Windows 10 update works in the background using resources even when you don’t want it to. Regardless of how important work you are doing, Window 10 update is not going to stop and will proceed to disrupt your work.
Many users feel irritated and helpless when Windows 10 updates get stuck in between and the user is left stranded without a working computer for hours or even an entire day. Sometimes there is unexpected restart followed by unexpected update process which leaves no option but to stare at the screen while Windows 10 completes the update.
If you are facing inconvenience due to Windows update process and want to stop Windows update, this post is for you.
Why you cannot block Windows 10 from updating?
Unless you are an offline Windows user, there is no direct way to stop Windows 10 from updating. Until Windows 8.1, Microsoft gave user wide range of options in the way to install updates. Here are some of the Windows updates options that most of us are familiar with.
- Install updates automatically (Recommended)
- Download Updates but let me choose whether to install them
- Check for updates but let me choose whether to download and install them
- Never check for updates (Not Recommended)
You will not find these update options in Windows 10 and that is the main point of contention. Since there is no direct option to stop Windows update, you need to adopt evasive ways to stop Windows update.
We have provided you with four different ways that prevent Windows 10 from updating. You need not try all of them. Select the one you are comfortable with and perform troubleshooting steps. Let’s get started.
(Note- Though we have provided ways to stop Windows update, we do not recommend it nor encourage users to do it. Users can use these methods at their discretion and we are not responsible for any outcomes that may arise from not keeping your Windows OS updated. We strongly feel Windows update secures your computer from different online threats and keeps your computer safe from hackers)
Sometimes the methods given below might not work for you as Windows Update Assistant resets the settings to default to enable Window update process on your computer. To prevent this from happening you need to uninstall Windows Update Assistant completely from your computer. Here are the steps to follow
Steps to uninstall Windows Update Assistant
- Click Start and then click Settings
- In the Settings window, click Apps
- Click Apps & features in the left pane
- In the right pane, look for Windows Update Assistant program and click on it
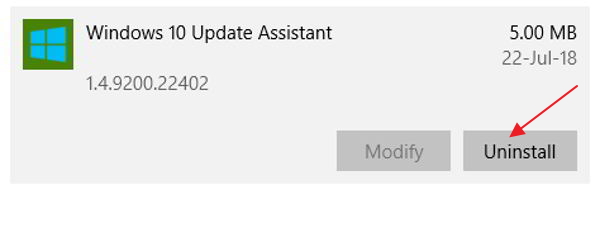
- click Uninstall
Once you have uninstalled Windows update assistant, you need to delete related folders as well. Here are the steps to follow.
Windows Update Assistant is generally deployed with Windows 10 and most of the time it will install by default. In that case, you need to follow the steps given below
- Go to Desktop and double-click This PC
- Navigate to following path in Windows Explorer- C Drive then go to Windows folder and then go to Windows10Upgrade
- Delete the Windows10Upgrade folder completely
If Windows Update Assistant was installed separately while migrating to Windows 10, the location of Windows10Upgrade remains the same but there are other folders too where the Windows Update Assistant stores data. Here are the steps to follow.
- Go to Desktop and double-click This PC
- Navigate to the following path in Windows Explorer- click C Drive and then go to Windows folder
- Delete the following folders – UpdateAssistantV2, Windows10Upgrade, and UpdateAssistant.
If you don’t want to uninstall Windows update assistant, you also have the option to disable it by following the steps given below
- click Start
- Type task scheduler in Cortana search box and select Task Scheduler from the list of results
- In the Task Scheduler window, click in the following order – Task Scheduler Library > Microsoft > Windows > UpdateOrchestrator in the left pane
- In the right pane look for Update Assistant and then go to Triggers tab
- Disable each trigger in the list
Once you have uninstalled Windows Update Assistant completely, you can proceed to any methods given here to stop Windows Update.
Method One – Make your Internet connection a metered one
Though Windows 10 is set to update automatically, it has one setting that can work in your favor to stop Windows update. If you set the Internet connection as metered one, Windows 10 update process will not run automatically.
According to Windows 10, a metered connection is an Internet connection with limited data. In Windows 10, cellular data connections are set metered by default and Wi-Fi and Ethernet (wired) connection are set non-metered by default.
The trick here is to set the Wi-Fi/Ethernet connection as metered one that will prevent windows 10 update from running automatically. Here are the steps to follow.
- Click Start -> Settings
- In the Settings window, click Network & Internet
- If you are using Wi-Fi, click on Wi-Fi in the left pane
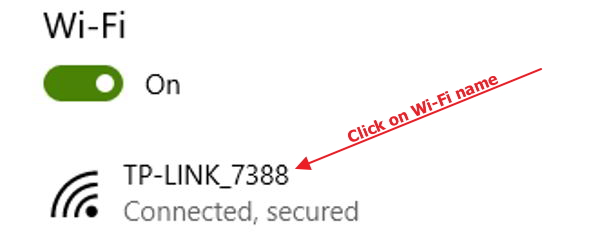
- Now, click on the name of your Wi-Fi connection and click the grey toggle switch to turn metered connection on( the toggle switch color changes to blue which indicates the connection is set as metered
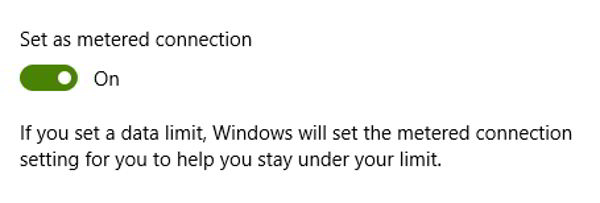
- If you are using Ethernet, click on Ethernet in the left pane
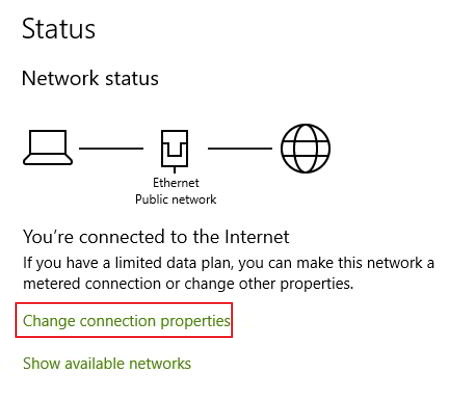
- Now, click Change connection properties. Now click the grey toggle switch to turn metered connection on.
When you set your Wi-Fi or Ethernet connection as metered, it will assume these connections have limited data plan. Then Windows 10 will not search or install updates until you connect to an Internet connection with an unlimited data plan (not set as a metered connection)
Method Two- Disable Windows update service to block Windows Update
The Windows update service is an important component of Windows which manages the download and installation of Windows update. In Windows 10, the Windows update service is set to start automatically whenever you log into Windows.
The Windows update service runs in the background and connects to Windows update server to check for updates. If it finds any new updates, it downloads and installs them. You can stop Windows update by disabling the Windows update service. Here are the steps to follow.
- Press Windows logo and R keys simultaneously on the keyboard to bring up Run command box
- In the run command box, type services.msc
- Click OK
- In the Services window, double-click Windows update

- In the Windows update properties box, go to the general tab and set the Startup type to Disabled by selecting the option from the drop-down list
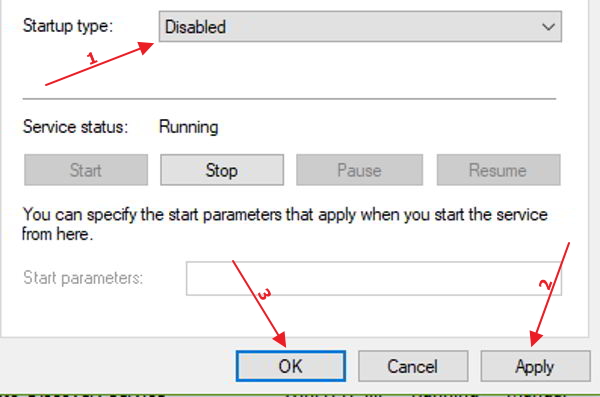
- Now click Apply and then click OK
- If you are disabling Windows update service for the first time, you need to perform one more step to stop Windows update.
- Go back Windows Update Properties dialog and go to Recovery tab
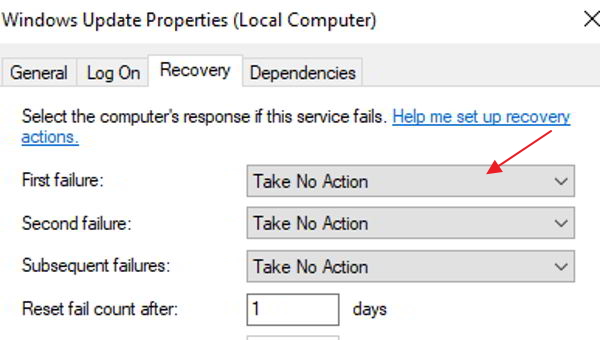
- Now click the drop-down list adjacent to the First failure and choose Take No Action
- Click Apply->OK
- Close all windows
- Restart your computer to apply changes
Method Three – Modify Group Policy settings to block Windows update
Group Policy is a hierarchical infrastructure that allows network managers to implement specific configurations for certain users or computers. Windows 10 Home does not have a Group Policy feature so this method won’t work for Windows 10 Home edition users.
Here we are going to make changes to group policy settings to block Windows update. Here are the steps to follow.
- Press Windows logo key and R simultaneously on the keyboard to invoke Run command console
- In the run command box, type gpedit.msc
- Hit Enter on the keyboard
- In the Local Group Policy editor window, click Computer Configuration and then click Administrative Templates
- Now click -> Windows Components and then click Windows Update.
- Double-click Windows update and then click Configure automatic updates
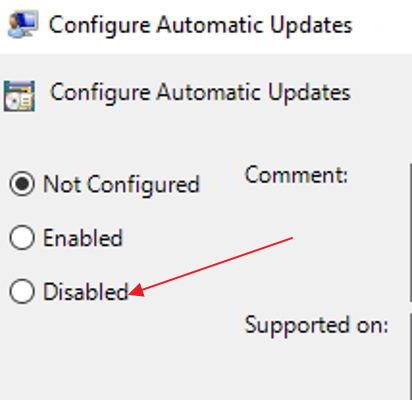
- In the left, click Disabled
- click Apply and then click OK
(Note- the above steps will prevent you from installing any Windows updates in the feature. you won’t be able to a newer version of Windows 10 that may have new features. you need to repeat the troubleshooting steps mentioned above and click Enabled instead of Disabled in the 2nd the last step to let Windows update work again)
We do not recommend users to completely disable Windows update as you light some important security updates that keep your computer protected from security threats, viruses or malware. We suggest users to keep the Windows update enabled with following settings
- Click Enabled in the 2nd last step mentioned above
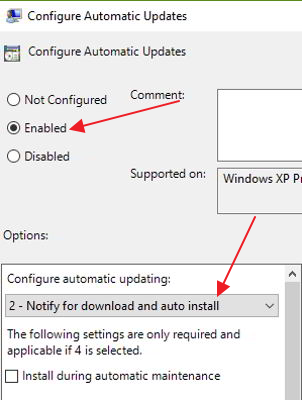
- Now go to the Options section and make some changes to configure automatic updating.
- Choose Notify for download and auto install
- Scroll down to find options like Scheduled install day, scheduled install time. click the drop-down list and select desired options as per your convenience
- Windows 10 also offers weekly, bi-weekly, monthly scheduled update options; scroll down in the same section to use any options given there.
- Once you are done with update settings, click Apply and then click OK
- Close all windows
- Restart your computer to let the changes take effect
Method Four – Change Device Installation settings
By default, Windows 10 also downloads updates for drivers and detailed info for devices automatically. If you do not want Windows to download driver updates, you need to change device installation settings by following steps given below
- click Start and type control in the Cortana search box
- click Control Panel from the list of results
- In the Control Panel windows, click System
- In the Systems window, click Advanced system settings in the left pane
- In the System properties window, click Hardware tab
- Now click Device Installation settings
- In the Device Installation settings window, select No(your device might not work as expected)
- click Save Changes
- Close all windows and restart your computer.
Henceforth Windows 10 will not download driver automatically from device manufacturers.
Tip- The Windows Update tool updates computer which enhances performance of the operating system and also fixes some problems. Since you have stopped Windows update, you need to consider an alternative way to update drivers. With the right drivers, your Windows 10 would run smooth and you would experience lesser problems.
Over the time some drivers become outdated and might also get corrupt. This could lead to other problems that might make Windows unstable and also hinder its performance. So don’t ignore the importance of driver update. Always update drivers periodically to maintain optimal performance of Windows.
You can either download drivers- manually or use a Driver update software tool.
Updating Drivers Automatically
Automatic driver update tools offer many benefits, the most important ones being:
- You can update device drivers automatically
- The software scans and updates all outdated or missing drivers at one go
- The tool picks the right drivers for your device and operating system, so you won’t have to worry about installing an incorrect driver by mistake
- Automatic driver updates are 100% safe
Driver Updater is one of the best driver update tools out there. Outbyte Driver Updater will give you access to a database of over 1 million drivers. It will regularly scan your PC, suggesting new driver versions to install. Driver Updater contains drivers for a variety of Windows devices. With just one click, you can update drivers in your system.
Step 1
Click here to Install and launch the app
Step 2
Scan all devices
Step 3
Install or update drivers automatically

Leave a Reply