Is your computer running slow? If yes, it’s time to investigate the issue. Open Task Manager and find out the process that is hogging computer resources.
If you find ntoskrnl.exe is utilizing extensive CPU resources and high disk usage, you need to fix the problem at the earliest; otherwise, the issue can lead to a BSOD error and memory dumps.
Many users have complained about the ntoskrnl.exe process and its high CPU and disk usage. In this post, we have provided solutions that could fix the issue. Let’s learn about this problem in detail.
What is NTOSkrnl.exe?
Ntoskrnl stands for NT Operating System Kernel. The extension .exe indicates it is an executable file but there is a possibility that some malware is disguising itself as an NTOSkrnl.exe process.
A genuine NTOSkrnl.exe is a kernel image file which is an important software component of the Windows operating system.
The NTOSkrnl.exe is responsible for many system processes including hardware virtualization, process and memory management, and several others.
Since the NTOSkrnl.exe in Windows 10 has an additional responsibility of compressing old page of memory to free memory, you can see the NTOSkrnl.exe using a large amount of memory sometimes.
In normal operation, NTOSkrnl.exe should not be using a large amount of CPU resources (not more than 30%). If you see high CPU usage by ntoskrnl system process, then you need to perform troubleshooting steps given in the solutions below and resolve the issue.
Solution One- Scan your computer for malware or virus
The ntoskrnl.exe is a trustworthy file from Microsoft which is digitally signed. Ntoskrnl.exe is located in the C:\Windows\System32 folder. Many malware residing in other system folders disguise their processes as ntoskrnl.exe to avoid visual detection.
If the ntoskrnl.exe process in Task Manager is not related to C:\Windows\System32 folder, then there is a possibility a malware has disguised itself as this file and residing on your computer. In that case, you need to update your anti-virus software and scan your system thoroughly to get rid of malware/virus.
If you see the ntoskrnl.exe is not a threat and it still uses extensive CPU resources and heavy disk usage, move to next solution.
Solution Two- Stop Windows Search Service
Ntoskrnl.exe is responsible for several system services. Windows search service provides property caching, content indexing and search results for files, emails and other types of content.
There is a possibility Windows search service is responsible for extensive usage CPU resources and high disk usage. In that case, disabling Windows search service is an ideal solution to resolve this issue.
Here are the steps to follow.
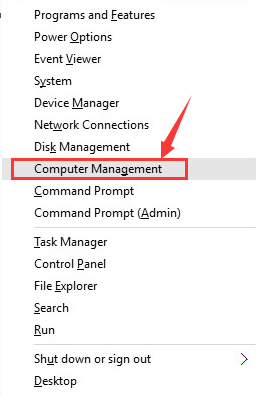
- Press Windows logo key + X simultaneously on the keyboard to bring up the context menu on the screen
- Select Computer Management from the list
- In the Computer Management window, double-click Services and Applications in the left pane to expand the category
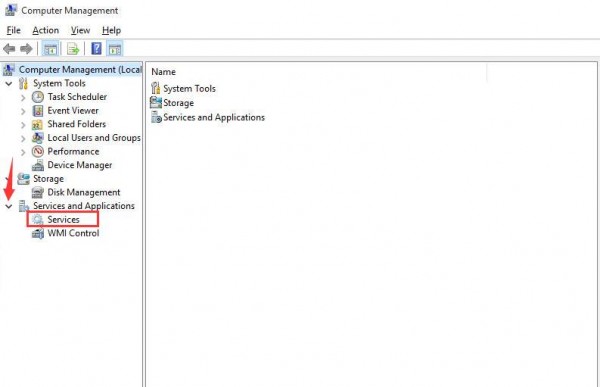
- Select Services
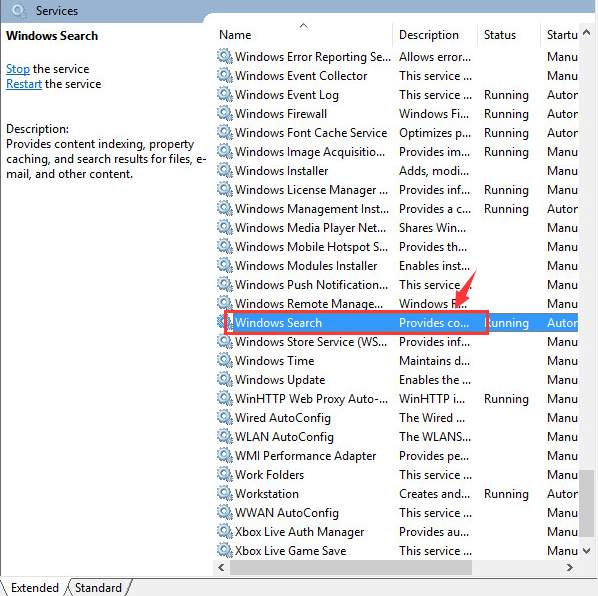
- In the right-hand pane, locate Windows search and double-click on it
- In the Windows Search properties window, go to the General tab
- Click Stop
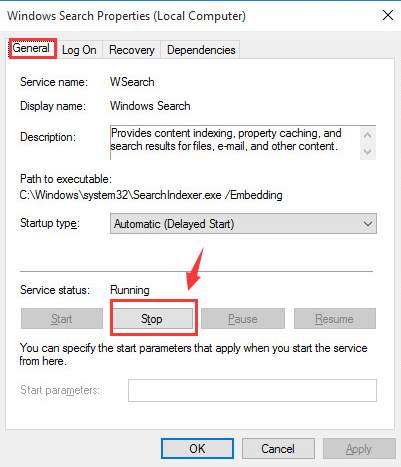
- When you see the service status changes to stop, click OK
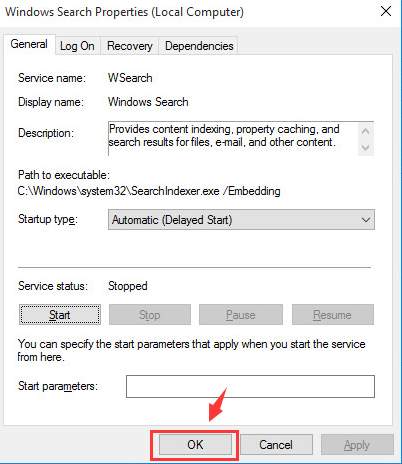
Now check the Task Manager and see if the ntoskrnl.exe process CPU and disk usage has reduced and returned to normal. If you see the CPU and Disk usage is high, move to next solution.
Solution Three – Remove incompatible applications
Incompatible applications can hog CPU resources and increase disk usage. Pay attention when you start the system.
Does the CPU and disk usage increase when you launch a specific application? Analyze your actions and their effects on CPU and disk usage. If you find any program causing high CPU and disk usage, uninstall it or get its latest version.
Solution Four – Run DISM command
DISM stands for Deployment Image Servicing and Management. It is a command-line tool that is used to service Windows setup, Windows images, and the Windows Recovery environment.
There is a possibility that some system files are corrupted. In that case, you need to use the /RestoreHealth command to scan the windows image for corruption and perform repairs automatically. Here are the steps you need to follow.
- Press Windows logo key + R simultaneously on the keyboard to bring up the Run command console
- In the Run command box, type cmd and click OK
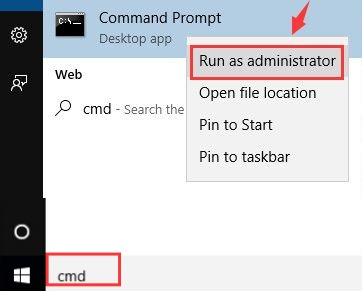
- In the list of results, right-click cmd and select Run as administrator
- In the command prompt window, type the following command hit enter on the keyboard
- Dism /Online /Cleanup-Image /RestoreHealth

- Wait for the command operation to complete and then close command prompt window
Now check the Task Manager to see if the CPU and Disk usage has returned to normal. If the problem persists, move to next solution.
Solution Five- Use Windows Performance toolkit to find out the root cause of the issue
Since none of the solutions have worked for you, it’s time to use the Windows Performance toolkit to find out the root cause of the issue. Here are the steps to follow.
- Open command prompt window with admin rights. You can use the first three steps in Solution Four as reference
- In the command prompt window, type the following command and hit enter on keyboard
- xperf -on latency -stackwalk profile -buffersize 1024 -MaxFile 256 -FileMode Circular && timeout -1 && xperf -d cpuusage.etl

(Note- you can also copy paste the command)
You need to run this command for at least 60 seconds to allow the tool to trace high CPU usage. When the operation of the command completes, you will see a warning on the screen and the command prompt reverts to C:\
- the findings(log file) of the trace are stored in a file named cpuusage.etl in the C:\Windows\system32 directory
- After reading the log you should know which programs are causing high CPU and disk usage.
Solution Six – Update Drivers
Bad and outdated drivers could also cause high CPU and disk usage. A simple solution to this problem is updating drivers. The most efficient to update your device drivers is by using a fast and accurate driver update tool.
Automatic driver update tools offer many benefits, the most important ones being:
- You can update device drivers automatically
- The software scans and updates all outdated or missing drivers at one go
- The tool picks the right drivers for your device and operating system, so you won’t have to worry about installing an incorrect driver by mistake
- Automatic driver updates are 100% safe
Driver Updater is one of the best driver update tools out there. Outbyte Driver Updater will give you access to a database of over 1 million drivers. It will regularly scan your PC, suggesting new driver versions to install. Driver Updater contains drivers for a variety of Windows devices. With just one click, you can update drivers in your system.
Step 1
Click here to Install and launch the app
Step 2
Scan all devices
Step 3
Install or update drivers automatically

Leave a Reply