Is your Windows 10 running very slowly, even when you’re not running many programs?
If yes, check the Task Manager before hitting the panic button. Chances are that a process might be hogging disk and CPU resources.
One process labelled by many Windows 10 users as a frequent troublemaker is wsappx. While a genuine process, it is guilty of using up a lot of system resources for no apparent reason.
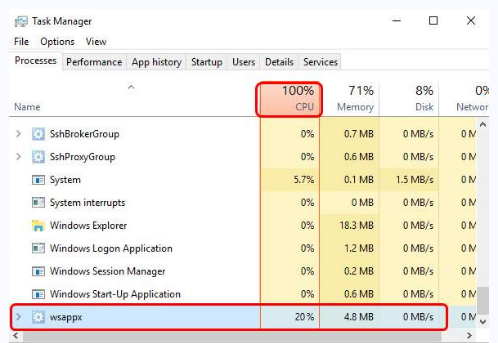
Is this what’s happening in your case? Do you see wsappx consuming very high disk and CPU resources?
We’ve listed several solutions to fix wsappx high disk and CPU usage once and for all. But before we look at the solutions, let’s first understand what wsappx is.
Wsappx – What is it?
Wsappx is a genuine windows process—and not a malware. It is an important component of Win 10. Windows store relies on it, as does Universal Windows Platform.
To put it simply, the wsappx process is chiefly used to operate, install, delete and update apps present in Windows Store. What this basically means is once you’re through with updating or installing apps in Windows store, you can safely disable it to free up disk space and CPU resources.
Fix wsappx High Disk & CPU Usage Issue
When the disk usage or CPU usage is reported at 100% or close to it, your system will either become very slow or freeze up—and quite naturally so. If one process hogs all the resources, other processes will have very little to work with. And that’s why the end result is an unresponsive computer.
As said above, high disk and CPU usage issue because of wsappx is pretty common. It can be resolved fairly easily, too. However, unfortunately there’s no one absolute solution which works for all.
If you find yourself up against this irritating issue, don’t worry as we have provided 6 solutions that have worked for other users.
- Disable Windows Store
- Update Device Drivers
- Increase Virtual Memory
- Perform a Virus Scan
- Run a Disk Check
- Troubleshoot in a Clean Boot State
You don’t need to try all these methods. Start with the first one in this list, and if it fails to resolve the issue, move on to the next one in the list and so on and so forth. (And of course, do let us know which of these worked for you!)
Solution 1 – Disable Windows Store
There are two ways to disable windows store: using Group Policy Editor and Registry Editor. The steps for each of the methods are discussed below.
Disabling Windows Store through Group Policy Editor
Here are the steps to follow:
- Press Windows Key and R simultaneously to open the Run dialog box. Here type ‘gpedit.msc’ and then press the OK button. This will open the Local Group Policy Editor Window on your computer.
- Next, click ‘Computer Configuration’ and then choose ‘Administrative Templates’
- Next click ‘Windows Components’. Now choose ‘Store’
- In the right pane, locate ‘Turn Off Store application’ setting
- Click the Enable option
- Finally select the Apply button
Disabling Windows Store through Register Editor
Not all Windows versions have the Group Policy Editor. If that’s true for your computer as well, don’t worry as you can disable Windows Store through Registry Editor.
Note: Making changes in Registry Editor is recommended only when you’re comfortable using it and have first made a back-up copy. Creating a back-up copy allows you to restore the Registry to its prior condition in case if the changes made by you lead to unforeseen errors or if you make wrong changes.
Here are the steps to backup registry.
- In the start search box, type ‘regedit’ and press Enter
- If the User Account Control window pops-up, click the Yes button
- Right-click Computer in the left-pane and select Export

- In the Export Registry file window, give a desired name to the file (such as registry backup 06.10.2018) and then click the Save button
Once you’ve created a backup, perform the steps below to disable Windows Store
- In the left-pane, browse to HKEY_LOCAL_MACHINE\SOFTWARE\Policies\Microsoft\WindowsStore key
- Now you must create new DWORD value in Windows Store Key. Give the new value the name of RemoveWindowsStore. Set the value as 1.
- Now restart Windows
You can also use this workaround: HKLM system\CurrentControlSet\Services AppXSvc
Key start dword value =4
Disabling of Windows Store means that you can no longer install 3rd party apps or update them. In case you try to launch the app, you’ll get the following error message on your screen.
Windows Store isn’t available on this PC. Contact your system administrator for more information.
Several applications require Windows Store apps. Examples include Movies and TV, Mail, Calculator, OneNote, and Photos. In case you require these apps, you are advised against disabling Windows Store.
Instead try out other solutions in this post.
Solution 2 – Update Device Drivers
Did you know that often high CPU usage issues occur because of faulty or incompatible drivers?
Precisely for this reason, we recommend update your device drivers. The simplest—and the fastest—way to do this is by using a reliable and user-friendly driver update tool.
Automatic driver update tools offer many benefits, the most important ones being:
- You can update device drivers automatically
- The software scans and updates all outdated or missing drivers at one go
- The tool picks the right drivers for your device and operating system, so you won’t have to worry about installing an incorrect driver by mistake
- Automatic driver updates are 100% safe
Driver Updater is one of the best driver update tools out there. Outbyte Driver Updater will give you access to a database of over 1 million drivers. It will regularly scan your PC, suggesting new driver versions to install. Driver Updater contains drivers for a variety of Windows devices. With just one click, you can update drivers in your system.
Step 1
Click here to Install and launch the app
Step 2
Scan all devices
Step 3
Install or update drivers automatically
Solution 3 – Increase Virtual Memory
Some users have been able to solve the issue by increasing virtual memory. We recommend you try the same, too.
Here are the steps to follow.
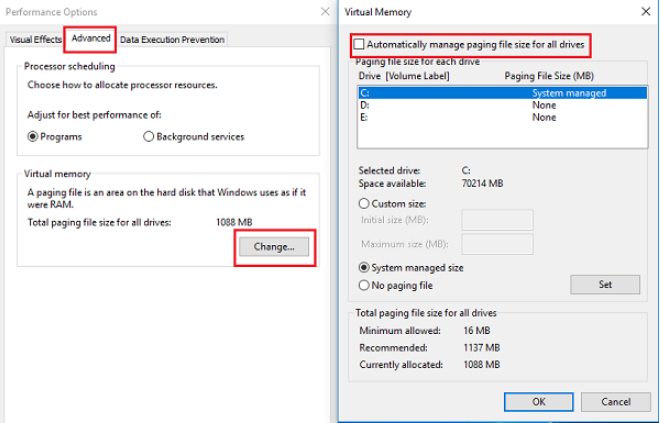
- In search bar, type ‘performance’ and press Enter
- Click ‘Adjust Appearance vs. Performance in Windows’
- Click ‘Advanced’ tab (it is one of the several tabs at the top of the window)
- Click ‘Virtual Memory’
- Click ‘Change’
- De-select the checkbox against ‘Automatically manage paging file size for all drives’
- Now choose the drive on which you’ve the Windows installed (usually it is the ‘C’ drive) and then click ‘Custom size’
- Here set ‘Initial Size’ same as your RAM (Note: Set the size in MB). Now set the ‘Maximum Size’ as two times the Initial Size
- Finally click the ‘Set’ button and then the ‘OK’ button and reboot Windows
Solution 4 – Complete a Virus Scan
It is possible that malware or virus infection might be the root cause of the high CPU usage issue. In case you’ve not scanned your system for virus for some time now, do it right away.
We recommend you to do a complete system scan. In case the scan reports any suspicious programs, remove or quarantine them without delay and then restart Windows.
If the problem still persists, move on to the next solution.
Solution 5 – Complete a Disk Check
Disk check is recommended to all those who’ve just started receiving the wsappx High Disk & CPU Usage Issue.
However, bear in mind that disk check takes some time to complete. If you run it, you may not be able to use your computer for a while. In case you need to use your computer immediately, you may be better off skipping this step for the time being. Try other steps first and if they fail to fix the issue, run a disk check after you complete your present work.
Here are the steps to run Disk Check.
- Press Windows Key + X
- Now select Command Prompt (Admin)

- If the User Account Control prompt window shows up on your screen, click Yes
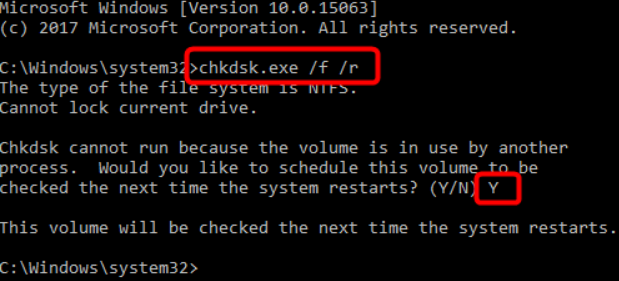
- In the command prompt window, type this command

- Now press Enter and type Y so that Windows runs disk check when the computer restarts
Solution 6 – Perform a Clean Boot State
In case the problem still persists, as a last resort, do a clean boot. When you perform a clean boot, Windows runs just the essential startup programs and driver sets. This in turn will allow you to isolate the problematic startup program manually if the issue is being caused by one of the startup programs.
Here are the steps to perform a clean boot state.
- Click Windows Key and R simultaneously to launch the run dialog box
- Type msconfig and then press enter
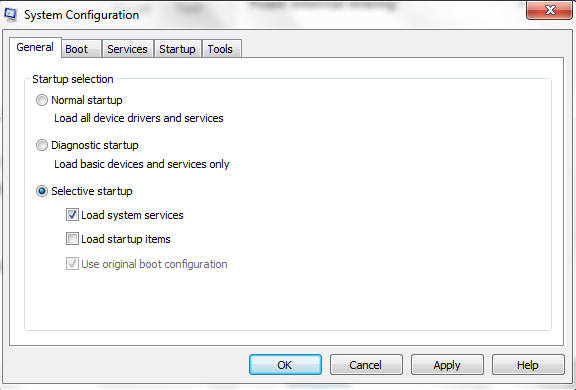
- In the System Configuration window, select Selective startup (the third and last option)
- Uncheck the box before Load Startup Items and select the boxes before Use Original boot configuration and Load System Services
- Now click Services tab on the top
- Select the box against Hide all Microsoft services on the bottom left corner
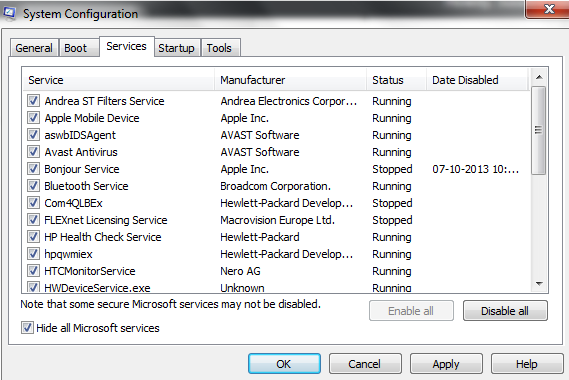
- Click the Apply button and then click the OK button
- Restart Windows to put it into a Clean Boot State
Check if the issue is resolved
When Windows restarts, you need to check whether the wsappx high CPU usage is solved or not. If yes, it means that the error is occurring because of a background service or program.
Now you’ll need to check what’s causing the issue—a background service or a background program. Go to the “Find the underlying cause of the issue” section to locate the answer.
On the other hand, if the problem recurs upon restart, you can infer that the underlying cause is not a background service or program. This means that troubleshooting in clean boot will not resolve the issue. In that case, go to “Restart Windows in Normal Startup Mode” section.
Find the underlying cause of the issue
Step 1 – Launch System Configuration
- In the start search box, type msconfig and press Enter
Step 2 – Click each listed service item individually to find the culprit service
- In the System Configuration window, click Services
- Ensure the check box before Hide all Microsoft Services is deselected
- Now select the first service and restart windows
- If the problem persists, it means this service is not the root cause. So select the next service item and restart windows and check if the problem persists. Continue to do so until you’re able to locate the service that’s causing the problem.
- If you’ve been able to locate the problematic service, contact the program manufacturer for a solution or deselect it as a startup service
- In case you have selected each service item individually but the problem still persisted, it means that Windows startup services are not the root cause of the problem. In that case, go to the next step.
Step 3 – Select each Startup item individually
Now do the same with startup items. That is, select each startup item separately and each time restart windows. Once you’ve identified the problematic startup item contact the program manufacturer for a solution or deselect it as a startup program.
Restart Windows in Normal Startup Mode
To go back to the normal startup mode, perform the steps given below.
- Type msconfig in the start search box and press Enter
- Click the General tab on the top
- Now select Normal Startup – load all device drivers and services
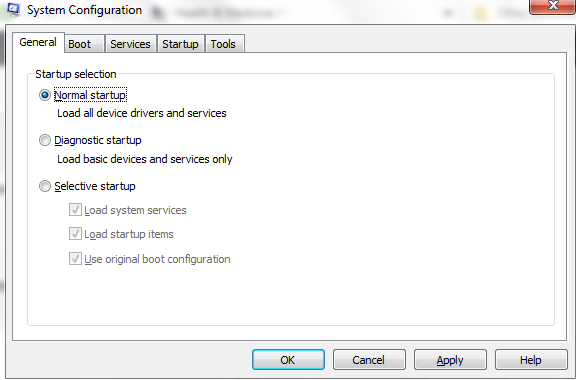
- Click OK
- Restart Windows

Leave a Reply