Does explorer crash or hang when you right-click in Windows 11?
If so, you’re not alone.
This is a fairly common problem. Fortunately, it doesn’t take much to fix it. By the end of this post, you’ll know exactly what you need to do to resolve the issue.
So, let’s get rolling.
Fix the “Win 11 Explorer Hangs or Crashes on Right-click” issue
We recommend you try the following solutions in the order they’re listed below. Before we begin, it’s necessary to state that except the Solution 1, all other solutions work with Windows 10. If you’re Windows 10 user who is facing the “explorer hangs on right-click” issue, start from the Solution 2.
Solution 1 – Restore old windows right-click context menu
Starting with Windows 11, the context menu in the Explorer is refreshed. It is more compact and based on modern design. There’s nothing wrong with that, but inexplicably the modern-designed right-click menu at times is noted to cause File Explorer to crash. So, it might be a good idea to restore the old right-click context menu to see if that fixes the issue.
- In the Search bar on your taskbar, type “cmd”, and then select Run as administrator under Command Prompt
- Next, paste the following command in the terminal and then press Enter
- reg add “HKCU\Software\Classes\CLSID\{86ca1aa0-34aa-4e8b-a509-50c905bae2a2}\InprocServer32” /f /ve
- Close command prompt
- Restart Windows
- Once your computer restarts, you’ll see the classic right-click menu
- Check if the problem is resolved
If the issue still persists, again open Command Prompt as Administrator, paste the following command and press Enter to undo the changes. Then, restart Windows.
- reg delete “HKCU\Software\Classes\CLSID\{86ca1aa0-34aa-4e8b-a509-50c905bae2a2}” /f
Solution 2 – Get rid of 3rd party shell extensions
Sometimes File Explorer crashes when you right-click because of a 3rd party extension. Therefore, disable all 3rd party extensions and check whether that does the trick.
- Go to NirSoft website and download ShellExView utility (Browse to the bottom of the page, where you’ll find the download link)
- Extract shellexview.zip file to a folder
- Now, double-click shexview.exe
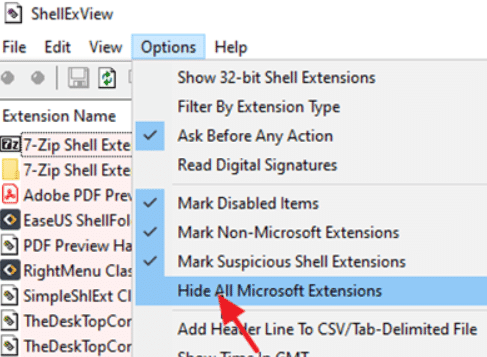
- In ShellExView window, click Options and then click Hide All Microsoft Extensions
- Select all the Context Menu extensions (You can do so by pressing and holding-down the CTRL key and clicking the relevant extensions one-by-one)
- Right-click and select Disable Selected items. Click Yes when Windows ask you to confirm your action
- Restart Windows and check if the issue is fixed
If the issue persists, select all the Context Menu extensions in the ShellExView Window and then right-click and choose Enable Selected items. Once you have done this, move on to the Solution 3.
If the issue is resolved, perform the following steps to locate the extension that is causing the issue:
- Open ShellExView
- Select the first Context Menu extension in the list, right-click it, and select Enable
- Restart Windows. In case the File Explorer doesn’t crash when you right-click, Enable all other disabled Shell extensions except the one you have just disabled. If the issue persists, enable that extension. Now, disable the next Shell extension in the list, restart Windows, and check if the problem is fixed. Keep repeating the steps for the remaining Shell extensions until you are able to identify the culprit extension
Solution 3 – Repair Windows System Files
- Type cmd in the Search bar and then select Run Command Prompt as Administrator
- In the command prompt window, type the command shared below and press Enter
- dism.exe /Online /Cleanup-Image /Restorehealth
- Wait until you get the “The operation completed successfully” message. Then type sfc /scannow and press Enter
- Wait until SFC scan is complete and then restart Windows
- Check if the issue is fixed
Solution 4 – Update Graphics Card Driver
Sometimes, the File Explorer crashing issue occurs due to outdated graphics card driver. Updating the graphics card driver will resolve the problem. You can update graphics card driver manually or automatically. Both the methods are listed ahead. Simply pick the one you like better.
Updating Graphics Card Driver Manually
- Type devmgmt.msc in the Search bar and press Enter to open the Device Manager window
- Expand Display adapters
- Right-click your graphics card and select Update driver
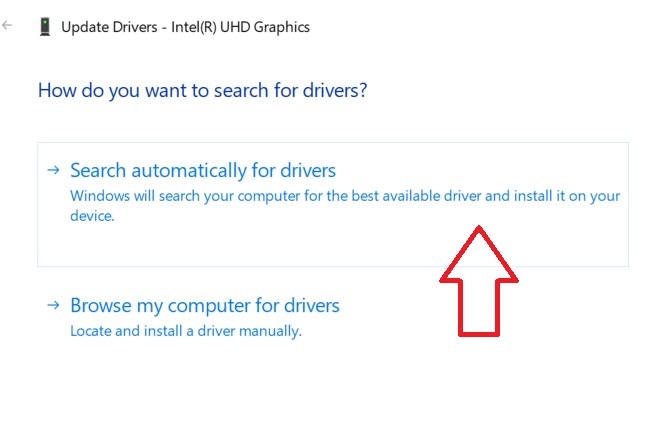
- Click Search automatically for drivers. Windows will now search your computer for the best available driver and install it
If Windows is not able to find the latest driver version for your graphics card, go to the card manufacturer’s website and download the latest driver version (if available) from there.
Updating Graphics Card Driver Automatically
If the manual method of updating a driver seems like a lot of work, you may be better off using a driver update software, which automatically updates outdated drivers. We recommend DriverUpdater because it is super-fast, reliable, and accurate.
Automatic driver update tools offer many benefits, the most important ones being:
- You can update device drivers automatically
- The software scans and updates all outdated or missing drivers at one go
- The tool picks the right drivers for your device and operating system, so you won’t have to worry about installing an incorrect driver by mistake
- Automatic driver updates are 100% safe
Driver Updater is one of the best driver update tools out there. Outbyte Driver Updater will give you access to a database of over 1 million drivers. It will regularly scan your PC, suggesting new driver versions to install. Driver Updater contains drivers for a variety of Windows devices. With just one click, you can update drivers in your system.
Step 1
Click here to Install and launch the app
Step 2
Scan all devices
Step 3
Install or update drivers automatically


Leave a Reply