Are you having problems with Exodus not working?
If so then this post should help you fix this issue.
Whether you’re receiving an error such as “Exodus Error Message” or “No Stream Available,” the solutions discussed in this post will allow you to watch your favorite series on Kodi in no time at all.
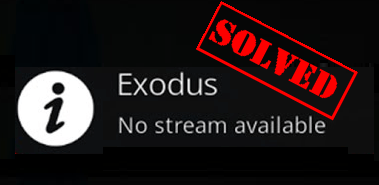
Getting error like those mentioned above can be frustrating, , particularly if Exodus was working absolutely fine the last time and you haven’t made any changes since then.
However, it doesn’t take a lot to solve the issue—and we’ll show you what all you need to do.
In this post, we will be discussing several solutions to “Exodus TV Shows Not Working” problem. You don’t have to try all the listed solutions. Start with the first one and then move on to the second one and so forth, till Exodus TV is up and running again.
Solution 1 – Update Exodus
The first port of call is to update Exodus. You need to perform the following two steps to do that.
- Uninstall Exodus
- Re-install the newest version of Exodus
Uninstalling Exodus
Here are the steps to follow.
- Open Kodi and then click Add-ons
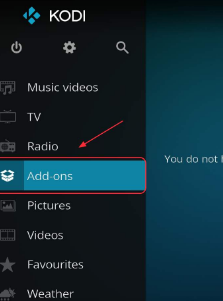
- Next, you need to click the package icon
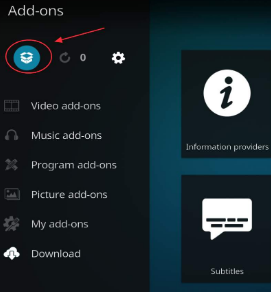
- Now click My add-ons and then select Video Add-ons
- Click Exodus
- Go to the bottom right and click Uninstall. Next, click the Yes button
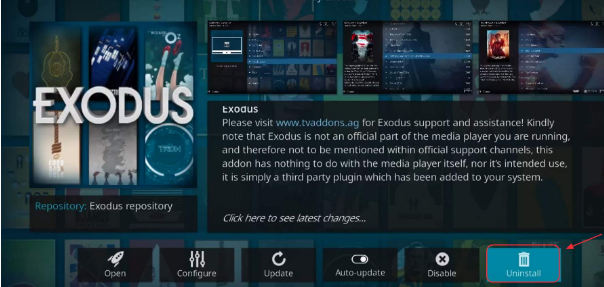
Wait for Exodus to get uninstalled. After the uninstall process is complete, reinstall the newest version of Exodus.
Install Latest Exodus
Here are the steps to follow.
- The first thing you need to do is download the Kodi Bae Repository Zip file. Click here to get the .zip file. Alternately you get it by opening GitHub page and then clicking the repository.kodibase-X.X.X.zip to download the file.
- Now open Kodi. Next click Add-ons. Click the Package icon present at upper left-hand corner
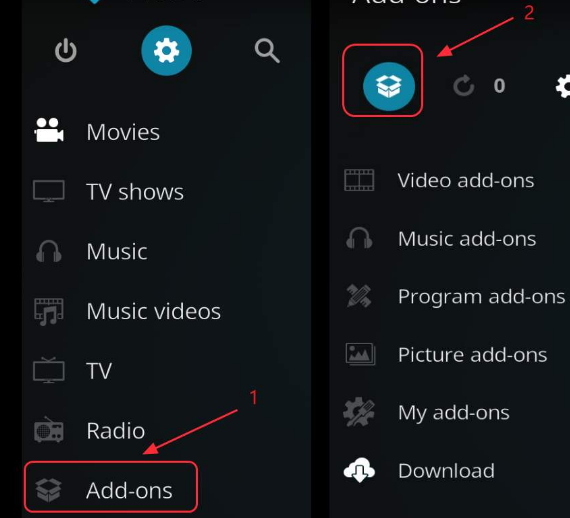
- Click Install from zip file option
- Now choose the .zip file you recently downloaded. To do so, browse to the location where you had stored the file.
- Next, you’ll see Kodi Bae Repository Add-on installed notification
- Now click Install from repository
- Select Kodi Bae Repository
- Select Video add-ons
- Click Exodus
- Now click the install button

Wait till the download process is complete. Once it’s complete, you shall see Exodus Add-on installed notification.
Solution 2 – Clear the Cached Data
Often the problem occurs due to the cached data. The chances of this happening are particularly high in case the error appearing on your screen is “No stream available.”
You can resolve this issue by clearing the cached data and the list of providers within Exodus. Here are the steps to follow.
- Click Add-ons | My add-ons | Video add-ons | Exodus
- Click Tools
- Now click Providers and then click Yes
- Click the Clear Cache option and then click Yes
- Restart and check if the issue is fixed. If video streaming is back, you’re all set.
Solution 3 – Try a VPN
If Exodus is not working on your Kodi, especially if the error you’re getting is the “No stream available” error, it is possible that your internet provider has blocked Kodi videos.
A virtual private network offers a workaround. A VPN can pull wool over your ISP’s eyes by masking the video. As a result, the ISP will not be able to recognize the Kodi video, and hence will not prevent it from streaming.
Before you pay for a VPN service, we suggest you try a free plan to see if this works.
Solution 4 – Adjust Kodi’s Video Cache Settings
Whenever you load a TV program or a movie in Kodi, it saves a file. In case these files are bulky, you might face issues when you try to play videos. Chances are you may see a lot of buffering happening.
To confirm if this is indeed the problem and to resolve it, you must perform these steps:
- Get Ares Wizard add-on
- Tweak the cache settings
- Get rid of cache files and temp files
Installing Ares Wizard add-on
Here are the steps to follow:
- Open Kodi. Click Settings and then click File Manager
- Double-click the Add Source option in the left pane
- Double-click the None option. Next, type this URL and click the OK button

- In the box below “Enter a name for this media source,” type ares repo, and then click the OK button
- Come back to Kodi home page. Click Add-ons in the Menu section in the left pane and then click the Package icon
- Select the Install from zip file option
- Click ares repo. Next click the zip file for installing it
- Select the Install from repository option
- Navigate to Ares Project | Program Add-ons | Ares Wizard. Next click the Install button at the bottom right-hand corner
With the add-on installed, it’s time to tweak Kodi’s video cache settings. Following which, you need to remove the temp files.
Adjusting Kodi’s Video Cache Settings
- In the Kodi homepage, click Add-ons. Next, click Program add-ons
- Click Ares Wizard. Next, click Tweaks
- Click Advanced Settings Wizard. Click Next
- Tweak
the Buffer Mode to a setting that suits your device (Compared to modes 3 and
modes 4, mode 1 and mode 2 utilize more RAM)
- Mode 1 – All internet streams, and this includes FTP streams, are buffered by Kodi
- Mode 2 (recommended) – Everything, and this includes local files, are buffered by Kodi
- Mode 3 – Only stream from internet is buffered by Kodi
- Mode 4 – In this mode, buffering is disabled
Now, the next step involves deleting Kodi’s temp files.
Deleting Kodi’s Temp Files
In case there’s not enough space for Kodi on the device, you might encounter buffering issues. Therefore, try deleting Kodi’s temp files.
Here are the steps to follow:
- Go to Kodi’s homepage and click Add-ons. Next, click Program add-ons
- Click Ares Wizard. Next, click Tweaks
- Click Maintenance
- Click Delete Thumbnails, then click Delete Packages, and finally click Delete Cache\Temp
Check whether Kodi is now working fine or not.
Solution 5 – Update the Graphics Card
Sometimes, the Exodus not working properly on Kodi issue occurs because of outdated, corrupt, and incorrect graphics card drivers.
Therefore, you should try updating your graphics card drivers.
You can update your graphics drivers in two ways – via device manager (manually) or using a reliable driver update software. We recommend the latter, because it’s easy, fast, and more accurate. Nevertheless, we’ve given the steps for both the methods so that you can decide which one suits you better.
Update Graphics Card Driver Manually
Here are the steps to follow:
- Press Windows logo + R
- In the run dialog box, type devmgmt.msc
- In the Device Manager window, expand Display adapters. All the installed graphic cards will appear here
- Write down the name of your graphics card. Next, navigate to the car manufacturer’s website or your computer manufacturer’s website. Search for the newest driver for your graphics card or computer model. Alternatively, type the important details regarding your graphics card (such as its model number and the name) in Google search bar and press Enter. You will list of sites that have that driver. Select any reputable website. Whichever method you are using, once you’ve located the latest driver, download it and save it on your desktop or any other place. Before you download the latest driver, ensure it corresponds to your computer type. This basically means, Windows 10 32-bit users should use the driver file meant for 32-bit computers. Likewise, if you’re using Windows 64-bit computer, download the driver file meant for 64-bit computers.
- Once you’ve downloaded and saved the latest driver file, go to Device Manager, right-click the graphics card and click Uninstall device
- Select the box before Delete the driver software for this device. Now click Uninstall
- Restart windows after the uninstalling process is complete
- Now run the graphic card driver’s setup file. Follow on-screen instructions to complete installation.
Update Graphics Card Driver Automatically
Updating Drivers Automatically
Automatic driver update tools offer many benefits, the most important ones being:
- You can update device drivers automatically
- The software scans and updates all outdated or missing drivers at one go
- The tool picks the right drivers for your device and operating system, so you won’t have to worry about installing an incorrect driver by mistake
- Automatic driver updates are 100% safe
Driver Updater is one of the best driver update tools out there. Outbyte Driver Updater will give you access to a database of over 1 million drivers. It will regularly scan your PC, suggesting new driver versions to install. Driver Updater contains drivers for a variety of Windows devices. With just one click, you can update drivers in your system.
Step 1
Click here to Install and launch the app
Step 2
Scan all devices
Step 3
Install or update drivers automatically
Solution 6 – Change the Stream Time
Here are the steps to follow.
- Click Add-ons | My Add-ons | Video add-ons | Exodus
- Next click Tools and then click General
- Set Provider’s Timeout to 20-35 seconds. Click the OK button
Now, see if you the issue is fixed.
Solution 7 – Change the Time and Date Settings of Your Device
In case you’re watching only old TV shows and movies in Exodus on Kodi, it is possible that the time and date settings of your device may be incorrect. For instance, the date and time on your TV might be wrong. Therefore go to the device’s settings, locate the time and date settings, and set the correctly (that is, to present time and date).
Now, open Kodi and see if things are back to normal.
Solution 8 – Install Exodus from Another Repository
Exodus is no longer been supported by its original developer. It’s quite possible that your problem could be because of some bug. Therefore, try a different version, one which is being updated on a regular basis. Since a few other developers have created different versions and some update their versions regularly, you should not face much difficulty in finding such a version.

Leave a Reply