The Superfetch service in Windows is known to maintain and improve the performance of the system overtime. It quietly runs in the background, analyzing RAM usage pattern and the applications you frequently use.
Over time Superfetch service marks these apps as “frequently used” and preloads them in memory. The result is the Windows operating system isn’t required to load them from the hard drive (which is slower) and the whole process of launching apps is much faster and responsive.
Why disable Superfetch service?
Though Superfetch service is intended to improve the performance of Windows, it sometimes also degrades its performance. By default, Superfetch service is designed to take up all unused memory for all apps. However, whenever the system needs memory, Superfetch frees the needed memory.
If you notice Superfetch is using too much of CPU and RAM resources and slowing down the system, you can disable it. You can disable Superfetch service without any fear and it does not impact the performance of the Windows operating system.
How to disable Superfetch service?
Here we have discussed two ways to disable Windows Superfetch service. You can use any method to disable Superfetch service.
Method One- Disable Superfetch through Services Panel
Windows offers a centralized Services Panel through which you can manage any Windows service. Through the Services Panel, you can enable or disable any service. You can also set any Windows service to Automatic start, Automatic (delayed start) or Manual start.
Here are the steps to disable Superfetch service.
- On your keyboard press, Windows logo key and R simultaneously to bring up Run command box
- In the Run command box, type services.msc and hit Enter on the keyboard
- In the Services window, look for Superfetch service in the list and double-click on it
- A Superfetch Service properties window opens, go to the General tab
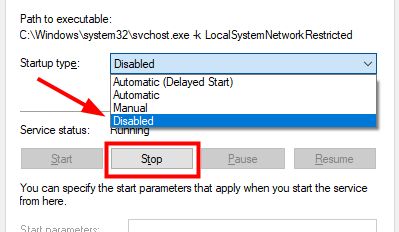
- Under Start-up type, click the downward arrow button to reveal options in the drop-down list
- Select Disabled
- Under the Status section, click Stop button
- Now click Apply and then click OK
You have successfully disabled Superfetch services. If you want to enable the Superfetch service anytime in future, just perform the steps above and in the 7th step, select Automatic or Automatic (Delayed start) and reboot your system.
Method Two- Disable Superfetch service through command prompt
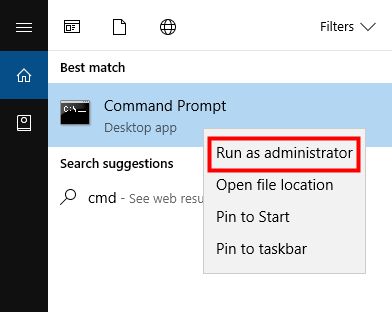
- Click Start and type cmd in Cortana search box
- Right-click Command Prompt from the list of results and click Run as administrator
- In the command prompt window, type the following command and press Enter on the keyboard
net.exe stop superfetch
- Wait for the command operation to complete. When the Windows stops Superfetch service, it will notify you with a message in command prompt window. See the image below.
- Now, type the following command in command prompt window and hit Enter on the keyboard
sc config sysmain start=disabled
- Wait for the command operation to complete. When Window disables Superfetch service, it will notify you with “SUCCESS” message in command prompt window.


Leave a Reply