Computer errors such as the titled error can occur any time. The good news is that many errors are pretty to resolve. And you can add the “display driver stopped recovering and has recovered” error in that list.
So if you are getting the below error message, there’s no cause to worry. We’ve got you covered.

In this post, we will look at why this error occurs and more importantly how can you fix it on your own.
Why “Display Driver Stopped Responding and Has Recovered” error occurs?
This error rears up its ugly face when Timeout Detection and Recovery (or TDR) feature finds that Graphic card didn’t respond in a set time period. When that happens, the system restarts the display driver to make sure Windows don’t reboot.
This problem usually occurs because of one of the following reasons:
- Your display driver is faulty
- You have a large number of programs running
- Overheating of GPU
- GPU timeout issues
How to solve the error?
We have listed 5 solutions to resolve this issue. You don’t have to try each one of them; instead, start with the first one and work your way down until you are able to fix the problem.
Solution 1 – Uninstall your graphic driver
Here are the steps you need to perform to uninstall graphic card driver:
- Press Windows key and R key simultaneously
- In the run dialog box, type devmgmt.msc and then press OK to launch Device Manager
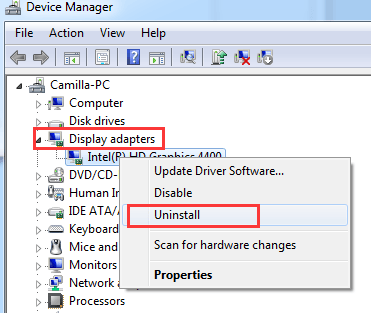
- Browse through the list and locate Display adapters. Expand it and right-click your display driver and then select Uninstall

- Once the driver gets uninstalled, reboot Windows
Now check if the problem is fixed. If not, move on to the next solution.
Solution 2 – Download and install newest graphic driver
You may want to update your graphic driver if the above step didn’t produce the desired result.
When it comes to updating drivers, you have two options. You can update them manually or automatically. The latter is a much easier, simpler, and faster solution. But we will share both methods, so you can decide which one is right for you.
Updating graphic driver manually
Here are the steps to follow:
- Press Windows logo + Rto open the run dialog box
- Type devmgmt.msc to open the Device Manager window
- Expand Display adapters. All the installed graphic cards will appear here
Note down the name of your graphics card. Now, visit the card manufacturer’s website or your computer manufacturer’s website and check for the newest driver for your graphic card or PC model. Alternately, you can type the name as well as the model number of your video card in Google search bar and locate the latest driver. After you’ve found the appropriate driver, download the driver file and save it in a suitable location, such as the desktop. Make sure that your driver file corresponds to your PC type. This basically means if you are using Windows 10 32-bit, the driver file should be for 32-bit Windows 10 PCs. Likewise Windows 64-bit users need to download the driver file that’s meant for 64-bit Windows 10 version.
- Now in Device Manager window, right-click your graphics card and then click Uninstall device
- A confirmation dialog box will appear on your screen. Tick the box before Delete the driver software for this device. Now select Uninstall
- After driver is fully uninstalled, reboot Windows
- Now launch the driver installation file and follow the instructions that appear on your screen to complete the installation process
Updating your graphics card automatically
Automatic driver update tools offer many benefits, the most important ones being:
- You can update device drivers automatically
- The software scans and updates all outdated or missing drivers at one go
- The tool picks the right drivers for your device and operating system, so you won’t have to worry about installing an incorrect driver by mistake
- Automatic driver updates are 100% safe
Driver Updater is one of the best driver update tools out there. Outbyte Driver Updater will give you access to a database of over 1 million drivers. It will regularly scan your PC, suggesting new driver versions to install. Driver Updater contains drivers for a variety of Windows devices. With just one click, you can update drivers in your system.
Step 1
Click here to Install and launch the app
Step 2
Scan all devices
Step 3
Install or update drivers automatically
Solution 3 – Increase GPU Processing Time
Important: This step involves modifying Windows registry. You should proceed only if you are confident about tweaking the registry. You should always back up registry before making any sort of changes to it. This will help you restore Windows registry to its prior state in case any problem occurs due to the changes made by you.
- Press the Windows key + R key simultaneously
- In the run dialog box, type regedit and click the OK button
- Navigate to the following registry subkey

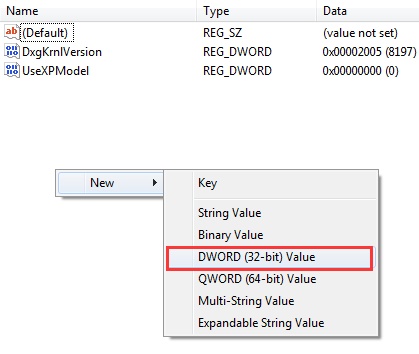
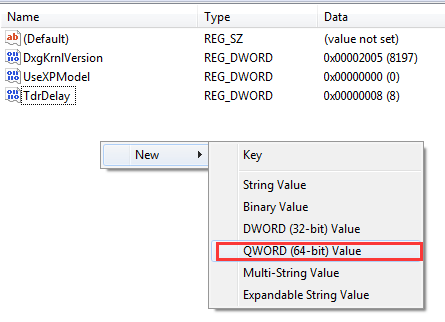
- In the right pane, you need to right-click anywhere in the blank space. Select New and then choose the below registry value according to the Windows version you are using
Those running Windows 32-bit need to follow these steps:
- Choose DWORD (32-bit) Value

- Use TdrDelay as the Name and then click Enter

- Double-click on TdrDelay and in the Value Data field add 8

- Click the OK button
Those running Windows 64-bit need to follow these steps:
- Choose QWORD (64-bit) Value

- Use TdrDelay as the Name and then click Enter
- Double-click on TdrDelay and in the Value Data field add 8
- Click the OK button
Now reboot Windows. Check if the problem is solved.
Solution 4 – Exit some programs that are running
PC performance can take a hit when a lot of programs are running at the same time. Therefore, we recommend you to close some programs and check if that does the trick.
If not, try the next — and the last — solution.
Solution 5 – Clean GPU radiator
Sometimes, the issue is caused by the overheating of the GPU. Cleaning the GPU radiator can help prevent overheating. So do that and see if that solves the problem.
So that’s it. We hope one of these solutions would work for you.

Leave a Reply