Are you getting the “Display driver stopped responding and has successfully recovered” error?

If yes, it doesn’t take much to fix this error, and in the post below we will show you how to go about it.
Typically, you will come across this error while playing games. When this problem arises, the screen turns black.
However, the good news is if you try the solutions listed below, it won’t be long before your computer starts functioning like before.
Set Power Supply on High Performance
If the video card is getting lower power, this problem can occur. For this reason, you should first make sure power supply is set on high performance.
Here are the steps to follow:
- In the Start Search box, type control panel and then select Control Panel in the results
- In the Control Panel window, set View by to Large icons (use the drop-down menu to choose this option)
- Under Select a power plan section, click Change plan settings next to High Performance
- Now click Change advanced power settings
- In the Power Options window, expand PCI Express and make sure the Setting is turned Off
- In case it is not, turn it Off and apply the changes

Fix Drivers for Your Graphics Card
If your Nvidia graphics card driver is faulty, you may receive this error. To solve the issue, uninstall the driver in question and update it.
Here are the steps to follow for uninstalling Nvidia graphics card driver:
- Press Windows key + R simultaneously
- In the Run box, type devmgmt.msc
- In the Device Manager window, expand “Display adapter”. Now right-click Nvidia graphics card and click Uninstall
- You will receive a pop-up asking you to confirm you want to remove the said driver. Just select OK to continue
- Restart Windows so that changes could take effect
Upon restart, Windows is going to install the driver for your graphics card automatically, which in turn might solve the issue. However, if this doesn’t happen, you should try to update the driver yourself.
You can update the driver manually in this case or use a reliable driver update tool. I’ve given steps for both; choose the one that sounds easier and more convenient to you.
Updating Nvidia Graphic Card Driver
- Press Windows key + R simultaneously
- In the Run box, type devmgmt.msc
- In the Device Manager window, expand “Display adapter”. Write down the name of your Nvidia graphics card driver
- Now go to the manufacturer’s website and download the latest driver for your graphic card. Make sure the selected driver is compatible with your Windows version. For instance, if you are using Windows 10, select a driver that’s compatible with Windows 10. Similarly, ensure that the driver file corresponds to your PC type. For instance, if you are using a 32-bit Windows 10, the driver file should be compatible with 32-bit version
- Save the downloaded file in a relevant location, like your desktop
- Double-click it to launch the driver file and follow on-screen instructions to install the driver
Update Nvidia Graphics Card Driver Automatically
Automatic driver update tools offer many benefits, the most important ones being:
- You can update device drivers automatically
- The software scans and updates all outdated or missing drivers at one go
- The tool picks the right drivers for your device and operating system, so you won’t have to worry about installing an incorrect driver by mistake
- Automatic driver updates are 100% safe
Driver Updater is one of the best driver update tools out there. Outbyte Driver Updater will give you access to a database of over 1 million drivers. It will regularly scan your PC, suggesting new driver versions to install. Driver Updater contains drivers for a variety of Windows devices. With just one click, you can update drivers in your system.
Step 1
Click here to Install and launch the app
Step 2
Scan all devices
Step 3
Install or update drivers automatically
Update Registry
If the first two solutions didn’t work for you, you can try updating the Windows registry.
Important – Before you make any changes to Windows Registry, it is recommended that you make a backup. This will help you restore the registry to its earlier state should any complications arise because of the recent changes made by you.
Here’s how you can backup Windows registry.
- Click the Windows key + R to launch the Run box
- Type regedit and press the Enter key to launch the Registry Editor
- In the Registry Editor window, click the File menu and then click Export
- Select a suitable location for backup, give the backup file a name and then finally click the Save button
Once you’ve done that, now you can go ahead and add the two registry keys. Here are the steps to follow.
- Click the Windows key + R to launch the Run box
- Type regedit and press the Enter key to launch the Registry Editor
- Locate and click this registry subkey:
HKEY_LOCAL_MACHINE\SYSTEM\CurrentControlSet\Control\GraphicsDrivers

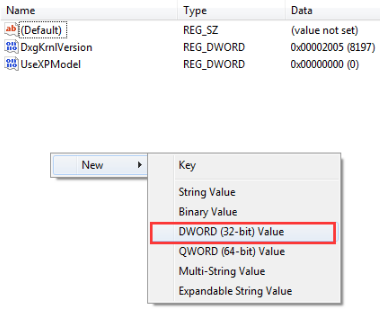
- In the right-pane, right-click in the empty space and click New
For32-bit Windows
- If you are running a 32-bit Windows, selectDWORD (32-bit) Value


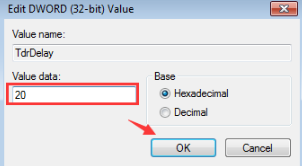
- Type TdrDelay as Name and then click Enter
- Now double-click TdrDelay and then in the Value data field type 20 and click the OK button

- Now repeat the steps listed above to add a new DWORD called TdrDdiDelay and assign it the Value Data of “20”
For 64-bit Windows
- If you’re running a 64-bit Windows, choose QWORD (64-bit) Value (by right-clicking
in the empty space in the right pane and clicking New)
- Now give the new value the name TdrDelay, and then double-click it and add “20” in the Value data field. Click the OK button
- Now repeat the steps listed above to add a new DWORD called TdrDdiDelay and assign it the Value Data of “20”
Restart Windows and check if the problem is fixed.
Reinsert the Graphics Card
If nothing has worked, as a last resort you can check if the graphics card is seated well in its PCI-E slot. So remove the graphics card and reinsert it in its slot. Before putting it back, clean the slot with a soft cloth.

Leave a Reply