The fall creator update was a package of new features in Windows 10. However, after the fall creator update, many windows users are complaining of computer freezing randomly. Unfortunately, this happens more frequently and unexpectedly and there’s not much you can do. Besides, there is no error displayed, nor can you find anything in error logs and that makes things difficult.
If you have been facing a similar problem and want to get rid of it, we have got you covered. Here we have shared easy to follow solutions that help you resolve the issue.
Now let’s proceed towards the solutions.
Solution One- Roll back to the previous version
If you have recently installed an update after which you started experiencing the problem of computer freezes randomly. The best option you have is to roll Windows 10 back to the previous version. Here are the steps to follow.
- Click Start and click Settings (gear icon)
- In the Settings window, click the Update and Security option

- In the next screen, click Recovery from the left column
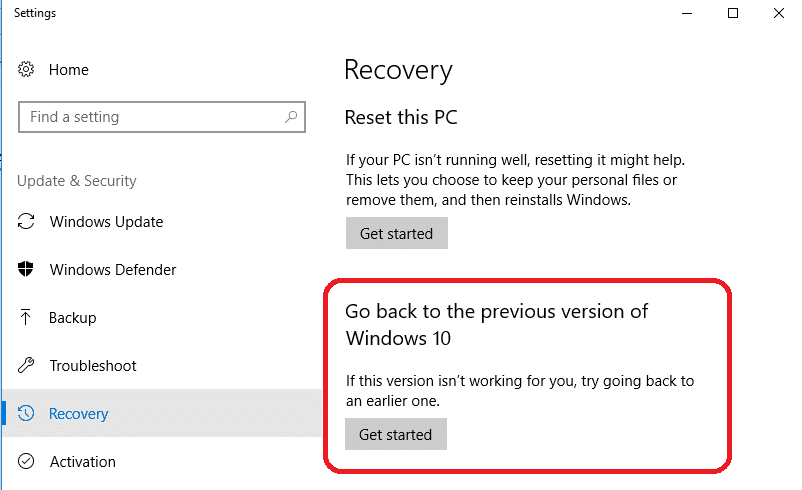
- On the right side, under ‘Go back to the previous version of Windows 10’, click ‘Get Started.’
- Follow on-screen prompts
You will not see this option if more than 10 days have passed since installing the last update. In that case, you cannot revert to an earlier version of Windows 10. You need to try other solutions given in this post.
If the solution did not work to resolve the issue, proceed to the next solution.
Solution Two- Run Memory Scan
Faulty RAM can cause issues like computer freezes randomly. Hence, the first thing you need to do is run a memory scan to ensure there is no problem with memory. Windows comes with an in-built memory diagnostic tool that checks memory for any problems. Here are the steps to run a memory scan on your computer.
- Close all programs
- Launch the Run command box by pressing Windows key + R simultaneously
- In the Run command, type mdsched.exe and hit Enter on the keyboard
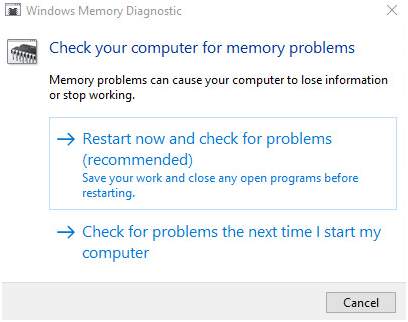
You will see a Windows Memory Diagnostic dialog pop-up with two-options
- Restart now and check for problems (recommended).
- Check for problems the next time I start my computer.
The first option restarts the computer and starts a Memory scan while the 2nd option will run a memory scan during the next reboot. If you have to finish some work, you can select option 2 else select option 1 to start the memory scan immediately
After selecting option 1, the computer will reboot and you will see the Memory Diagnostic tool running. The blue screen will show the progress of the memory scan and the errors it may find. Wait for the memory scan to complete. If the memory diagnostic scan does not list any error, you can conclude the RAM is working fine. In that scenario, proceed to the next solution.
Solution Three – Adjust Virtual Memory
The virtual memory refers to the page file used by the Windows operating system. Virtual memory is an important feature in windows where the operating system compensates for the shortage of physical memory by transferring some pages from RAM to the hard disk.
According to experts, windows need a page file (also referred to as virtual memory) to run programs. The size of the page file is set by default but you can change it for better performance. Here are the steps to adjust virtual memory.
- Press Windows key + E on the keyboard to launch the File explorer
- Right-click on This PC
- Select Properties from the drop-down menu
- In the System window, click Advanced System Settings’ that appears in the left column
- In the System Properties window, click on the Advanced tab
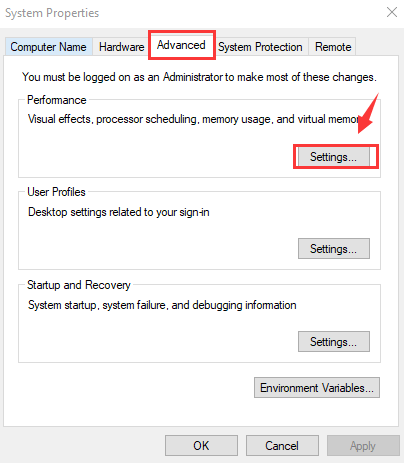
- Go to the Performance section and click on Settings
- In the Performance Options window, click on the Advanced tab
- Now under Virtual memory, click Change
- In the virtual memory dialog, uncheck the option- Automatically manage paging file size for all drives
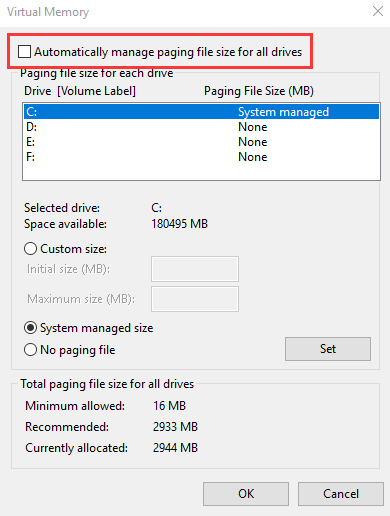
- Select your Windows installation drive(C 🙂
- Click Custom Size
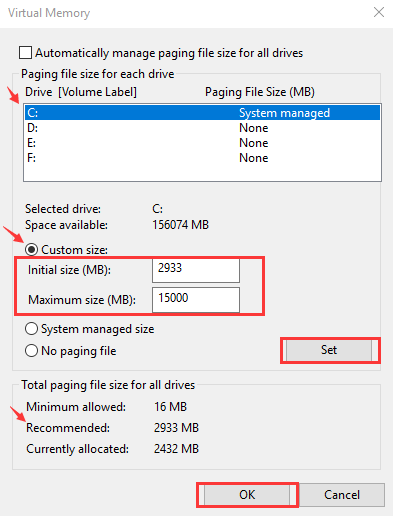
- Enter values for Initial and Maximum size (in MB). Follow the tip given below to decide the values for Initial and Maximum size.
- Initial Size –You can go with the Microsoft recommended values
- Maximum size- the value should not be set very high. As a basic rule, the maximum value should not be higher than 1.5 times of physical RAM installed on your computer. For example, if you have 4GB RAM (4096 MB), the maximum size should not exceed 6,144 MB that is derived by 4096 X 1.5
- After you have entered initial and maximum values, click Set-> OK
- Close all windows
If you find the computer freezes randomly even after adjusting virtual memory, proceed to the next solution.
Solution Four – Clear all temporary files
As you use your computer, the operating system generates hundreds of files during each session. These files collect over time and they can affect the performance of your computer. It is always a good habit to delete temporary files regularly. Here are the steps to clear all temporary files.
- In the Cortana search, type disk cleanup and hit Enter on the keyboard
- Click Disk Cleanup from the list of results
- Select C: for disk cleanup
- Click OK
- Under the Files to delete section, select the file types you to want get rid of. To get a description of the file type, select it.
- Click OK
You can also delete unwanted system files to optimize windows performance. Here are the steps to follow.
- In Disk Cleanup, click Clean up system files.
- Select the file types to get rid of. To get a description of the file type, select it.
- Click OK.
If clearing temporary files did not help, move to the next solution.
Solution Five – Run a disk check
There is a possibility the disk has developed some bad sectors which have led to the corruption of system files. In that case, you need to run a disk check and fix the bad sectors and recover the information. Windows comes with an in-built CHKDSK tool that can automatically check and fix disk errors. Here are the steps to run the CHKDSK tool.
- Click Start
- Type explorer in Cortana search and hit Enter on the keyboard
- Click windows explorer from the list
- In windows explorer, right-click the Windows installation drive (C 🙂
- Click Properties
- Go to the Tools tab
- Select Check, at the Error-checking section
The CHKDSK tool will now scan the disk for errors. It will automatically fix the errors. If the CHKDSK scan does not find any errors, you might see a message like the one below. In that case, you need to move to the next solution.
Solution Six – Run SFC scan
SFC is short for System File Checker. It is an in-built maintenance tool that fixes the corruption of system files. According to experts, the computer randomly freezes could be due to some corrupted file. The SFC scan checks the integrity of the system files and replaces the corrupt files with good cached versions. Here are the steps to run an SFC scan.
- Click Start and type cmd in Cortana search
- From the results, right-click Command Prompt and select Run as administrator
- Click Yes in the User Account Control Menu prompt
- When you see a blinking cursor appears in the command window, type SFC /scannow

- Press the Enter key
Allow the SFC tool to run and wait for the process to complete. The tool finds and performs file fixes automatically and there is no user intervention needed. After the SFC scan is completed, restart your computer. Check whether the computer freezes randomly. If the problem persists, move to the next solution.
Solution Seven – Disable C-State in BIOS
C-states are CPU states when the CPU has reduced or turned off certain functions. According to experts, an active C-State can cause problems like computer freezes randomly. Hence, you need to disable C-State in BIOS. Here are the steps to follow.
- Press the BIOS access key on your computer. It could be F2, Delete, F11, or any other key
- After entering BIOS, go to the Advanced tab. Use the arrows keys to navigate through BIOS options
- In the Advanced menu, select CPU configuration
- Look for C1E Function and Intel(R) C-STATE tech options. They both should be disabled. If they are enabled, you need to disable them.
- Use the up and down arrow keys to reach these options. Once the required option is highlighted, press Enter on the keyboard
- Use the up and down arrow keys to select the Disable option in the menu. When the disable option is highlighted, press Enter on the keyboard.
- Follow the above steps to disable C1E Function and Intel(R) C-STATE
- Save BIOS settings and exit

Leave a Reply