Windows 10, while an efficient operating system, can surprise you with random errors. One such problem is that of a black screen with a cursor.
There is no error code shown on the screen, nor is there any indicator that tells for how long the black screen will stay.

The computer black screen with a cursor in Windows 10 is not a normal thing, and there could be several reasons why this error has cropped up. Common reasons include:
- A feature update installation that may causing compatibility issues
- Some problem with a Windows update
- Loose display connection
- A hardware related issue
Kindly note this is not an all-inclusive list. You may also get this error because of other reasons.
Whatever the reason might be, the good news is you can resolve the computer black screen with cursor Windows 10 problem fairly quickly. To make things easy for you, we have shared a few solutions that can help resolve the issue.
Solution One – Check connection (for Desktops)
The first thing you need to do is ensure the connection at both ends is firm and the video input connector is well seated in the slot. The connection check solution is directed towards desktop users. If you have multiple video ports, try using a different video port. If the black screen problem does not appear with the new video port, the old port is to blame for the issue.
If the black screen issue is persistent at all video ports, you can conclude the video ports are working fine and you need to look elsewhere to find the root cause of the issue. Try the next solution in line.
Solution Two- Remove the battery (for laptops)
As mentioned above the solution is the only application for the computer that runs on batteries. Here are the steps to follow.
- Shut down your Windows 10 OS
- After the laptop is completely switched off, remove the battery
- With the battery removed, press and hold the power button on the laptop for half a minute or more
- Put back the battery in your laptop and boot Windows
Check whether the black screen issue is resolved. If it persists, move to the next solution.
Note – All solutions discussed below require access to Windows settings. Since you are facing the black screen with a cursor problem in Normal mode, you cannot execute the steps until you reach the desktop screen. In that scenario, the only way out is booting Windows in Safe Mode and then following the steps given below.
How to start Windows 10 in Safe Mode from a black/blank screen?
Before you boot Windows 10 into Safe Mode, the computer needs to enter the Windows Recovery Environment. To do this, switch off the computer repeatedly (2-3 times). Here are the steps to follow.
- Press the Power button and hold it down for 10 seconds to power off the computer
- Press the Power button to switch the computer on
- When you see the Windows logo on the screen or the manufacturer’s logo, press and hold down the Power button for 10 seconds to power off the computer again
- Press the Power button to turn on your computer
- Restart your computer and press and hold down the Power button again for 10 seconds to turn off the computer
- Press the Power button again to start the computer
- This time allow the computer to restart completely. It will enter the Windows Recovery environment
Now that the computer is in the Recovery environment, you can start the computer in Safe Mode. Here are the steps to follow.
- On the Choose an option screen, click Troubleshoot -> Advanced options -> Startup Settings -> Restart.

After the computer restarts, you will see different options to start your computer
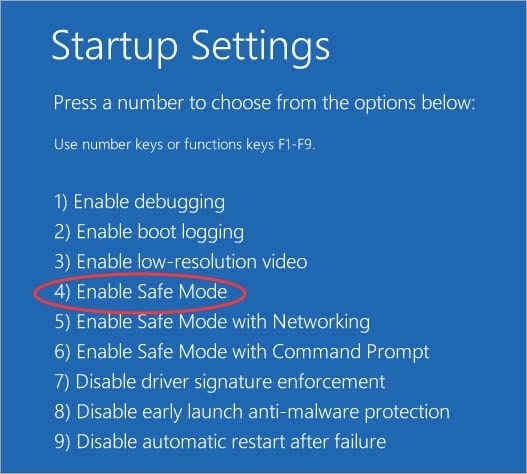
- You need to select option 5 – Safe Mode with networking. You can press F5 to start the computer in Safe Mode.
After your computer boots into Safe Mode, you need to perform the troubleshooting steps given in the solutions given below. After trying every solution, you need to exit Safe Mode and see if the computer black screen with the cursor Windows 10 issue is resolved.
How to exit Windows Safe Mode?
- Press Windows logo key and R button on the keyboard simultaneously
- Type msconfig in the Run box and hit Enter on the keyboard
- In the System Configuration window, go to the Boot tab
- Under the boot options, uncheck the box – Safe boot
- Close all windows
- Shut down the PC
Solution Three- Disable Fast Startup
The Windows 10 Fast Startup mode is a nice feature. It combines the hibernate and cold shutdown features. When the fast startup mode is enabled Windows shits down all programs and logs off all users before shutdown just like a cold shutdown. However, the Windows kernel and system session is running and its image is stored like in the hibernate mode.
When you boot your system, the Windows kernel and system session is not freshly loaded but loaded from the memory. This might cause errors like a black screen with a cursor. Many users have reported disabling fast startup has resolved the black screen issue in Windows 10. Here are the steps to follow.
- Press the key combination Windows + R to bring up the Run dialog
- Type powercfg.cpl and hit Enter on the keyboard
- In the Power Options window, click the “Choose what the power buttons do” option that appears on the left
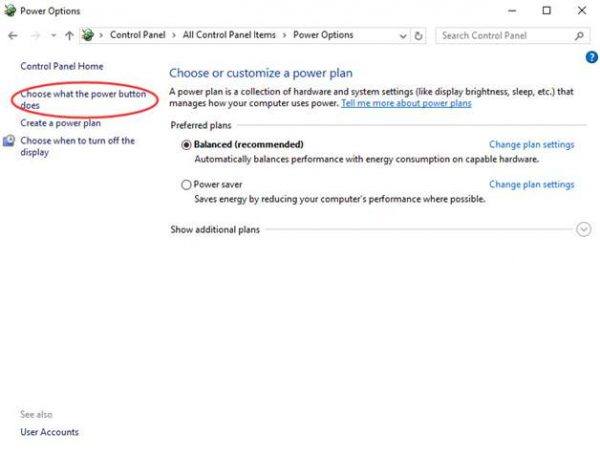
- In the next screen, scroll down to Shutdown settings
- Uncheck the option – Turn on fast startup
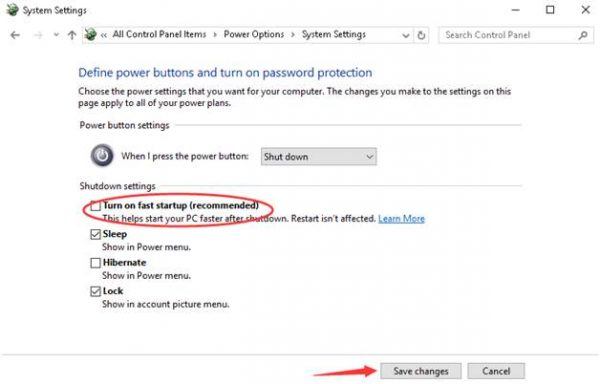
- Click Save changes
- Close all windows
- Restart your PC
Check if the black screen with a cursor problem appears. If the issue is not resolved, move to the next solution.
Solution 4 – Disable integrated graphics card
Many laptops come with a dedicated graphics card. In some scenarios, the motherboard in the laptop also has an integrated graphics card. According to computer experts, only one graphics card needs to be active in Windows. There is a possibility the Windows 10 OS is considering the integrated graphics card as a second monitor which is causing the black screen computer.
In that scenario, disabling an integrated graphics card is a safe option. Here are the steps to follow.
- Click on Start and then click on Run
- Type devmgmt.msc and hit Enter on the keyboard
- In the Device Manager window, expand Display Adapters
- Check whether you can see two display adapters
In most cases, the graphics card with Intel’s name is the integrated graphics card, for example the Intel HD 400 graphics card. Check the computer specifications to know about integrated graphics card
- Right-click on the integrated graphics card and click on Disable
- Close Device Manager window
Reboot your computer in normal mode to see if the black screen issue has been fixed. If the problem persists, move to the next solution.
Solution 5 – Login into Windows with a different user account
The black screen issue could be the result of a corrupted user profile. To ensure that is not the case in your computer problem, you need to log into Windows with a different user account. If the black screen problem does not surface when you log in as a different user, you can copy the current user profile (the good one) to your existing profile (the bad one) and get the older user account working again.
- Start your computer in Safe Mode
- At the login screen, you will see an option Switch user
- Click Switch User
- It will show you all existing user account in Windows 10 including the regular user account you used that might be corrupt
- Click on the user account which you want to use
- Enter PIN or password to log in to Windows
After you have logged into a working user account, perform the steps given below
Go to following folder – C:\Users\{working-user-profile-name}\AppData\Local\Microsoft\Windows\Caches.
Copy the folder Caches
Log in with the corrupted user account
Go to following folder – C:\Users\{working-user-profile-name}\AppData\Local\Microsoft\Windows\Caches.
Replace the folder with a folder from the working user profile
If you don’t have another user account, you need to create one with administrator rights. Here are the steps to follow.
Steps to create a new user account with admin rights
Before you proceed with the steps given below, you need to ensure the account you would be signing in is an administrator account. If it is not an administrator account, you need to activate the default administrator account by following the steps given below
- Click Start and type cmd in Cortana search
- Right-click command prompt from search results and click Run as administrator
- If prompted type the username and password that grants admin rights to the computer
- Type: net user administrator /active:yes.
- Hit Enter on the keyboard
After activating the default admin account, log in to your admin account and perform the steps given below.
- Click Start and type settings in Cortana search
- Click Settings that appears at the top of search results
- In Windows Settings, click Accounts
- In the next window, click Family and Other People that appears in the left pane
- Under Other People, click the + icon with the title Add someone else to this PC
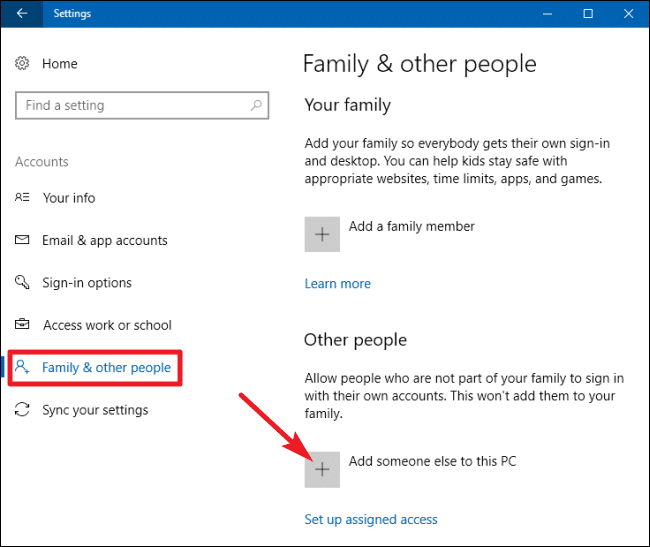
- Follow the on-screen instructions to create a user account.
If changing user accounts have not helped, move to the next solution.
Solution 6 – Set the display output to IGFX in BIOS
IGFX sets the onboard graphics as the first display. Many users have reported setting the display output to IGFX in BIOS helped them resolve the black screen with a cursor issue in Windows 10.
You need to access BIOS to set the display output to IGFX. The BIOS access key is not standard and it could be F2, Del, or F4. Check your laptop documentation or motherboard documentation to know the right BIOS access key
- Start the computer and press the right BIOS access key repeatedly until the computer enters BIOS
- Once you get access to BIOS settings, look for the display output setting and set it to IGFX
- Save Changes to BIOS and exit BIOS.
- Restart your computer
Check whether the black screen issue has been resolved. If it persists, the last resort is Reset the PC.
Solution 7 – Reset this PC
Reset Windows will reinstall windows that are more likely to resolve the black screen with a cursor issue in Windows. Resetting the PC will delete all settings, apps, and files. Hence, we recommend you to take a backup of important data in Safe Mode before following the steps given below.
- Click Start -> Settings
- In the Settings window, click Update and Security
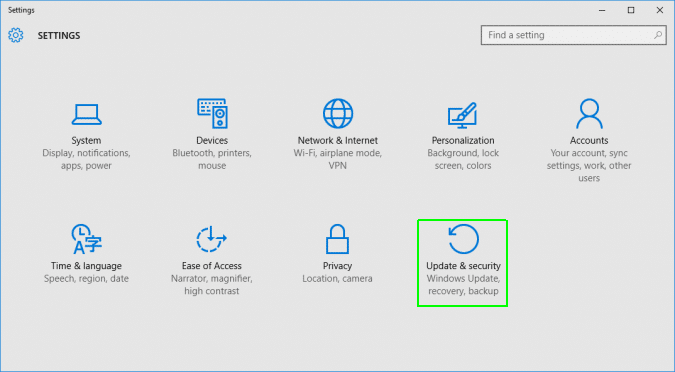
- In the Update and Security, click Recovery in the left pane
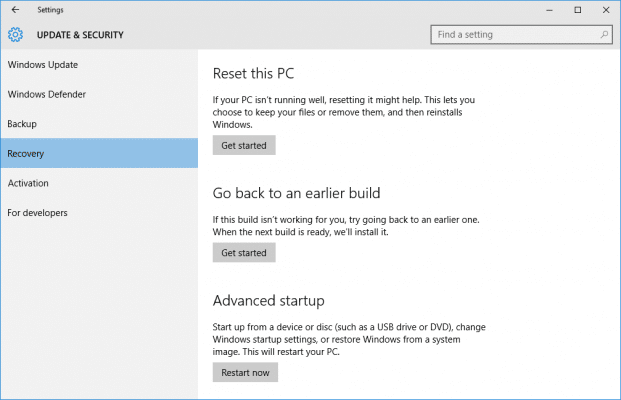
- When the Recovery options are revealed in the window, go to Reset this PC section
- Click Get Started
- In the next window, you will get two options – Keep my files and Remove Everything
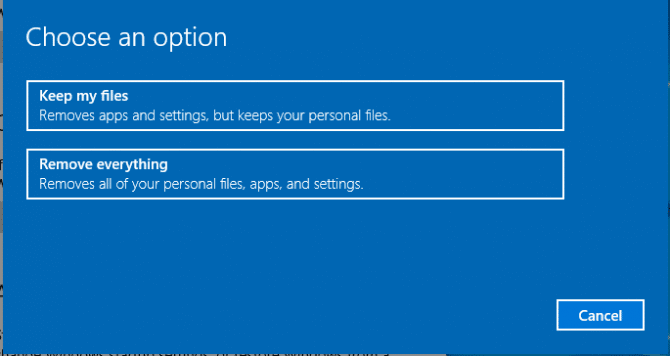
- Select any option you want
- Click Next
- Click Reset
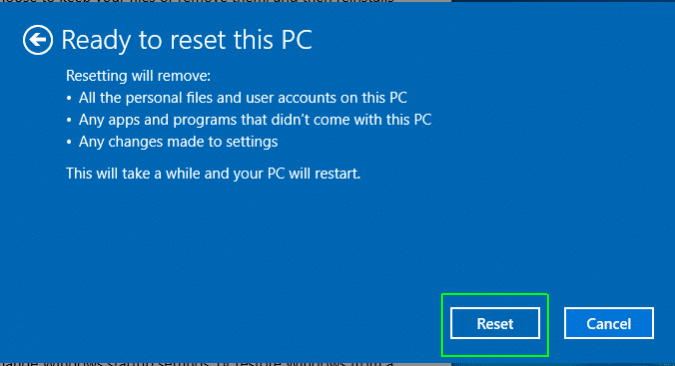
- Click Continue when prompted
Wait for the process to get over. Start your PC and see whether the problem is resolved.

Leave a Reply