Imagine you need to print something important but your Canon Pixma MX492 just won’t print?
That can be very frustrating but this is a common issue and something that you can fix yourself.
If your Canon Pixma MX492 Printer is not printing and you are looking for DIY solutions, this post is just for you. Follow along as we explore how to fix this problem.
Why is the Canon Pixma MX492 not Printing?
There are many reasons why the Canon printer is not working as it should. In this post, we will limit ourselves to two most common causes:
- Your printer isn’t being detected
- Your printer is being detected but it is not responding
After you have successfully located the reason behind the problem, then fixing the issue can be easily done. Having said that, in order to locate the problem plaguing your printer, you sometimes have to try all available fixes one by one. We recommend you try the solution that you think will most likely work and then take it up from there. With our help you should be able to resolve the issue in no time at all.
Detect the Canon MX492 Printer
In case the devices you are using are unable to detect your Canon printer, you can try a few things to fix the issue. Ensure all devices, including the Canon printer, is turned on before you try any DIY fix.
Ensure the Canon printer and devices are on the same wireless network
To do so, first open the Settings menu from your Start menu. Then click the Windows icon. Next, click the gear (Settings) icon to access Windows Settings

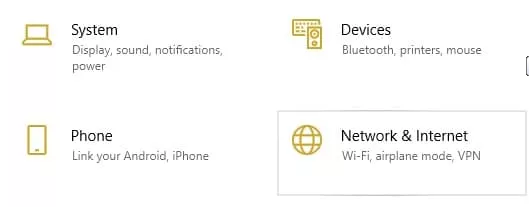
Now, click Network and Internet. Regardless of the system or devices that you have, you will be able to locate the network settings.
You will see a Status tab, which will give you relevant information regarding the network you are using.
The Network Status tells you the network to which your device is attached to. With the help of this information you can ensure that the printer is on the same network. If that is not the case, you can make adjustments.
In case the printer still doesn’t work, it would be worth the trouble to give printer sharing a try.
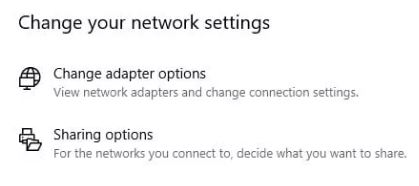
Scroll to Change Your Network Settings and click Sharing Options.
In Advanced Sharing Settings, scroll to Guest section and locate the File and Printer Sharing subheading below it
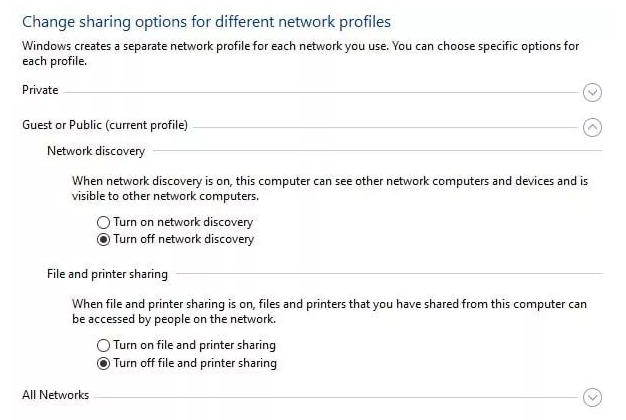

Click Turn On File and Printer Sharing. Save the changes. If the printer is still not detected, continue further.
- Ensure the router and device are connected
It is possible that the wireless router has lost connection with your printer. First, check if both are properly connected to an electrical source. Next, turn them on.
- Ensure the Printer is assigned the correct port
Another reason could be that your printer is not assigned the correct port. Open Settings to resolve the issue.
Click Devices once you are inside Windows Settings. And then click Printers & Scanners.
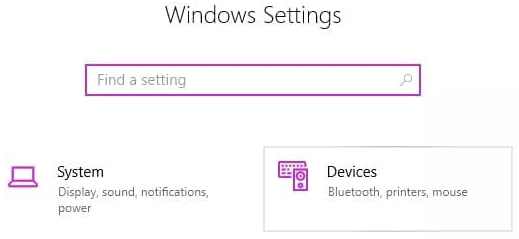
Now you will see all the printers and scanners attached to your computer. Select the Canon Pixma MX492 printer and click it.
Windows 10 users will see three options on the screen. Click Manage.

Another screen will open up. It will have advanced options. Below Manage Your Device, click Printer Properties. Now click Ports. Now browse through the list that appears on your screen to locate the right port. If you are using a wireless printer, the right port probably will be named as LAN followed by a number like 1, 2, 3 and so on. Check the box before the correct port and click the Apply button.
Hopefully, these simple steps are all that you would need to fix the issue. In case your printer was connected already, perform the steps listed in the following section to locate the underlying reason and to fix the problem.
Ensure Your Router and Computer are Connected
Before, we were trying to find out whether the router and printer were connected. But in case the printer is showing no response to a device, there is a good chance the device (not the printer) is not properly connected to your router and network.
Simply turn the router and your computer off and on again to fix the issue. In case your router is unplugged from its electrical source, plug it back before turning it on.
Ensure the signal strength is good
A low signal strength is another reason for a printer not printing. Thankfully, this problem has an easy fix: just move your printer near the router to give its strength a boost.
Of course, the first step is to check the signal strength. Here is what you need to do:
Go to Menu > Setup and then select Device Settings. Click OK. Now press OK an LAN Settings, as well as Confirm LAN Settings, and Print LAN Details. Your Printer will now print a page listing the printer’s configuration in detail. Your printer’s signal strength is going to shown as percentage. In case this figure is low, simply move your printer closer to the router to fix the issue.
Configure Your Computer’s Firewall
Your computer’s firewall is there to protect it from threats coming from outside, but sometimes it may prevent devices or legitimate programs from running smoothly. It is possible that in your case the firewall might be keeping the printer out. To fix the problem, you will have to change the settings so that the printer’s signal is able to bypass your computer’s firewall.
Open Windows Settings and browse to Update & Security. Click Windows Security in the pane on your left-hand side. Click the Open Windows Security button in the right-hand pane. A new window will open on your screen. Click the Firewall & Network Protection tab. If you have a Windows 10 computer, you will see an icon which shows signal being transmitted out by an antenna.
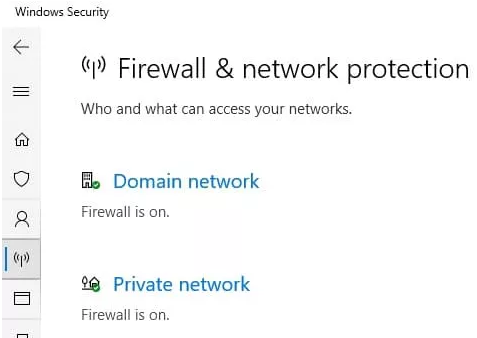
Browse through the list and click the Allow an App Through Firewall option. Another screen will appear on your screen. Click the Change Settings button. Now, check if your device is included in the list. If not, click Allow Another App.
Locate the printer you are using in the Add an App window. Once you have located it, simply add it the list of devices and apps allowed through the firewall.
Do Not Forget to Update Canon Printer Drivers
All kinds of issues can occur because of outdated printer drivers. For this reason, it is absolutely necessary that you always update your device drivers. Updating device drivers manually, however, is not always easy. A simple (and not to mention a faster) alternative is to use a driver update tool. We recommend Driver Updater to users as it is fast, easy and 100% reliable.
Automatic driver update tools offer many benefits, the most important ones being:
- You can update device drivers automatically
- The software scans and updates all outdated or missing drivers at one go
- The tool picks the right drivers for your device and operating system, so you won’t have to worry about installing an incorrect driver by mistake
- Automatic driver updates are 100% safe
Driver Updater is one of the best driver update tools out there. Outbyte Driver Updater will give you access to a database of over 1 million drivers. It will regularly scan your PC, suggesting new driver versions to install. Driver Updater contains drivers for a variety of Windows devices. With just one click, you can update drivers in your system.
Step 1
Click here to Install and launch the app
Step 2
Scan all devices
Step 3
Install or update drivers automatically

Leave a Reply