Two’s company, three’s a crowd, so they say. But when it comes to improving productivity at work and boosting your multitasking skills, three monitors is not one too many. Multiple monitors can boost your efficiency can make your workload seem less heavy than if you work with a single monitor. And if you are an avid gamer, a 3-monitor set up can rocket your gaming experience to a whole new level.
Now, you may be wondering, “That’s all well and good, but setting up a 3-monitor display is not exactly a walk in the park.”
Well, a walk in the park it may not be, but neither it is as difficult as a Greek puzzle. In this post, we’ll walk you through each and every step of setting a 3-monitor setup. These instructions are the only thing you need to complete the setup on your own. So, what do you say, shall we get started?
Step 1 – Prepare for a 3-monitor setup
The first step is to check whether your PC can support multiple monitors, and if it can, then you must gather necessary equipment and cables.
- Check PC requirements
Your graphic card must be able to support three monitors. Check the specification of your PC for compatibility.
- Get the required equipment and cables
The next step is to gather the necessary things. Apart from three monitors—we recommend you use identical monitors to ensure a uniform display—you’ll need video cables (DisplayPort, DVI, or HDMI cables for connecting the monitors to the system), monitor stands, surge protectors and power strips.
Step 2 – Pick the best location
Once you’ve all the equipment you need, it’s time to pick the best location for a 3-monitor setup.
Make sure the distance between you and the monitors is optimal, and the same goes for the angel at which you’ll view the screens.
Another important thing to consider is the lighting. Position the monitors in such a way as to minimize the impact of artificial and natural light sources.
Step 3 – Set up the Monitors
Now let’s get the monitors connected physically and configure them.
Plug in your monitors
- Connect video cables the available video outputs of your PC
- Connect the power cables to all three monitors and plug them into a power source
Configure Settings
- Power your monitors on
- Open the monitor menu
- Adjust settings like contrast, brightness, and color as needed
- Align the monitors in your desired configuration and adjust their height and angle for maximum comfort
Configure the 3-monitor setup
Follow these steps to configure your computer to start using all 3 monitors.
- Right click anywhere on your desktop
- Choose Display settings
- Your computer should be able to detect all three connected monitors
- Decide if you would like extend the desktop across these three monitors or duplicate the display
- Choose the right resolution for all monitors and select between portrait or landscape orientation as required
- Determine which of the three monitors will be the primary display (the system notifications and taskbar will appear here); the remaining two monitors will be your secondary display
Calibrate the 3-monitor setup
This is an important step since calibrating the monitors ensures accurate and consistent colors across the three screens. Some monitors have an in-built calibration tool, which you can use to make basic adjustments. If your monitors don’t have this tool, you may want to consider using a 3rd party software tool. You may also need a 3rd party software tool for advanced calibration.
Basic 3-monitor setup troubleshooting
One you’ve put the 3-monitor setup in place, hopefully it will work seamlessly. But if you encounter some issues down the line, these tips could prove handy.
- No Signal: First, check the cable connections. Next, check whether your monitors are turned on or not.
- Color Issues: Recalibrate the monitors to ensure there are no color profile conflicts.
- Incorrect Resolution: Open the display settings and adjust your resolution settings.
If the problem persists, consider updating your graphic card driver. Outdated or missing graphic card driver can lead to display (and other) issues.
Updating Graphics Card Driver
You can update the graphic card driver manually or automatically. The latter is simpler, easier, and faster than the manual method, but we are sharing the steps for both, so you can pick the one that you like better.
Updating Graphics Card Manually
Follow these steps:
- Press Win + R
- Type devmgmt.msc in the Run dialogue box and press Enter
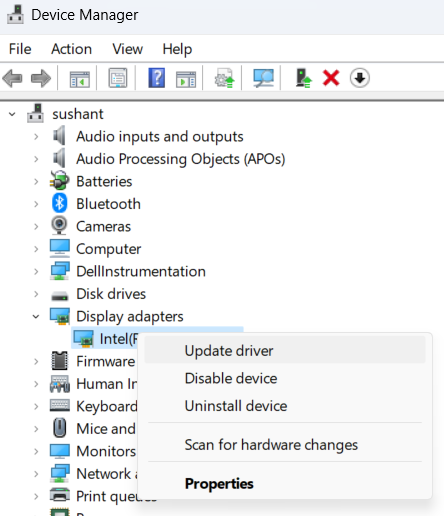
- In the Device Manager window, expand Display adapters
- Right-click your graphic card, and click Update Driver
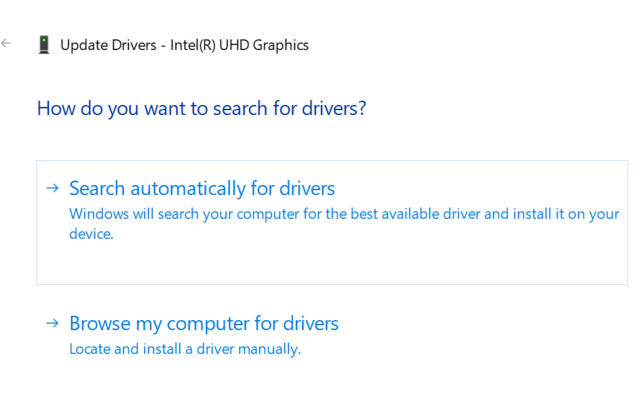
- You’ll see two options in the next screen; Select the first option (Search automatically for drivers)
- Windows will automagically search the computer for the latest driver and install it
- You may have to restart Windows after the new driver is installed
In case Windows is unable to locate the latest driver, go to the graphic card manufacturer’s website and search for the latest driver for your graphic card model. Next, download the driver file and launch the installer.
Updating Graphics Card Automatically
If you don’t want to jump through hoops to get the latest graphics card driver, consider using a reliable driver update tool, like Driver Updater. It can update your graphics card driver (and other device drivers) with just a few mouse clicks.
Automatic driver update tools offer many benefits, the most important ones being:
- You can update device drivers automatically
- The software scans and updates all outdated or missing drivers at one go
- The tool picks the right drivers for your device and operating system, so you won’t have to worry about installing an incorrect driver by mistake
- Automatic driver updates are 100% safe
Driver Updater is one of the best driver update tools out there. Outbyte Driver Updater will give you access to a database of over 1 million drivers. It will regularly scan your PC, suggesting new driver versions to install. Driver Updater contains drivers for a variety of Windows devices. With just one click, you can update drivers in your system.
Step 1
Click here to Install and launch the app
Step 2
Scan all devices
Step 3
Install or update drivers automatically


Leave a Reply